In Command Prompt, type bcdedit /set {default} recoveryenabled No and press Enter. Restart your PC, the Automatic Startup Repair should be disabled and you might be able to access Windows 10 again. If you need to again enable it, you can type bcdedit /set {default} recoveryenabled Yes in CMD and press Enter. How do I get out of automatic repair?
How do I fix Windows 10 Startup Repair not working?
Windows 10: Run Startup Repair in Windows 10. Click/tap on Advanced options, and go to step 2 above. Sometimes it may take running Startup Repair up to 3 times and restarting the PC each time to fix the startup issue. Click/tap on Advanced options, go to step 2 above, but click/tap on instead. Click/tap on Shut down.
How to fix Windows 10 boot to Advanced Startup options?
1 Boot to Advanced Startup Options. You will not be prompted for an administrator's password if you booted from a Windows installation USB or recovery drive. Click/tap on Advanced options, and go to step 2 above. Sometimes it may take running Startup Repair up to 3 times and restarting the PC each time to fix the startup issue.
How do I use Startup Repair in the advanced startup environment?
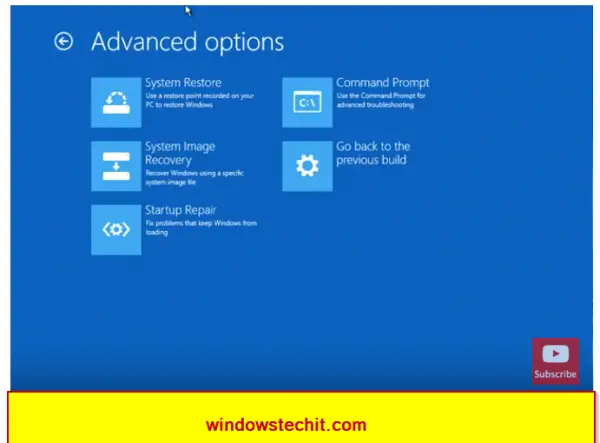
While in the Advanced startup environment, use the following steps to use Startup Repair: Click the Troubleshoot button. Click the Advanced options button. Click the Startup Repair button. Select your account.
How to Fix my Windows 10 boot error?
[Solution] How to Fix My Windows 10 Boot Error 1 Open Settings . 2 Click on Update & Security . 3 Click on Recovery . 4 Under the "Advanced startup" section, click the Restart now button. See More....
How do I stop the startup repair loop in Windows 10?
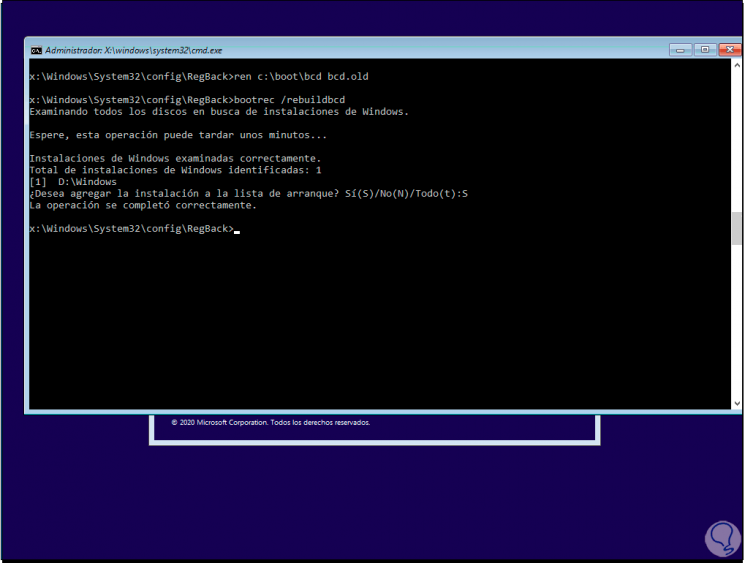
Click on “Advanced Options” Click on “Command Prompt” In the command prompt window, type “bcdedit /set {current} recoveryenabled No” and hit “Enter” (this command deletes problematic system files) Type “exit” and press Enter.
How do you exit preparing automatic repair loop?
Here are the steps:Upon the 'Preparing automatic repair' window, press-and-hold Power button three times. Force to shut down the machine.The system will enter the boot repair page after 2-3 times reboot.Choose "Troubleshoot", then go on to "Refresh PC or Reset PC."
Why am I stuck on preparing automatic repair?
One of the common reasons why you may get into the “Preparing automatic repair” loop is if your boot files are missing or damaged. As a result, some users will rebuild key parts of the system using the procedure below. Note: In the steps below, we assume that you're unable to boot into your system even in Safe Mode.
What do I do if my computer shows automatic repair?
1:4610:15Preparing Automatic Repair Error in Windows 10 FIXED [Tutorial]YouTubeStart of suggested clipEnd of suggested clipNow there were underneath the troubleshooting window select Advanced Options. Now there's a fewMoreNow there were underneath the troubleshooting window select Advanced Options. Now there's a few different methods we're going to go through in this tutorial. The first one will be the select System
How to use startup repair?
While in the Advanced startup environment, use the following steps to use Startup Repair: Click the Troubleshoot button. Click the Advanced options button. Click the Startup Repair button. Select your account. Type your account password. Click the Continue button. Quick Tip: If your computer is loading correctly, using this tool, ...
How to fix a computer that won't start?
While in the Advanced startup environment, use the following steps to use Startup Repair: 1 Click the Troubleshoot button. 2 Click the Advanced options button. 3 Click the Startup Repair button. 4 Select your account. 5 Type your account password. 6 Click the Continue button.#N#Quick Tip: If your computer is loading correctly, using this tool, you'll get the "Start Repair couldn't repair your PC" message because there's nothing that needs fixing.
Why is my computer saying "Start Repair couldn't repair my PC"?
Quick Tip: If your computer is loading correctly, using this tool, you'll get the "Start Repair couldn't repair your PC" message because there's nothing that needs fixing. Once you've completed the steps, the Start Repair feature will proceed to scan, detect, and fix any problems that may prevent your device from loading correctly.
How to fix a loading problem?
If you have access to the desktop, you can use these steps to access the recovery environment to use the Startup Repair tool: Open Settings. Click on Update & Security. Click on Recovery. Under the "Advanced startup" section , click the Restart now button. After completing the steps, you can now continue with the steps below to fix loading problems ...
What is startup repair?
Startup Repair is a Windows recovery tool that can fix certain system problems that might prevent Windows from starting. Startup Repair scans your PC for the problem and then tries to fix it so your PC can start correctly.
Can startup repair fix a virus?
Startup Repair can only fix certain problems, such as missing or damaged system files. It can't fix hardware failures, such as a failing hard disk or incompatible memory, nor does it protect against virus attacks.