How to disable automatic repair on Windows 10
To disable automatic repair during the third unsuccessful boot of Windows 10, use these steps:
- Open Start.
- Search for Command Prompt, right-click the top result, and select Run as administrator.
- Type the following command and press Enter: bcdedit.
- Make note of the reoveryenabled and identifier values under the "Windows Boot Loader" section.
- Type the following command to disable automatic repair and press Enter: bcdedit /set {current} recoveryenabled...
- Open the Command Prompt as administrator and run the bcdedit command: ...
- To disable automatic repair at Windows 10 startup, execute this command: bcdedit /set {current} recoveryenabled no.
What to do if automatic repair is not working?
Resolution
- After Automatic Repair fails to repair your PC, select Advanced options and then Troubleshoot.
- Select Advanced options and then select Command Prompt.
- If prompted, enter in the password for the user name.
- At the Command Prompt, go to the \windows\system32\config folder by typing the following command: Console cd %windir%\system32\config
How to disable Windows 10 automatic repair at startup?
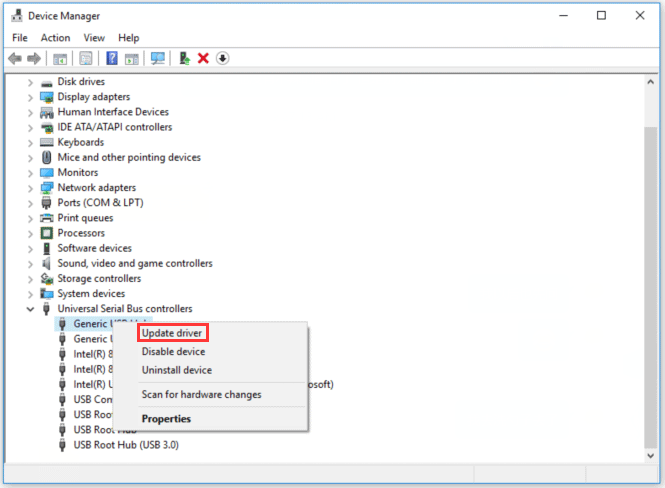
Enable or Disable Automatic Repair in Command Prompt in Windows 10. 1 Open an elevated command prompt. 2 Type bcdedit into the elevated command prompt, and press Enter. (see screenshot below) 3 Look under the Windows Boot Loader section for your Windows 10 (description), and make note of its identifier (ex: " {current}").
How to stop auto resizing of windows in Windows 10?
Step 2: Under the Snap section, you will get the following options:
- Arrange windows automatically by dragging them to sides or corners of the screen.
- When I snap a window, automatically size it to fill available space.
- When I snap a window, show what I can snap next to it.
- When I resize a snapped window, simultaneously resize any adjacent snapped window.
How to disable automatic repair on Windows 10 [Guide]?
So, here is how to go about it:
- Open the Control Panel, choose System, and then select Advanced System Settings.
- Look for the Advanced tab and head into the Startup and Recovery section. ...
- In the dialog box that will appear, head on down to the System failure section and proceed to uncheck the Automatic Restart checkbox.
- Click OK to apply and save the changes.
How do I get rid of preparing automatic repair?
You can do this from Command Prompt with the following steps:Restart PC and click "Advanced options" on the Automatic Repair blue screen.Click "Troubleshoot" > "Advanced Options" > "Startup Settings". ... Choose "Disable early launch anti-malware protection".
How do I get out of automatic repair in Windows 10?
Click on “Advanced Options” Click on “Command Prompt” In the command prompt window, type “bcdedit /set {current} recoveryenabled No” and hit “Enter” (this command deletes problematic system files) Type “exit” and press Enter.
How do I stop Windows from automatically repairing?
In Command Prompt, type bcdedit /set {default} recoveryenabled No and press Enter.Restart your PC, the Automatic Startup Repair should be disabled and you might be able to access Windows 10 again.If you need to again enable it, you can type bcdedit /set {default} recoveryenabled Yes in CMD and press Enter.
How do I bypass a repairing disk error?
What to Do on Stuck “Repairing disk errors” Issue in Windows 10?Let It Finish Overnight. First of all, “Repairing disk errors” is triggered by automatic CHKDSK on booting. ... Restart from Safe Mode. It is known that safe mode can solve myriad problems in computer. ... Automatic Repair. ... System Restore. ... Replace Drive.
Why does my laptop says automatic repair?
The “preparing automatic repair windows 10 stuck” screen usually appears on your computer after an error causes the system to unexpectedly shut down. For example, if your system ran into an error that caused it to crash, at the next boot Windows 10 will attempt to automatically repair the damaged files.
What is Windows 10 repair?
Windows 10 includes a host of different troubleshooting and repair tools designed to make the process of fixing everyday Windows problems much more accessible than in older versions of the operating system. One of those tools is Startup Repair, which can fix issues with your Windows startup. If there's a problem with a driver, service, or file that might be causing an issue when booting your PC, Startup Repair should fix it for you.
How to fix Windows 10 startup?
Windows from scratch may be the best way to fix a Windows 10 startup repair problem. It's a good idea to backup any files and folders you can before doing so, as doing a fresh install deletes everything on your boot drive. Replace your hard drive. You could have a damaged or degraded hard drive.
What Causes The Windows 10 Automatic Repair Loop?
The repair loop itself is caused by Startup Repair failing to fix the Windows startup problem. A failed Windows update degraded hardware like memory or a hard drive or missing or damaged system files corrupted by malware. You may also encounter this problem due to a driver issue for a specific piece of hardware or a registry error.
How to fix Windows 10 startup repair loop?
Reset your PC. A more dramatic way to fix the Windows 10 startup repair loop is to reset your Windows 10 installation. Doing this will effectively reinstall Windows, but keep all your files, folders, and settings —you will need to reinstall your applications, however.
How to get out of automatic repair loop?
Run the Fixboot and Chkdsk commands. Two commands worth trying to get you out of the automatic repair loop are Fixboot and Chkdsk. They can target and repair any errors in your hard drive and your Windows boot directory. Although you can run them in Windows using the Command Prompt, since automatic repair can't repair your PC, you'll need to run them using the Advanced Startup Options .
How to disable startup repair?
To do so, you'll need to access the Startup. Settings menu and press the corresponding number key to disable it. Run Startup Repair from USB/DVD. There's always a chance that your Startup Repair function itself is not working, but your PC is.
How to fix memory issues on PC?
Although you should try to switch the slots your existing memory is in first and booting with just a single stick in (try both of them individually), you can also replace your memory to see if that gets your PC working again.
Why does Windows 10 automatically repair?
The cause of Automatic Repair is if you PC crashes 2 times consecutively or fails to boot, Windows 10 will run Automatic Repair by default. Disabling automatic repair will only mean that you will have to manually run automatic repair if wanted or needed instead if it automatically being run when the above is true.
Do you have to be an administrator to enable or disable automatic repair?
You must be an administrator to enable or disable automatic repair.
How to stop Windows 10 from auto repair?
Method 1: Disable Automatic Repair Before Windows 10 Fails to Boot 1 Open the Command Prompt as administrator and run the bcdedit command:#N#Make note of the identifier value under the " Windows Boot Loader " section. 2 To disable automatic repair at Windows 10 startup, execute this command:#N#bcdedit /set {current} recoveryenabled no 3 Now, the automatic repair feature will no longer run automatically after the third unsuccessful boot of your PC.
How to disable auto repair on Windows 10?
To disable the automatic repair feature on Windows 10, type the following command and press Enter: The major drawback of the automatic repair feature is that Windows 10 tells you nothing about what exactly it's trying to repair.
Does auto repair work after third boot?
Now, the automatic repair feature will no longer run automatically after the third unsuccessful boot of your PC.
Why does my computer go into auto repair?
Normally, by running Automatic Repair, Windows diagnoses the start-up problem (missing or corrupt system files, drivers, registry settings, etc.), fix it and then restart the PC automatically. But when Windows didn't shut down properly, it gets into automatic repair loop. For example, if your PC powered off improperly because of a power outage, system crash, data in the registry could be incomplete and corrupt, which lead to the automatic repair loop.
How to fix a computer that is stuck in repair loop?
Sometimes, your PC gets stuck at automatic repair loop or is attempting repair forever because Windows thinks that there is a problem with your PC while there is not, so you may just restart the PC. Step 1. Restart the PC and keep pressing F8 to get it into Windows Boot Manager. Step 2.
How to get out of auto repair loop?
Perform Command Prompt. If you see "your PC did not start correctly", you can go into Boot Options menu and use Command Prompt to get out of automatic repair loop. Step 1. Click Advanced Options; Choose Troubleshoot > Advanced Options > Command Prompt;
What to do if bootrec.exe doesn't fix auto repair loop?
If the bootrec.exe command doesn't fix the automatic repair loop, some suggest that you should run chkdsk commands as well.
Why won't my computer repair?
When Windows shows "Windows Automatic Repair couldn't repair your PC", it could indicate a corrupted registry on your computer. Therefore, you can get your Windows out of automatic repair loop by restoring the registry from RegBack directory.
What Is Automatic Repair Loop and Why Does It Happen?
The tool is designed to launch automatically when a start-up problem comes up on Windows system.
What is automatic repair?
Automatic Repair is a feature introduced in Windows 10/8 that can fix some PC issues when the computer cannot boot properly.
How to fix a computer that won't boot?
If your Windows cannot boot because of the "Preparing Automatic Repair" or "Diagnosing your PC" error, you can do a hard reboot. Remove the battery and AC adapter. Press and hold the power button for 20 seconds and see if it will boot up normally.
How to re-build a boot record?
Step 1. Insert the Windows bootable installation disk into your PC that has "Preparing Automatic Repair" or "Diagnosing your PC" error message. Step 2. Boot your PC from the installation disk. Step 3.
How to fix auto repair loop?
8 Solutions - Fix Preparing Automatic Repair Loop Windows 10 1 Remove the battery and AC adapter. 2 Press and hold the power button for 20 seconds and see if it will boot up normally.
How to install Windows 10 on a Windows 10 laptop?
Step 1: Turn off your computer. Step 2: Insert the Windows bootable installation disk to your PC and boot from it. Step 3: When prompted to Press any key to boot from CD or DVD, press any key to continue. Step 4: Select your language preferences in the Windows Setup interface, and click on Next button to continue.
Why does my computer go to black screen?
Automatic Repair is a feature introduced in Windows 10/8 that can fix some PC issues when the computer cannot boot properly. But sometimes due to some reasons, Windows Automatic Repair might fail to work and get stuck in diagnosing your PC. It will go to a blue or black screen of death error.