- Move your pot to a well-ventilated area. Epoxy fumes are no joke, and are no fun to breathe in. ...
- Wipe down the broken shards with a cloth to remove any dirt. ...
- Stir equal parts of epoxy and hardener together. Pour a blueberry-sized amount of both epoxy resin and hardener on a paper plate or dish.
- Mix colored clay powder into the epoxy mixture so it matches your pot. Scoop a small spoonful of powdered clay and mix it in with the epoxy.
- Spread the epoxy over the cracked edge with a toothpick. Dip a clean toothpick into the epoxy mixture and spread it along the base section of the crack.
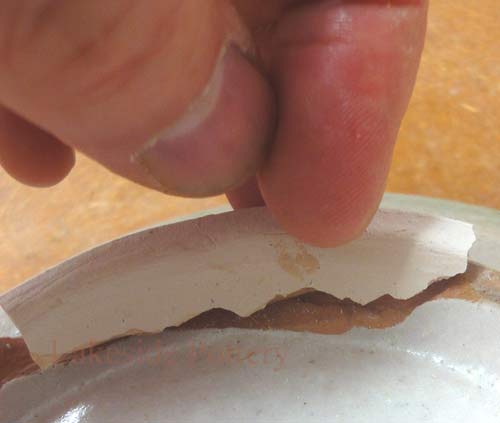
- Press the broken piece into the glue and hold it for several seconds. ...
- Let the epoxy dry overnight so it can cure completely. Double-check the instructions on your epoxy bottle to see how much time it needs to dry and cure.
- Sand down the surface with fine sandpaper to make it smooth and flat. Grab a sheet of super fine-grit sandpaper and rub along the glued seam of your pot.

What is the best way to repair a clay pot?
Step 1: What You Will Need for Pottery Mending Steps?
- Two-part clear 5 minutes PC Clear epoxy ***
- Wooden stick or a pin-tool for applying adhesive
- A container with PVC pebbles / pellets, rice or sand
- Clay
- Razor blade
- Denatured or 91% Alcohol
- Rug
- Paper pad to mix Epoxy on
How to waterproof a clay pot?
long roots... a Vinyl Latex Emulsion, to seal and waterproof clay pots. This sealer is completely and easily with water. It has the consistency of milk, and I pots. Once its' totally dry after a few hours, it's totally safe for plants, and is sealed from moisture for many years.
How to cure a clay teapot?
How to Season an Yixing Teapot
- Prepare a very clean pot and boil water in it. ...
- Using a slotted spoon with no smells or stains, lower the tea pot, and separately, the lid into the boiling water. ...
- Boil for 3-5 minutes. ...
- Choose a tea whose flavor you want the pot to absorb. ...
- Remove tea leaves and let pot soak in the bowl of tea with lid soaking separately.
How do you clean clay pottery?
- Proper Soaking of the Clay Pottery: The clay-made objects, vessels, or pots need to be soaked in the vinegar and water solution for approximately 30 minutes. ...
- You may hear the sound of bubbles or even see them. ...
- Checking: After 30 minutes, the objects are required to be taken out from the liquid to check if it is cleaned or not. ...

How do you fix a cracked clay pot?
Add 1/2 cup white rice flour and 3 tbsp sugar (any sugar is fine, whatever you have). Place the pot in the oven with the lid off, turn the oven to 200 degrees celsius and leave the pot inside for 2 hours. The mixture will boil and bubble, this is what we want. Turn the oven off and let the pot cool inside.
Can a broken clay pot be repaired?
0:072:49Learn How to repair a cracked clay pot / broken parts fast ! How ... - YouTubeYouTubeStart of suggested clipEnd of suggested clipNow we're gonna do here is fix this play Python broken in number four five pieces. So of course weMoreNow we're gonna do here is fix this play Python broken in number four five pieces. So of course we can do this with regular glue. But we need to fix. This right away and the best way to do this is
What is the best glue to repair a clay pot?
A glue that contains marine epoxy is best for terracotta pots. The epoxy is strong and durable which will increase the lifespan of your terracotta pots. This epoxy is also waterproof so it will not get washed away when it rains or when watering the plant.
How do you repair a hairline crack in a ceramic pot?
How do you fix a crack in a ceramic bowl? Apply adhesive to the sides of the crack and press the pieces together. You can use either super glue or a 2-part epoxy. If you choose to use epoxy, make sure you mix both parts together according to the instruction on the packaging.
Can you fix cracked terracotta pot?
Cracks can be repaired by wiring the cracked edges together. This method takes time and patience, but it provides a durable and lasting solution. Rather than wiring the pot where it has been cracked, you can also wrap thin wire strands around the entire pot to hold it together and prevent further damage.
Can you use super glue on clay pots?
If you need to do it quickly and it is only a minor repair, we can recommend the use of a suitable superglue. You can use this to glue a damaged clay pot, for example.
Is Super glue safe for plant pots?
Cyanoacrylate aka Super Glue should be safe to use for your pots. I've used it in aquariums to attach plants to hardscape with no ill effects to livestock and plants.
Does epoxy work on ceramic?
Epoxies include a hardener and a resin that, when mixed, provide a strong bond that's ideal for ceramics. While a little extra effort is required to prepare, and drying times are longer, epoxy is more durable than super glue, so it's the better choice for fixing items that get a lot of handling.
How do you seal cracked ceramic?
You need gap-filling adhesive/touch-up glaze, an emery board, and soap and water. Wash and dry chipped surfaces. Apply glue. Complying with the instructions in the product information, fill in chips or cracks and rebuild any lost material to protect the mug or object from further chipping.
Does Gorilla glue work on clay pots?
For broken pots I've used Gorilla Glue many times. Works great. It holds securely enough that I don't find that I need to wire the pot.
How do you restore an old clay pot?
How to Clean a Terracotta PotStep 1: Empty Your Pots.Step 2: Use a Brush to Wipe Away Loose Dirt.Step 3: Soak Your Pots in Warm Water and White Vinegar.Step 4: Scrub Your Pots While They Soak.Step 5: Scrub Persistent White Spots With Baking Soda.Step 6: Let Your Pots Air Dry.
Why does my clay roaster crack?
Though clay roasting pots are a helpful addition to the kitchen, they can break easily if certain precautions are not taken. Sudden changes in temperature, especially from hot to cold, can cause the pot to crack. Examine the pot before throwing it out to see if it is fixable. The fix for a crack in a clay pot is done with common household items.
Why do you use a clay roasting pot?
Clay roasting pots are used to seal nutrients into food and keep its natural juices and flavors intact, creating dishes that are low in fat and high in flavor. The secret behind clay roasting pots is the steam that evaporates from the pores in the clay when baking in the oven, cooking the food without removing the flavor.
How long to boil milk in a roasting pot?
Turn the burner on low to medium heat to bring the milk to a slow boil. Allow the cracked roasting pot to simmer in the boiling milk for about an hour.
How to make a clay roaster?
Step 1. Place a pot or pan large enough to hold the clay roasting pot on a burner on the stove. Select a pot deep enough to fill with milk after the clay pot with the crack in it is placed inside.
Can you put a clay roasting pot on a cold surface?
Products containing harmful chemicals pose the risk of seeping into food during the cooking process. Do not set a clay roasting pot on a cold surface immediately after removing it from the oven. The drastic change in temperature may cause the clay to crack.
What to do with broken pottery?
If your broken pottery is beyond repair, consider repurposing it into a piece of art. You could embed the pieces in wet concrete to make stepping stones for a garden, or you could even sand the pieces down and make jewelry out of them.
How to fill a chipped pottery?
Fill the chipped section completely with the prepared filler. Use a wooden or plastic stick to fill the entire chipped area with the filler. If needed, use a toothpick to poke it into small, hard to reach areas. It's okay if the filler isn't even with the rest of the pottery—you'll deal with that part later.
How long does epoxy take to harden?
Epoxy filler can take anywhere from 2 hours to 2 days to harden, so make sure to check the manufacturer's instructions for that information. Use a razor or a straight-edged knife to shave off larger chunks of filler that is raised up over the surface of the piece of pottery.
How to fix broken plastic?
Mix a 2-part epoxy adhesive to fill cracks and reattach broken pieces. Squeeze the epoxy onto a non-porous disposable surface, like a thin sheet of plastic, and use a wooden or plastic stick to mix together the 2 components as quickly as possible. It'll start to harden after 3 to 4 minutes, so you need to work fast.
How to fix chipped wood?
Follow the instructions and mix the filler and the hardener. Squeeze out enough filler to completely fill the chip you're repairing. Read the directions to determine how much hardener you need to mix in with the filler so that it'll work properly.
How to smooth out a chipped pottery?
2. Sand the edges of the chipped area to smooth ragged edges. Use fine sandpaper on both the edges of the broken-off piece and the main piece of pottery. Use a back and forth motion with light pressure until the edges are smooth.
Is silicone based adhesive food safe?
Warning: If your piece of pottery is used with food, like a mug or a soup bowl, look for a food-safe adhesive or one that is silicone based . There are both epoxies and other types of adhesives that are FDA-approved for food safety.
How to fix a cracked pot?
Another easy fix exists unless pieces of the pot are missing. You can use epoxy glue for this repair, and it shouldn’t take longer than half an hour. Clean the pot and allow it to dry. Then, run the glue down the crack until it covers all of it.
How to repair a terra cotta flower pot?
If your pot has started to crumble or crack, begin repairs with a flat-edge screwdriver and some fine- and medium-grain sandpaper. Use the edge of the screwdriver to remove any crumbling material. Do so gently, removing only the material that flakes off without much pressure. Be careful not to dig into the clay. Now, you can use the sandpaper to remove any other areas of rot, continuing to work slowly and carefully.
How long does it take for two part epoxy to cure?
Once you mix them up, however, they harden quickly, so you need to work fast. Two-part epoxy dries clear, forms a strong bond and must cure for at least 24 hours.
Can you use sandpaper to repair a terra cotta pot?
Now, you can use the sandpaper to remove any other areas of rot, continuing to work slowly and carefully. According to writers from Deep Green Permaculture, cracked terra cotta flower pots are easy to repair with the right adhesives. The two main categories of adhesives are landscape block adhesives and two-part epoxies.
Can clay pots be glazed?
It's normally not glazed and is prized for its durability, versatility and affordability. All types of clay pots can decay or crack after time, but unless they are really broken or shattered, you should be able to repair them with minimal fuss.
Can you paint over a ceramic pot?
If you want to paint over a terra cotta or glazed ceramic pot after repairing it, the experts from Ceramices recommend using acrylic, latex or epoxy paint – some are available in spray paints. Before starting, clean the pot with water and a stiff brush, and put it in the sun to dry. Use a foam brush or the spray to apply the paint, ...
How to fix a crack in a pot?
String the wire through 2 holes above and below the crack. Slide 1 end of the wire through the top hole, and the other end into the bottom hole. Keep the wire even while you thread it, so even pieces of wire are going through the pot. Repeat this process with each set of drilled holes along the broken seam. 7.
What can I use to repair a broken terracotta pot?
Silicone caulk is also a good option for repairing a broken terracotta pot. You can also buy caulk in a color that best matches your pot! Mix colored clay powder into the epoxy mixture so it matches your pot. Scoop a small spoonful of powdered clay and mix it in with the epoxy.
How to make a pot out of epoxy resin?
Stir equal parts of epoxy and hardener together. Pour a blueberry-sized amount of both epoxy resin and hardener on a paper plate or dish. Grab a toothpick and mix them both together before you start reconstructing your pot. Check the instructions on your epoxy packages beforehand.
How do I repair a terracotta pot?
1. Dust off the pieces of your pot with a clean cloth. Go over the sides and edges of your terracotta pot with a rag, cleaning away any leftover dust and grime. Sometimes, dirt gets stuck in the broken cracks and makes the pot more tricky to repair. 2.
How to fix a pot that is leaking?
1. Move your pot to a well-ventilated area. Epoxy fumes are no joke, and are no fun to breathe in. Find an open, well-ventilated space where you can repair your pot so you don’t have to inhale any nasty chemicals. A room with several open windows can work, or you can repair it outside. 2.
How to make a pot with copper wire?
Cut a length of copper wire into several 3 in (7.6 cm) pieces. Lay out a section of copper wire, measuring and marking every 3 in (7.6 cm). Snip off these short sections of wire with a pair of wire cutters, and set the pieces aside. This wire will be the “thread” that sews your pot back together.
How to make a pot smoother?
8. Sand down the surface with fine sandpaper to make it smooth and flat. Grab a sheet of super fine-grit sandpaper and rub along the glued seam of your pot. Work away any imperfections or inconsistencies, so your pot feels smooth and seamless.
