How do I fix a leaky shut-off valve?
First shut off the water to the leaking water valve. Next remove the handle from the stem and then loosen and remove the packing nut. Remove the old washer and slide on the new one. Reinstall the packing nut, tighten lightly with a wrench (don't over tighten at this or any other point) and reattach the handle.
Why is my shut-off valve dripping?
Since cut-off (shut-off) valves are rarely used, the washer inside the valve can become hard or covered with mineral deposits over time. When you close the valve then open it again, the washer on the valve stem may not seat properly, causing it to leak around the valve stem nut.
How do I fix a leaky toilet fill valve?
How to Fix a Leaky Fill Valve in a Toilet Turn off the water supply. Empty the tank. Disconnect the water supply hose. Unscrew the fill valve's nut to remove it. Buy a replacement fill valve. Slide the rubber gasket on the new valve. Screw the new valve into your toilet.More items...
How much does it cost to replace a shut-off valve on a toilet?
A valve replacement can run a homeowner between $60 and $200 or more for labor and materials, depending on local rates and minimums....Fill, Shut-Off and Flush Valve(s), Flapper.Toilet PartAverage Price RangeDIY Project TimeShut-off valve$5 – $351 – 2 hoursBowl flush valve$20 – $301/2 – 2 hours2 more rows
How often should shut off valves be replaced?
Generally speaking, the lifespan of most residential water shut off valves is about 10 to 15 years. So, if you're purchasing a home that is 10 or 15 years old - we would recommend that you invest in replacing your shut off valves now to avoid any problems in the near future.
How do you replace a water shut off without turning off water?
1:222:01How To Install A Water Shutoff Without Turning Water Off - YouTubeYouTubeStart of suggested clipEnd of suggested clipClean cutter and just slip want to be sharkbite son. With the water and shut up. And shop back allMoreClean cutter and just slip want to be sharkbite son. With the water and shut up. And shop back all the remaining water around the perimeter. And you're good to go.
Why does my toilet fill valve keep running?
Adjust the Fill Height by Checking the Float The water level in the tank is controlled by an adjustable float. A float that's set too low produces a weak flush; if it's set too high, water spills into the toilet overflow tube and the fill valve won't shut off. The toilet keeps running.
How do you tell if toilet fill valve is leaking?
0:101:58How to Know When Your Fill Valve on a Toilet Needs Replacing - YouTubeYouTubeStart of suggested clipEnd of suggested clipNeeds to be replaced. Now a lot of times what happens is either the bottom washer ends upMoreNeeds to be replaced. Now a lot of times what happens is either the bottom washer ends up deteriorating and causing a leak or the toilet fill valve just won't fill anymore.
How do you fix a faulty fill valve?
0:533:58How to Fix a Toilet - Fill Valve Replacement - YouTubeYouTubeStart of suggested clipEnd of suggested clipReach behind the fill valve and snap the lock ring down into place then attach the refill tube toMoreReach behind the fill valve and snap the lock ring down into place then attach the refill tube to the overflow tube and adjust the new fill valve for optimum water level.
Can a toilet fill valve be repaired?
Fixing a toilet fill valve (once referred to as a ballcock) is relatively easy to repair if you happen to have a common Fluidmaster brand valve. Often, repairing a fill valve is done by simply replacing the entire fill valve, but Fluidmaster fill valves can be repaired by just replacing a seal inside the unit.
How do you stop a toilet from trickling?
1: Water Trickling Into the Bowl (Phantom Flushes) This problem is almost certainly caused by a bad flapper or flapper seat. The solution is to drain the tank and bowl, check and clean the flapper seat and then replace the flapper if it's worn or damaged.
Is it easy to replace a toilet fill valve?
However, the good news is that replacing your toilet fill valve is something any homeowner can do. It does not take a lot of experience with plumbing or a lot of time. However, you do need a few parts, a couple of tools, and a little bit of effort.
How do you tighten a toilet fill valve?
Turn an adjustment screw located on the top of the valve. To raise the water level, turn the adjustment screw clockwise; to lower the water level, turn the screw counterclockwise.
How to stop a toilet shut off valve from leaking?
For a leaky toilet water shut-off valve, the easiest solution is to tighten the package nut 1/4 turn with a wrench. Do not remove the valve, just tighten the packing nut. Hopefully this is enough to compress the rubber gasket so that it is sealed on the valve stem to prevent water leaks.
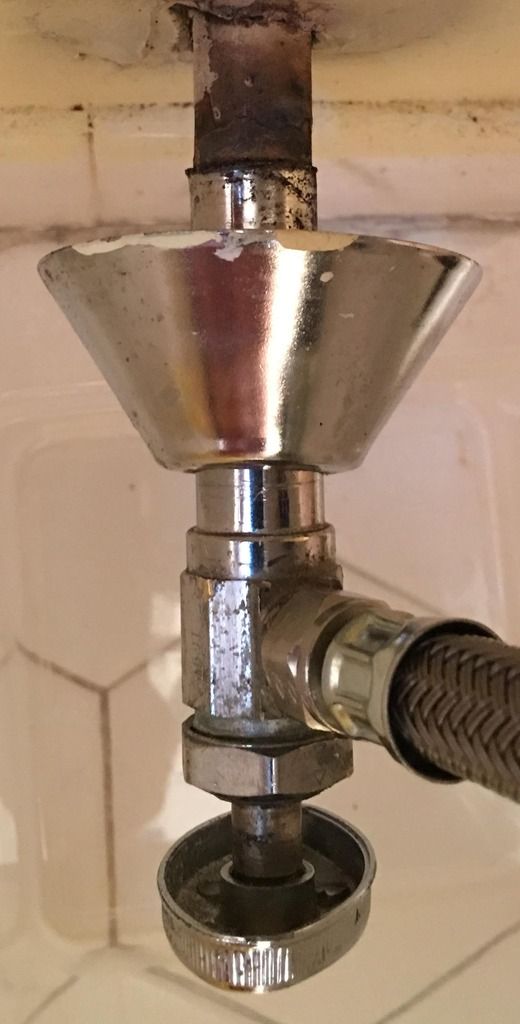
What is a straight shut off valve?
This is a “straight” shut-off valve with 1/2″ and 3/8″ compression fittings for toilet water supply. Straight means that the input and output are at opposite ends. The valve is a multiturn model because the handle rotates several times to open and close the valve.
How to stop packing washer from leaking?
Tighten the packing washer 1/4 turn if it leaks. If necessary, repeat until the leak stops, but do not tighten the nut so much that it crushes the packing washers.
How to remove packing nut from valve stem?
Unscrew the packing nut with a wrench. Unscrew the valve stem with your fingers. The packing washers and thrust washers will fall off along with the valve stem.
What is a stopper valve repair kit?
The stopper valve repair kit will provide a new bib washer, push washer and, most importantly, a new hood wrap washer. Components that fail when the shut-off valve leaked between the package nut and the stem.
What is a multiturn stop valve?
Multiturn stop valves are very common at home for shutting down the hot and cold water supply faucet or toilet. The problem is that the sink or toilet water shut-off valve may leak and turn the handle. Usually change the filling valve of the toilet tank after closing the water. The inner rubber hood wrap seals become less flexible ...
Why open cold taps in the kitchen, bathroom or outdoor plumbing bibs that are below sea level in the bathroom?
– Why? – Why? Because this will reduce the residual pressure in the cold water pipes and drain the water above the pipe where the valve stops. You do not want a few gallons of water to flow back from the open stop valve for second floor plumbing repairs and bathroom floor.
How to stop a leaking water valve?
Put a plastic tub under the leaking valve to reduce the water spillage on the floor while you work. Then, fit an adjustable wrench onto the nut of the shut-off valve and turn it counter-clockwise at 1/8 to 1/4 turn at a time. This will tighten the packing nut and may stop the drip. Browse replacement shut-off valves on Amazon.
Why does my toilet shut off?
The most common problem for a toilet shut-off valve is that it can develop a leak. Dripping shut-off valves can leave puddles of water on the bathroom floor which can ruin the flooring, make the room look dirty, destroy bathroom furniture, cause mold and mildew to grow, and run up your water bill. Leaking is caused by loose packing nuts on these ...
Why is my washer shut off valve leaking?
Leaking is caused by loose packing nuts on these valves. In some cases, this may also be caused by minerals deposits on the washers. A leaking shut-off valve doesn’t necessarily mean it always needs replacement. Follow the steps below for simple solutions to this issue before you engage in most costly repairs.
How to protect a toilet from scratches?
But first, you need to protect your bathroom and your equipment. Wrap the slip joint pliers' jaws in masking tape to protect your shut-off valve from any scratches caused by the sharp edges. Next, shut off the main water supply to the toilet, and detach and drain the pipes using a wrench or pliers. The small plastic tub will catch ...
How to clean neoprene washers?
Take the neoprene washers and remove any mineral deposits by using a clean rag. While scrubbing, work them constantly until they are flexible once again.
How to fix a water valve that is leaking?
Get started by shutting off the valve. Shut off the main water supply to the house to prevent sudden bursts of water. Cover the jaws of the pliers with masking tape. This is critical to prevent scratching of the shut-off valve surface. Use the pliers to firmly grip the packing nut. This nut is located under the handle of the valve. Turn the nut in the clockwise direction. This is the most basic repair to ensure that the nut is properly tightened. If this doesn’t stop the leakage, proceed by loosening the packing nut by turning the nut in the counterclockwise direction with a plier or wrench.
How to clean a water line on a water valve?
Start by disconnecting the water line from the valve. Use a wrench or plier for loosening the nut at the other end of the valve, connected to the water supply line. Use a dry cloth to wipe the piping. Using Teflon taping, wrap the pipe threads of water line.
How to fix a cracked washer?
Clean the washers using water and an old toothbrush. Ensure that you remove the mineral deposits that often coat the washers. If the washers seem cracked, you need to replace them. For this, you need to carry the valve stem to a hardware store to procure an exact replacement.
Where is the shut off valve located?
The toilet shut-off valve is also called the stop valve. This is the valve controlling water to the toilet, usually located below the cistern of the toilet. Most shut-off valves are rather durable and only need to be replaced after many years. However, due to sustained usage, the valve can malfunction, leading to leaks or reduced water pressure. You don’t need to hire professional help for repairing shut-off valves. These valves have a very basic configuration and they can be easily repaired at home, using some basic supplies.
Can a shut off valve be repaired?
However, due to sustained usage, the valve can malfunction, leading to leaks or reduced water pressure. You don’t need to hire professional help for repairing shut-off valves . These valves have a very basic configuration and they can be easily repaired at home, using some basic supplies.
How to tighten a toilet shut off valve?
Thread the nut onto the valve output. Hand-tighten the nut, then use a crescent wrench to tighten it another half turn.
How to fix a leaky water valve?
If there is a leak, shut off the water, empty the lines, and unscrew the valve’s compression nut. Add plumbers tape or plumbers putty to the threads on the valve. Reinstall, making sure to tighten all compression nuts, and recheck the fitting.
How to tighten compression nut?
Hand-tighten the compression nut onto the threading of the new valve’s input. Then use two crescent wrenches, one to hold the valve body in place and the other to engage the nut, to tighten the nut another half turn.
How to remove sweated copper valve?
For sweated copper joints, place a tube cutter over the copper pipe as close to the old valve as you can. You need to leave enough pipe extending from the wall to have room to install the new fitting. Tighten the pipe cutter and rotate until it cuts completely through the metal, and then remove the valve.
How to unscrew a compression joint?
For compression joints, use a crescent wrench to unscrew the bolt connecting the pipe to the existing valve while holding the pipe with a pair of pliers. The pliers will prevent the pipe from being twisted or bent as you apply pressure with the crescent wrench to loosen the bolt. Once you’ve removed the nut, pull the old valve off of the pipe. Then remove and discard the nut and compression rings.
What to do if you can't get the supply hose to line up with the new valve?
If you can’t get the supply hose to line up with the new valve, you’ll need to loosen the valve nut and reposition it, so it lines up with the supply line . Make sure you adequately tighten all nuts before proceeding to the next step.
How long does it take to replace a toilet valve?
Replacing a leaky toilet valve is a repair that most DIYers can complete in a few short hours. By following these simple steps, you can ensure that your toilet valve replacement will go smoothly, eliminating the offending leak and allowing you to get your toilet back into service.
How to fix a leaking shut off valve?
To fix a dripping/leaking shut off valve, use an adjustable wrench to tighten the packing nut which will compress the washer and stop the leak. If that does not work, loosen the packing nut and wrap Teflon packing around the valve’s bonnet threads. Tighten the packing nut and check if the leak stops.
What causes a shut off valve to leak?
A loose packing nut may also cause your shut off valve to leak. The function of the packing nut (also known as bonnet nut) is to compress the washer on the valve stem thereby creating a watertight seal.
How to tighten a valve packing nut?
Grab an adjustable wrench or slip-joint pliers and gently tighten the valve’s packing nut. Since the nut will not be very loose, this will involve turning it by about 1/8 or 1/4 of a turn clockwise.
How to expose threads on valve spindle?
Pull the packing nut all the way back to expose the threads of the valve’s spindle.
Why does my washer shut off leak?
The reason your shut off valve is dripping/leaking is because the washer inside has hardened over time, or it is covered by mineral deposits. Since these valves are rarely operated, when you close the valve then open it the washer will fail to seal properly and hence the dripping.
How do I drain water from a water heater?
Turn off water to the valve and open a faucet to drain water from the pipes. I always avoid draining the water heater since an empty tank will cause the element to burn. Unless you turn off the power to the heater prior.
What to use to clean a corroded valve stem?
If the valve stem is corroded, scrub off the corrosions and mineral deposits using an emery cloth.

Step 1 – Tighten The Valve
Step 2 – Prepare to Take It Apart
- If the leaking doesn’t stop, you'll need to just remove the nut to get to the washers within. But first, you need to protect your bathroom and your equipment. Wrap the slip joint pliers' jaws in masking tape to protect your shut-off valve from any scratches caused by the sharp edges. Next, shut off the main water supply to the toilet, and detach an...
Step 3 – Remove The Nut
- Get a hold of the shut-off valve and begin to take it apart. Take out the screw from the handle of the valve and untwist the packing nut. Remove the threaded valve system; when you do this, remember the position of the neoprene washers so that you can easily put them back together later, taking a picture of the set up if needed.
Step 4 – Clean The Washers
- Take the neoprene washers and remove any mineral deposits by using a clean rag. While scrubbing, work them constantly until they are flexible once again.
Step 5 – Reassemble The Valve
- Following your picture or your memory, start putting the shut-off valve back together. Make sure neoprene washers are positioned properly otherwise you will make more problems later. Once again, tighten the packing nut 1/8 to 1/4 turn at a time using the wrench. Do not use plumber's putty or you might have a hard time fixing the shut-off valve in the future. Also make sure you do…
Step 6 – Turn on Water and Check For Leaks
- Turn the water from the main back on, and watch for leaks as the line is being filled. If you see that the valves are still leaking, then its time to replace the shut-off valve entirely. When you purchase through links on our site, we may earn commissions at no cost to you.