Here’s what you need to fix your favorite stuffed animal:
- Step 1: Thread the needle.
- Step 2: Sew the opening closed with a ladder stitch (aka invisible stitch).
- Step 3: Tie a knot & cut the thread.

How to clean a very old stuffed animal?
Steps to Clean the Doll:
- To clean a stuffed animal without wetting it, get a large bag that the toy can fit into if possible. ...
- Put the toy in the bag and sprinkle in a generous amount of an absorbent powder. ...
- Seal the bag and shake it vigorously to distribute the powder onto the toy.
- Allow it to set for an hour or two. ...
How do you refresh a stuffed animal?
How do you refresh a stuffed animal? Mix some detergent and warm water in a bowl, and with a rag or brush cleanse the animal lightly, but enough to freshen them up and remove most of the residue. Use a damp cloth to remove the detergent and then let the animal dry.
How to restore stuffed animals?
Teddy Bear Restoration
- De-stuff and Vacuum. First thing I did was get an Xacto knife and cut the rear seam in his back, then proceeded to de-stuff him.
- Wash and Dry. Next, I filled up my sink with cold water and soaked him in there. ...
- Sew and Repair. Now that he's all clean I started on his repairs. ...
- Re-stuff Head. ...
- Re-stuff Arms and Legs. ...
- Sew and Re-stuff Body. ...
- Stuff and Seal. ...
- Enjoy! ...
How can you easily wash stuffed animals?
How to clean stuffed animals in the washing machine?
- Check the tag to see if you can wash your stuffed animal in the washing machine. If you can, then move on to Step 2.
- Pour a small amount of laundry detergent on the stuffed animal and work it into the stained or dirty area.
- Put the stuffed animal in a mesh bag and set your washer on the gentle cycle using cold water.
How do you fix a stuffed animal without sewing?
3:535:20How to Fix a Torn Stuffed Animal - Easy No Sew DIY - YouTubeYouTubeStart of suggested clipEnd of suggested clipSo you're gonna take a glue gun or it across that inside seam squeeze it together without burningMoreSo you're gonna take a glue gun or it across that inside seam squeeze it together without burning your fingers you might want to wear it cotton gloves for this hold it to the course.
Can you put a patch on a stuffed animal?
To patch, cut out a piece of fabric larger than the hole. Lay the fabric over the hole so it extends beyond the hole on all sides. Feeling where the hole is underneath I pin the patch to the stuffed toy around the edges of the hole.
How do you fix a ripped stuffed animal seam?
0:042:57How to stitch a plush toy for your kid | hand sew a stuffed animal repair DIYYouTubeStart of suggested clipEnd of suggested clipI'm gonna show you how to fix. Your child's favorite plush toy. So in this case I have this dog hasMoreI'm gonna show you how to fix. Your child's favorite plush toy. So in this case I have this dog has this rip right over here my son Ben been asking me for about almost a week for me to fix it. So I
How do you fix a squished stuffed animal?
The first thing to do is go to a fabric or craft store and get polyester fiberfill stuffing. Polyester fiberfill is the best thing for re-stuffing as it is both hand and machine washable. You can even put it in the dryer with the worry of it bunching up and distorting the shape of the animal.
How do you sew a seam on a stuffed animal?
0:405:29Ladder Stitch How to | Memory Bear Sewing | Whitney Sews - YouTubeYouTubeStart of suggested clipEnd of suggested clipKnot. Bring the needle up from the inside of your project a few stitches away from where yourMoreKnot. Bring the needle up from the inside of your project a few stitches away from where your opening. Begins. Then take a small stitch in one side parallel with the opening.
How do you darn a teddy bear?
30:2758:28HOW TO FIX AND REPAIR ANTIQUE AND VINTAGE TEDDY BEARS 101YouTubeStart of suggested clipEnd of suggested clipThis is called a blind stitch or a ladder stitch. And i pull it tight. Then i go in this side. And iMoreThis is called a blind stitch or a ladder stitch. And i pull it tight. Then i go in this side. And i make this stitch there like a ladder.
How do you sew a hole in a toy?
0:373:41How to sew up a hole in a stuffed animal - YouTubeYouTubeStart of suggested clipEnd of suggested clipAren't you gonna assist me with this surgery. Yeah okay okay so I have a needle and thread with youMoreAren't you gonna assist me with this surgery. Yeah okay okay so I have a needle and thread with you want to make a pretty decent-sized knot at the end because when you're sewing like the the plush
Can you Refluff a stuffed animal?
1:503:53How to make an old stuffed animal look new again - YouTubeYouTubeStart of suggested clipEnd of suggested clipLike sort of roughly. And it will completely reflow in the most matted stuff animal fur and make itMoreLike sort of roughly. And it will completely reflow in the most matted stuff animal fur and make it look brand new again so I'm just going to go ahead and do all of mr.
How do you fix matted teddy bear fur?
0:112:07How to Fix Stuffed Animal Fur from Dryer Damage and More! - YouTubeYouTubeStart of suggested clipEnd of suggested clipYou can use a dog brush or something similar now just brush away brush brush brush brush.MoreYou can use a dog brush or something similar now just brush away brush brush brush brush.
How do you make stuffed toys fluffy again?
Make the Stuffed Animal Soft Again — One simple way to fluff up your stuffed animal again is by using a towel and rubbing the fur. The stuffed animal should be clean and damp. Use a soft comb to comb the fur as it dries and then allow it to air dry. You can also try using a hair dryer on damp fur.
What to do if a hole is missing in fabric?
If some of the fabric is missing, you can patch the hole with another fabric or even a fun patch! For example, if the child’s favorite thing is butterflies, you can use butterfly fabric or a large butterfly patch to cover the hole.
How to make a nose stitch?
Starting one side and creating the stitches from the bottom to top looks nice, the thread is laid vertically. The first stitch into the nose. I brought it from the center up through to the top line of the nose mark. 2) Make a long stitch over to the bottom of the nose edge and go down into the fabric.
Can stuffed animals have scars?
Stuffed animals can be fragile, and just like humans, they might have some scars. Some repairs might involve a complete change of fabric or body parts – eyes for example, if one goes missing, you might need to replace both. If you choose, this can be turned into a great life lesson about being flexible!
Is stuffed animal soft or moveable?
Our goal is to repair their stuffed animals to the best of our ability, all while keeping in mind that it is a soft and moveable creature. Their fluffy fur is very forgiving, usually hiding the repairs. This is also helpful for dog owners who want to try and save their dogs toys.
Can you pop thread back into a stuffed animal?
The thread will pop back into the body of the stuffed animal. It will have a better chance of staying tucked in all that fluff and less chance of coming undone than if you trimmed it close to the final securing stitch. Bring the needle up a few inches away from the secured stitch site.
How to make a mangled toy look better?
Unstuff and wash. You may not need this step, but washing can be much easier without the stuffing, and replacing or rearranging the stuffing can make a mangled toy look 100 percent better. Most toys have a spot several inches long (usually along their back) where they were turned, stuffed, and hand-stitched closed.
Is a Velveteen Rabbit a perfect toy?
Any repair you do will likely not be perfect, but perfection probably isn't what your child loves about their toy. A favorite bear with a missing arm is still a favorite bear, hold out hope that the toy can be salvaged. "The Velveteen Rabbit" has always been a favorite story of mine, and I figure a little extra wear on a toy just brings it closer to being "real." Plus, battle scars add character!
Is there a backup toy plan?
For one, there is the backup toy plan. This is a great option if you know that this toy will be a favorite at a time when purchasing a backup is still an option. We didn't. Once you have said backup in hand, you are supposed to routinely switch out the toys so they become one and the same in your child's heart.
Can you reattach a toy that has become detached?
Now is the time to reattach any limbs or ears that have become detached . These parts will be much easier to attach properly before you stuff. Don't be afraid to turn the toy inside out for this step, it will make for a much cleaner attachment. Use the other limbs as a guide for your repair.
How to restuff a toy?
To begin restuffing you need to open up the toy’s body. Start by searching along the seams to find the area through which the toy was stuffed when it was originally made. If you examine the seams carefully and you’ll find one that looks a little different from the others.
Can you put stuffing in the dryer?
It can be washed by hand in the sink with warm soapy water, or it can be put in the washing machine on a gentle cycle and you can put it in the dryer without worrying that the stuffing will shift, bunch up, shrink, or otherwise deteriorate.
Step 1: De-stuff and Vacuum
First thing I did was get an Xacto knife and cut the rear seam in his back, then proceeded to de-stuff him.
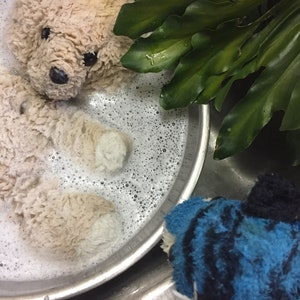
Step 2: Wash and Dry
Next, I filled up my sink with cold water and soaked him in there. I used gentle fabric soap and soaked him for about an hour. I then slowly laundered him with my hands to make sure he'd get a good scrubbing. Check out the color of the water. Gross! That's about 35 years worth of grime coming out.
Step 3: Sew and Repair
Now that he's all clean I started on his repairs. I turned his arms inside-out and then took a needle and thread that kind of matched the original. Make sure to use a needle that's large enough to push through the fabric, then sew. I don't know anything about sewing so I just looped the thread around. Seemed to work perfectly.
Step 4: Re-stuff Head
Now it's time to re-stuff. I bought this "economical eco-friendly recycled polyester fiberfill" and ended up removing it all after I had re-stuffed fully. DO NOT USE THAT. He ended up feeling like a cheap carnival animal and wasn't super soft and squishy like he originally was.
Step 5: Re-stuff Arms and Legs
Next, I stuffed his arms and legs. I made sure not to stuff his body yet, as I still needed to sew up his back a little more.
Step 6: Sew and Re-stuff Body
As you can see in the first picture, his back is now fully opened up, so, I needed to sew him up again to where my hand would fit in just enough to stuff more stuffing into him. That way, you'll have enough room for stuffing and the final seam won't be so big or noticeable. Now, start stuffing!
Step 7: Stuff and Seal
Last step, sew up his back. I didn't care so much if you could see the thread or seam too much, but because of his fur, the stitching seemed to get lost anyway. Perfect! Now he sits up nicely and looks nice and fat.