Fixing a Cheap Anvil
- Cleaning Up Original Surface. If you have a cheap anvil that's made of cast iron or a soft material that you've already put to use and the face ...
- Prepping the Plate. Now that you have your tool steel plate or whatever type of plate your going to use, you have to do a couple of things ...
- Cutting Out the Hardy Hole. ...
- Drilling Holes in the Plate. ...

How much should I pay for an anvil?
To sum it up, the answer to how much an anvil will cost is, as with most purchases, a relative thing. A standard guideline of cost is $7-$9 per pound for a new anvil or $2-$4 per pound for a used one, but quality and durability are just as important as weight.
How to restore an old anvil?
Such as:
- You can spend a lot of time and money and make your anvil worse off than it was originally
- Making the face more brittle and prone to cracking in welded areas
- Heating the face of the anvil can ruin its temper in all areas in contact with the weld bead
- Edges of your anvil won’t be able to hold up to heavy use and will start to chip out or deform
How to secure an anvil to a stump?
Square the top and bottom:
- Cut log of sufficient diameter to length somewhere around 2 inches longer than desired. How much extra length depends on the straightness of the cut.
- Determine the side of the base that is the most square and place it on the floor. ...
- Make a sled for the router out of quality 1/4 inch plywood with some side supports of 3/4 inch by approx. ...
What to use instead of Anvil?
Instead of an anvil, you can use any large, solid block of steel, which you can transform into a makeshift anvil at home. Some of the best options include railway tracks, scrap metal, or heads of sledgehammers. This article will also give a brief outline of how to use these anvil substitutes and how to create them.
Can a anvil be repaired?
The most common ways to repair or restore an anvil are by either grinding down the surface, welding any missing areas, or both. However, if you're a brand new blacksmith then trying to repair your first anvil can often do much more harm than good. If your anvil only has minor damage, try working around it.
Can you repair a damaged anvil Minecraft?
You cannot repair an Anvil. The Anvil will break if it's done. You can just build another one and place it on the old place of the Anvil. You just can repair Items at the Anvil.
How do you smooth an anvil?
3:176:05Should Anvils Be Repaired? - YouTubeYouTubeStart of suggested clipEnd of suggested clipThen move forward so anvils tend to crack and chip along the edges just as a function of use. ThisMoreThen move forward so anvils tend to crack and chip along the edges just as a function of use. This is a Peter Wright with a hardened. Face you can see that it's right on the right on the bubble.
What is the face of an anvil made of?
hardened steelThe primary work surface of the anvil is known as the face. It is generally made of hardened steel and should be flat and smooth with rounded edges for most work.
How do you repair an anvil?
3:337:27How to Repair An Anvil - YouTubeYouTubeStart of suggested clipEnd of suggested clipSome more bring those up to where they're straight with the size of the anvil. It's tedious and slowMoreSome more bring those up to where they're straight with the size of the anvil. It's tedious and slow it's dirty it's got to be done I'm optimistic I think I've got a good scald.
Why is my anvil cracked Minecraft?
An anvil can be damaged and destroyed from falling. If it falls from a height greater than one block, the chance of degrading by one stage is 5% × the number of blocks fallen. The damage state does not affect the anvil's function, but only anvils of the same damage state can stack in inventory.
Can you resurface an anvil?
7:5213:03How to Repair An Anvil: Resurface An Anvil for Optimal Anvil RestorationYouTubeStart of suggested clipEnd of suggested clipAnd it helps to take and actually have a sanding disc that you can actually go across the entireMoreAnd it helps to take and actually have a sanding disc that you can actually go across the entire surface of the anvil to take and get it nice and clean. And you don't want this to be a mere finish.
Can you weld an anvil?
1:2310:12Blacksmithing For Beginners - Welding and Resurfacing an AnvilYouTubeStart of suggested clipEnd of suggested clipIf you start welding on a cold. And Vil the heat from the weld is going to get sucked into the bodyMoreIf you start welding on a cold. And Vil the heat from the weld is going to get sucked into the body of the anvil. And the welds are going to cool too quickly and they're going to become brittle.
Should you oil an anvil?
Lightly oil the surface. Oil and water do not mix, therefore creating a protective seal over the metal of your anvil, preventing moisture from surfacing and the metal from corroding.
What steel is best for anvil face?
Material: anvils have been made from many materials in the past. You need something you can heat treat. I'd suggest a high carbon steel, 4140, or, if you can afford it, S7 or H13. You probably won't want water hardening steel since you won't be able to cool it quick enough.
Why do blacksmiths tap the anvil?
Blacksmiths hit the anvil between strikes to keep momentum and rhythm up. It allows them to keep a steady rhythm with the hammer while planning out their next move, readjusting their grip, or flipping the hot item over. These light taps can also help when their hands become tired.
Why is there a square hole in an anvil?
Unlike the step, it often features slightly rounded edges so that the edges don't cut into the metal being pounded on the face. The hardy hole is a square hole through the anvil that allows you to secure various tools in the anvil.
Why Do You Want to Repair the Anvil?
Knowing the reason why do you want to repair the anvil greatly determines how you should repair it or even should you in the first place. So, before you start, ask yourself one simple question; What do I intend to do with this anvil?
Should You Even Repair the Anvil?
This is a frequent question that I see on many forums and comments on social media. The answers are typically extremist. One side is saying that all anvils must be in perfect condition. In contrast, the other side claims that anvil doesn’t require restoration work in most cases.
Repairing the Anvil
Congratulations, you made it to the most important part of the guide, where we explain the exact process of repairing the anvil. Since there are many different kinds of damages on the anvil, there are also various repairing approaches.
Jaret
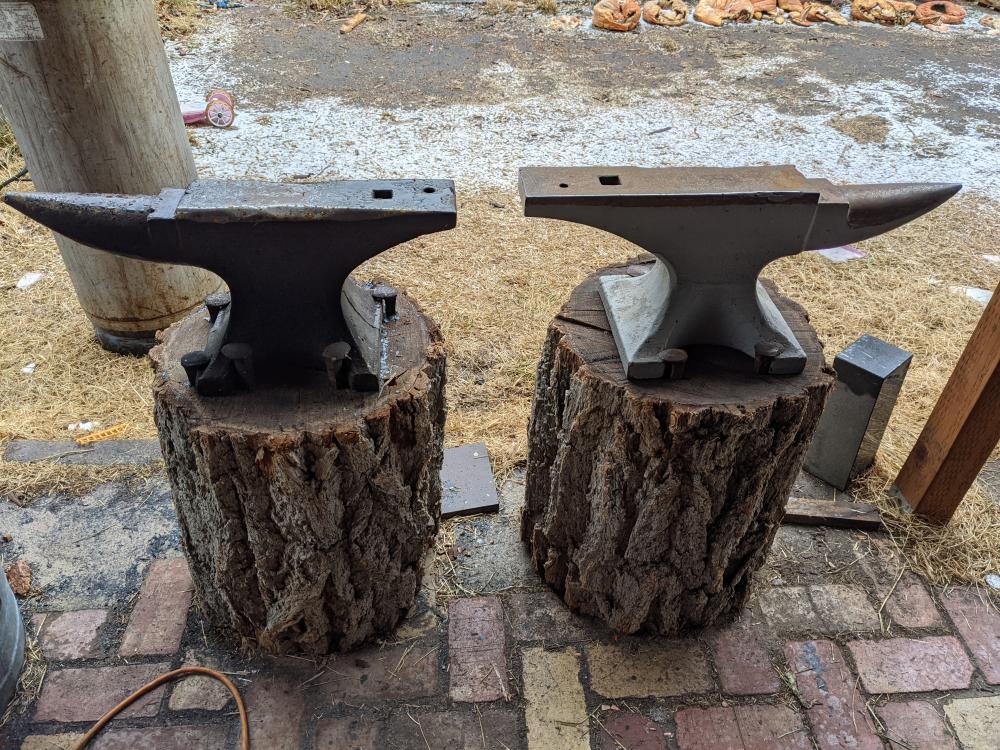
Ok, I bought a couple. spent just over $200 for both. One is an Ajax 125 pounder, the other is a Colombian (thanks Finnr) that is 100 pounds. Sometimes I spent money carelessly. The Ajax is in rough shape, and I want to refinish it.
Steve Sells
From what I see the #2 pic is fine to use as is, its in much better shape than my first anvil (I still have it). The last pic may be fine, Use it a few hours and see, does it leave marks in the steel you are working? ifnot why mess with it ? Having said that if you are wanting it just to look a little better, a 120 grit ot finer flap dish should shine it up fast with out risking too much damage to it.
keykeeper
I don't see a thing wrong with either of those, although the Colombian is great, IMHO. Use them both, work around the problems on the Ajax. Plenty of flat surface on it.
dwczerr
The Columbian is in very nice shape.....the Ajax, as you said, has seen much more use and the edges are gone. I'd recommend using the Columbian for forging and hanging on to the Ajax as it is without doing any repairs.
arftist
Sometimes it is good to have another anvil mounted, even if it's not perfect. For example, you may want to do an operation to a part, and then use a hardy cut off tool in the same heat.
dablacksmith
you did great on the price!!! and i agree with everyone else ... start hammering ! the one has a real good face ... the other isnt as bad as you think . if you ever have kids forgeing or someone you dont really trust have them use the worse one ,, less chance of damageing it ...
Mike Ameling
Nothing "foolish" about what you spent for those anvils. Those chipped edges only bother if you are doing stuff where you need a corner of the anvil. And usually you can just shift over to a section that has a better corner for the specific project. But you can also clean up and radius some of those chipped corners.
Step 1: Cleaning Up Original Surface
If you have a cheap anvil that's made of cast iron or a soft material that you've already put to use and the face is pitted from the hammer striking it try to get it as flat as possible.
Step 2: Prepping the Plate
Now that you have your tool steel plate or whatever type of plate your going to use, you have to do a couple of things before you weld it on.
Step 3: Cutting Out the Hardy Hole
First thing you do is you drill holes where your going to cut the hardy hole slot out so that you don't have to cut as much. Then you cut the hole out.
Step 4: Drilling Holes in the Plate
This is optional but I did this to make the plate not have a hollow spot under the plate. So drill holes in random spots on the plate.
Step 5: Welding the Plate On
Now clamp the plate on and make sure it's where you want it. Then weld all the way around the plate twice for extra strength. Then fill in the holes with the welder a little above flush. Then grind the top smooth.
Step 6: Flatting the Top
Now get a sanding wheel on a grinder and sand the top lightly till it's flat and smooth. As you can see I drilled a hole all the way through and made the pritel hole.
Step 7: Rounding the Horn
Now get a grinding wheel and take of as much as you want so that you think it's round enough. Then get a sanding wheel on a grinder and smooth the horn.
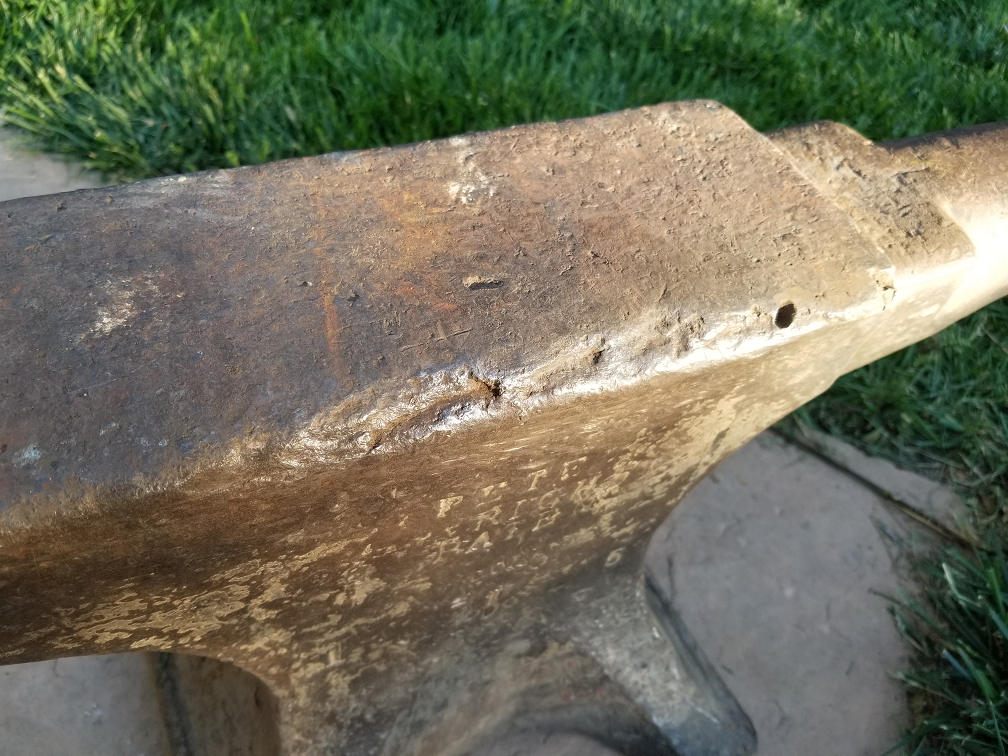
Knifeguy
I am new to black smithing and just purchased my first anvil. It is a Peter Wright 101 that needs some work. I have cleaned it with a wire brush and there are some large chips along the face edges. I am not sure how to repair this and am looking for some advice. Thanks!
Tubalcain2
We need pictures to be of any help. most of the time, newbies are over concerned, and the anvil doesn't need any repair at all. "repair" attempts often ruin an anvil or don't help, at best. welding or grinding on an anvil is a bad idea except in specific cases in which it should only be done by an expert. Pictures????