How to Repair a Malfunctioning LCD Screen
- Tools Needed. This fix can be performed using a minimum of tools. You need only the tools necessary to...
- Disassembly. Disassemble the device to expose the LCD. Obviously, this step will vary by device. If you are...
- Prep the Screen. Prepare the screen for repair by exposing the ribbon cable on the backside of the screen. In...
- Repair the Connections. Using LOW heat (you do not want to melt the ribbon or the solder on the board), slowly...

What is the best way to clean a LCD screen?
What Are the Correct Ways to Clean Your Industrial LCD Screen?
- Consult the Manufacturer’s Cleaning Instructions. ...
- Switch Off Your Monitors before Cleaning. ...
- Avoid Using Harsh Chemicals. ...
- Use Canned Air and Microfiber Cloths. ...
- Use Distilled Water. ...
- Use Special Screen Cleaning Products and Let It Dry Completely. ...
How to properly clean your LCD screen?
Moisten a lint-free cloth with LCD cleaner to remove stubborn smudges.
- Never spray LCD cleaner directly on the screen since the liquid can trickle down into the screen frame and damage it.
- Do not use commercial cleaners with alcohol in them.
- If you want to sanitize your screen, LCD cleaner probably will not be effective.
How to clean LCD screen at home?
Step-By-Step Method on how to Clean LCD TV Screen:
- Turn off your LCD TV and unplug it.
- Use a soft cloth that is dampened in a small amount of distilled water.
- Gently wipe the screen with that soft cloth in a circular motion so you can clean off the dust.
- For stubborn stains, use a combination of mild soap and warm water.
- Turn the TV back ON.
Can I replace my LCD screen?
Yes.., Great News!, you can indeed swap lcd panels and you can donit cheap. First.., Check with manufacturer and see what resolutions were offered with your particular model and keep in mind going above those guidelines may be burdensome on the gpu or may not be compatible due to gpu/hardware specifications.
Can you fix a LCD screen without replacing it?
People typically decide to buy a new device when this happens. Fortunately, with an LCD repair, you can fix the device without needing to replace it.
How do you fix a broken LCD screen?
2:343:48How to Replace a Broken, Cracked or Smashed Laptop LCD screenYouTubeStart of suggested clipEnd of suggested clipAnd add some sellotape to help ensure it doesn't come loose over time. Then gently flip the screenMoreAnd add some sellotape to help ensure it doesn't come loose over time. Then gently flip the screen over into place and since this replacement screen does have brackets for the screws.
Can a damaged LCD fix itself?
No it won't fix itself, but the black was probably fluid that escaped from the screen and may have evaporated to show you more of what was behind it. The damage is permanent but working parts of the screen may be hiding behind the black.
What causes LCD screen damage?
LCD screen is too sensitive to mechanical shocks and heat , since the pressure may squeeze the fluid present in between the plates which can cause its permanent damage. Excessive heat can change the physical properties of the liquid so some part of the screen may damage and appear as black spots or segments.
How much does it cost to fix a broken LCD screen?
Costs typically range from $60 to $350 for LCD, LED, plasma, and 4K TVs. Common problems include screen and bulb replacement, backlight repair, HDMI port repair, or control board replacement.
What happens when you press on an LCD screen?
— if you press any screen with a sharp object, you may damage its covering; and if you press very hard even with your finger you may damage the internal components of the screen. BTW: Most screens sold as “LEDs” are still actually LCDs, but with an LED backlight.
Do LCD screens break easily?
They Are Breakable. Although they are designed to resist the rigors of daily use, the screens on our favorite mobile devices are actually very fragile. Most laptop and netbook Liquid Crystal Displays (LCDs) are less than ¼ inch thick.
What causes black lines on phone screen?
Watching your mobile screen with those white or black vertical/horizontal lines is annoying. In short, it's tough to use a phone with these lines appearing on the screen. Typically, this issue is associated with the LCD, caused by a faulty hardware component in your device due to some accidental fall or water damage.
What happens if the LCD is broken?
If you drop your phone and the screen is cracked or shattered, but the display is still lit up, you have probably only damaged the front screen. However, if you see lines, black spots or discolored areas, or the screen won't light up, your LCD screen is most likely damaged and will need to be repaired.
How can I fix the LCD line on my phone?
Remove the Case, Battery and SIM Card Put your device on a cold surface and leave it there for a couple of minutes. Then reinsert the SIM card and battery. If you're experiencing overheating issues, this will help your device cool down a bit.
Step 1: Tools Needed
This fix can be performed using a minimum of tools. You need only the tools necessary to disassemble the device (in this case only one screwdriver was necessary), a hot-air gun (a powerful hair dryer may work), and a pencil eraser.
Step 2: Disassembly
Disassemble the device to expose the LCD. Obviously, this step will vary by device. If you are having trouble getting your particular device apart, try Googleing "'yourdevicename' disassembly".
Step 3: Prep the Screen
Prepare the screen for repair by exposing the ribbon cable on the backside of the screen. In this phone, there is a plastic clip holding the LCD that must be temporarily removed. A plastic-coated paper clip is a handy for holding the LCD down while you work.
Step 4: Repair the Connections
Using LOW heat (you do not want to melt the ribbon or the solder on the board), slowly heat the ribbon cable where it is connected to the mainboard to soften the glue. At the same time, gently but firmly rub the connection strip with the pencil eraser. Tips: 1. Try to avoid directing too much hot air onto the LCD itself as this could damage it. 2.
Step 5: Results
With any luck, your results will be something like this. This repair, including disassembly, took approximately ten minutes to complete and the results are excellent; the screen is 100% functional again.
How to fix a scratched TV screen?
Open your repair kit and read the instructions. Usually, scratch repair kits require that you spray a solution onto the scratch and immediate area around it, then gently buff the scratch with a microfiber cloth.
How to fix scratches on a car?
Open your repair kit and read the instructions. Usually, scratch repair kits require that you spray a solution onto the scratch and immediate area around it, then gently buff the scratch with a microfiber cloth. ...
Can you repair a scratched LCD screen?
Although you can't repair a scratch in an actual LCD display, the screen covering it is sometimes repairable. If your phone, computer, or television has an LCD screen cover with a scratch, your repair options will vary, since scratches can range from barely noticeable to visually distracting. If your screen simply has a small scratch, you can ...
Can you use microfiber cloth to buff a TV screen?
Microfiber cloths, unlike paper towels or traditional napkins/cloths, won't scratch your screen during the buffing process. Power down your TV/phone/computer. Scratches should be easier to see when the screen is dark. Open your repair kit and read the instructions.
Step 3: Remove Back Cover
EN - By using a card (like a credit or a loyalty card) or a plastic spatula you can now unclip the front frame of the screen from the rear cover, by inserting the card into the thin slit on the edge of the screen
Step 4: Remove the Frame
EN - Once the front frame has been separated from the LCD panel, remove the small connector on the front (red circle) to be able to completely remove the frame
Step 5: Remove the Left Cover
EN - Press lightly in the direction of the arrow to release the left protective cover.
Step 6: Disconnect the Connectors
EN - Release the 4 small connectors on the left and see the next step to release the top video connector
Step 7: Remove Top Connector
EN - Press on both sides of the connector to release it. Be careful, fragile ! You can now separate the protective cover from the LCD panel.
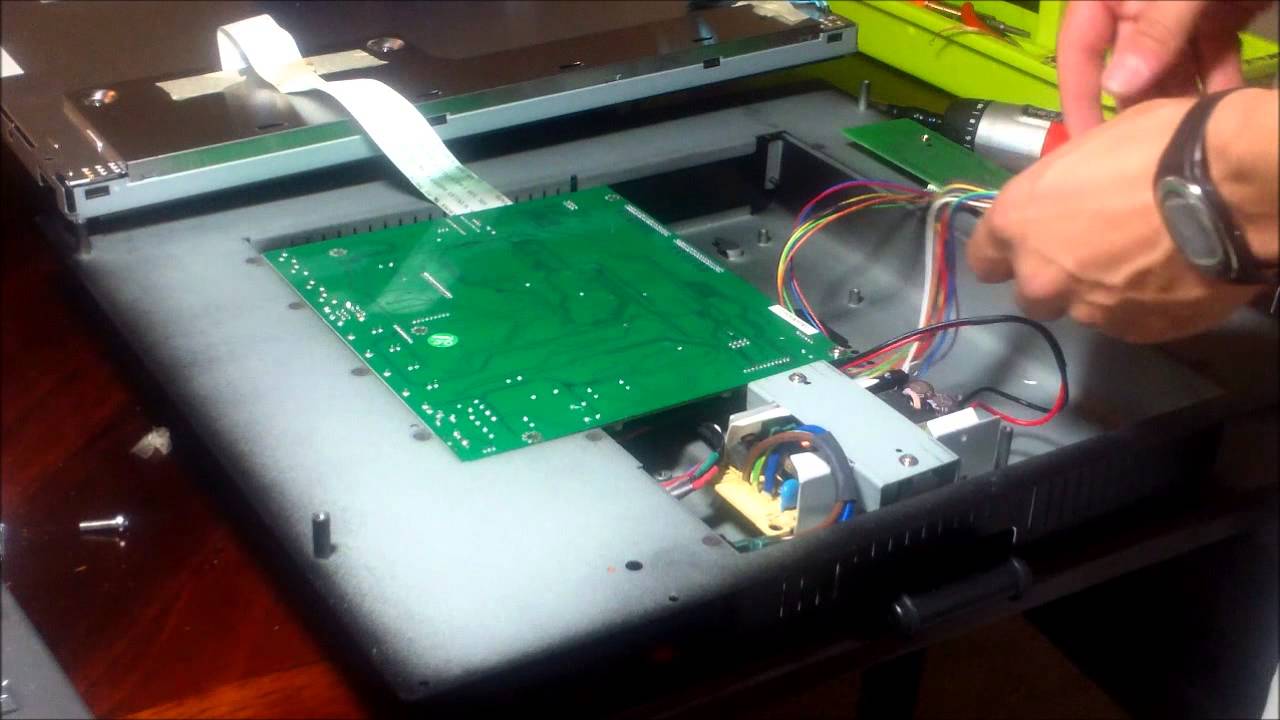
Step 8: Release the Power Board
EN - Once the protective cover is separated from the LCD panel you can turn it over to see the video card on the left and the power supply card on the right. Release the power board by removing the two screws and disconnecting connector A. In order to be able to take out the connector "A", you'll have to release the white hook of the connector.
Step 9: Recognise the Defect Capacitors
EN - The 3 capacitors Out Of Order (OOO) are in the 2 red circles. We recognize that they are OOO because they are bulging on the surface, with a slight line that looks like rust