
How to fix a blender motor?
- Check your blender with a volt-ohm meter with its RXI scale. Before that unplug the blender from the socket and turn the power switch on.
- Carefully detach the switch housing from the base housing by lifting the corners of decal or facing the surrounding cover of the pushbuttons.
- Now you need electrical contacts that happen to clean electrical devices. ...
How to fix a blender that won’t turn on?
Step 1: Remove the blender base and locate the fuse in the wire from the multispeed switch to the motor. Step 2: Disconnect the wire and use a continuity tester or multitester to check the fuse. If the circuit is open, the fuse is blown. Step 3: Replace the faulty in-line fuse with one of identical rating.
Why would a blender motor need to be replaced?
The most common reason to replace the motor is if the motor brushes are worn out. Blender seals can also be known as gaskets, O-rings, washers, or sealing rings. The seal is part of the blade assembly, and can cause motor problems by being torn or cracked and allowing liquid to get into the motor.
How to replace the drive shaft on a blender?
Step 1: Remove the base and turn the blender over. The other end of the drive shaft will protrude from the bottom side of the motor. Step 2: Grip the drive shaft with a wrench or pliers, then turn the blender on its side to attach a wrench to the drive stud. Step 3: Hold the drive shaft steady as you turn the drive stud clockwise.
How do you test the motor on a KitchenAid Blender?
To test a blender's motor: Step 1: Place a probe on each cord prong. Step 2: Select a speed-control button or turn the speed controller slightly, then read the resistance on the meter. Step 3: Next, rotate the drive stud clockwise one turn.
What causes a blender to stop working?
In most cases it is debris in the blades of the blender that causes jamming. Either try removing the debris or replace the coupling.
Why is my blender not blending?
Possible Solution There may be times when an air pocket is created around the blade, causing the ingredients to miss the blending blade. Unplug the power cord. Remove the Blender Jar from the base, and use a spatula to rearrange ingredients in the Blender Jar. Turn the Blender on to continue use.
What happens when a blender overheats?
Overworked Motor When the motor gets overworked, that's when overheating happens. If the stress has been happening for too long, then your motor may be completely broken. At this point, replacing broken blades, seals, or couplers won't stop the damage that's already been done.
Why does my blender smell like its burning?
Blenders with heavy use will have worn out brushes over time. The brushes will arc, resulting in a burning smell and possibly some smoke. The carbon brushes are used in electric motors to transfer electricity to the armature inside the motor. Brushes wear down over time and stop coming in contact with the armature.
Why is my blender spinning but not blending?
It is rotated by the drive stud, which blends or chops food within the jar. The most common problem is caused by the jar leaking liquids. The solution is to tighten the base. If this doesn't solve the problem, inspect and, if necessary, replace the gasket.
How do you lubricate a blender motor?
0:191:14Fixing Your Screeching And Smelly Blender (Quick Fix) - YouTubeYouTubeStart of suggested clipEnd of suggested clipSo it's it's just it's quite simple just put some I use some lubricate for my bike chain. And itMoreSo it's it's just it's quite simple just put some I use some lubricate for my bike chain. And it works perfectly and it's only almost rotated freely so it's it's good.
How do I stop my blender from overheating?
0:070:39Prevent Your Blender From Overheating - YouTubeYouTubeStart of suggested clipEnd of suggested clipBefore you begin using your blender ensure that you do not fill it past the maximum fill level whenMoreBefore you begin using your blender ensure that you do not fill it past the maximum fill level when you are using the blending. Function have it switched on for a maximum of three minutes at a time.
How long does a blender last?
How long do blenders last? In general, less-powerful blenders will last three to five years, while more expensive models with a powerful motor will last about 10 years. However, how often you use your blender will impact its lifespan.
How do you fix a hand blender that is overheating?
If the appliance overheats, it switches off automatically.Unplug the appliance and let it cool down for 10 minutes.Then put the mains plug back into the wall socket and switch the appliance on again.
Why is my blender so loud?
Blenders are loud because they have metal components and motors that work hard and spin fast to mix liquids and foods. Much of the noise a blender puts out is due to the motor working hard or the resistance between the metal blades and the food items in the blender.
Why does it smell like burning plastic?
The smell of burning plastic could be a sign of an overheated household appliance, a kitchen accident, or a problem with the HVAC system. Heaters and furnaces may smell of burnt plastic when their parts are broken or worn out.
Is it normal for smoke to come out of a blender?
Worn or Contaminated Blade Bearings The bearings on a Ninja blender's blade assembly operate under tremendous strain. They not only run at very high speeds but must endure the constant vibrations generated by blending. Over time they can become worn, and food can seep into them, causing them to produce smoke.
Introduction
The fix is needed when the motor is worn out and overheats when used. To replace the old motor for a new one a Philips screwdriver (2mm), Tri-head screwdriver (2mm) and a soldering iron are needed. Also, you will need a new motor.
Step 3
Unscrew the Tri-point screw (2mm) on the top to disassemble the top part of the casing.
Step 4
Unscrew the Phillips (2mm) connecting the middle part of the casing with the bottom part.
Step 5
Use force to twist the middle part from the bottom part of the casing OR use spudgers to wiggle open the product.
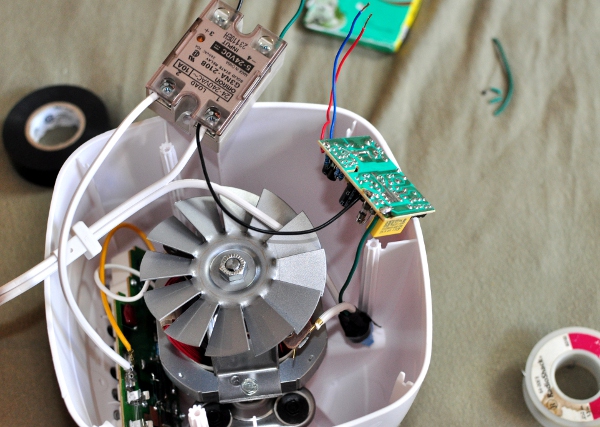
Step 7
With a soldering iron disconnect the wires coming from the motor from the PCB.
How to test a blender motor?
To test a blender's motor: Step 1: Place a probe on each cord prong. Step 2: Select a speed-control button or turn the speed controller slightly, then read the resistance on the meter. Step 3: Next, rotate the drive stud clockwise one turn. If the resistance reading (in ohms) changes, the motor needs service.
How to tighten a blender drive shaft?
To tighten the drive stud: Step 1: Remove the base and turn the blender over. The other end of the drive shaft will protrude from the bottom side of the motor. Step 2: Grip the drive shaft with a wrench or pliers, then turn the blender on its side to attach a wrench to the drive stud.
How to check if a fuse is working on a blender?
To determine if the fuse is working: Step 1: Remove the blender base and locate the fuse in the wire from the multispeed switch to the motor. Step 2: Disconnect the wire and use a continuity tester or multitester to check the fuse. If the circuit is open, the fuse is blown.
How does a multispeed switch work in a blender?
The multispeed switch in the blender sends current to the motor based on which control buttons are selected or how far the rheostat is turned. More current means a higher motor speed. Placing hard foods in the blender jar ...
Why does my blender burn out?
More current means a higher motor speed. Placing hard foods in the blender jar and trying to chop them with a low motor speed can cause the motor to burn out. Because the jar holds liquids, yet must be disassembled for cleaning, it has seals to keep liquids from escaping.
Why does my blender chop food?
A blender's blade assembly blends or chops food in the jar. The most common problem is caused by the jar leaking liquids. The solution is to tighten the base. If this doesn't solve the problem, inspect and, if necessary, replace the gasket.
What is the cross section of a blender?
The cross section of a blender. A food blender is a popular and useful kitchen appliance. Foods and liquids placed in it are blended or chopped based on the speed set by the operator. Today's food blender can chop ice, make peanut butter, grate cheese, and perform many other useful functions.
How to fix a blender that is leaking?
To fix blender leaking from the bottom, remove the gasket and clean it thoroughly after drying it place it tightly in its position and run the blender to check. Jam or overload gasket is another cause of black liquid. Check the blending jar bottom either it’s crack or not.
How does a blender work?
Blenders work with their blades linked to the motors. The link is a metal stud or coupling that attaches the blades with the motor . As long as these two are free to rotate there won’t be any problem. But over time the blender could be overloaded. Here is how you can fix your blender.
How to replace a jar coupling?
Hold the cap nut with taped pliers and start to replace the jar coupling. Now turn the coupling clockwise to and slowly remove it. If the condition indicated to replace the motor coupling, hold the motor shaft with pliers and unscrew it. After fining all the replacement or coupling units flow all these steps backward to assemble the blender.
How to check if blender is low?
Step 1. Check your blender with a volt-ohm meter with its RXI scale. Before that unplug the blender from the socket and turn the power switch on. Now the clip the clot-ohm meter probes to the plug prongs. Now press the speed switch of the blender, chances are you will see a low reading in it.
How to clean a motor blade?
Take an old toothbrush and scrub it carefully. After cleaning it with water dry it with a paper thoroughly and use some white grease to lubricate it. Your blade should spin by hand how without any trouble. If so, it’s ready to work again with the motor.
How to get the smell out of a blender?
Remove the bottom cover of the motor while unplugging the power cord from the socket. Take a thick dry cloth to make barricade putting it on the middle where the motor and you are standing. Plug it back, run it on high speed until the smell coming back. Now unplug the blender again and remove the towel.
Why does my motor coil smell?
There is much cause of the smoking smell. But mostly happen motor coil is wound at high speed on the machine a lubricant is added to the lacquered wire which could off-grass sort of stinks.
What are blender blades?
Blades. Blender blades can also be called cutter assemblies, blending assemblies, and agitator assemblies. The assembly consists of the blades, a bearing, and the sealing plate. The bearings in the blade assembly can become seized from liquid and food seeping through.
Why do blender couplers fail?
Couplers. Blender couplers, or couplings, come in a variety of shapes and materials. Most of the time they are made to fail in the event the blades get overloaded. Couplings can melt and then harden, if made from plastic, causing the motor to overload and result in a burning or electrical smell.
Why do blenders use carbon brushes?
The carbon brushes are used in electric motors to transfer electricity to the armature inside the motor. Brushes wear down over time and stop coming in contact with the armature. Make sure your blender is unplugged before replacing the brushes.
Why does my blender smell like it's burning?
The most common reason to replace the motor is if the motor brushes are worn out. The failure of other parts in your blender can cause the motor to fail as well, resulting in a burning or electrical smell. Other parts such as the seals can become torn, allowing liquid to seep through to the motor. Blending lots of ice can also cause ...
Why does my blender smell?
Motors. The failure of other parts in your blender can cause the motor to fail as well, resulting in a burning or electrical smell. Other parts such as the seals can become torn, allowing liquid to seep through to the motor. Blending lots of ice can also cause the blades to fail, resulting in an overworked, burnt-out motor.
What is an O-ring on a blender?
O-Rings. Blender seals can also be known as gaskets, O-rings, washers, or sealing rings. The seal is part of the blade assembly, and can cause motor problems by being torn or cracked and allowing liquid to get into the motor. To replace the seal ring, follow the instructions above for taking apart the blade assembly.
Where are the brushes on a blender?
Consult your owner manual to find out where the brushes are located in your model. They may be located behind spring-loaded brush caps, which can be unscrewed using a flat blade screwdriver. The brush should pop out fairly easily. There are two brushes, likely located on each side of the blender.
Step 1: Taking It Apart
Technically, the first step to repair was waiting for a while. There might have been a self-resetting safety mechanism inside the case, so I waited a few hours and then powered on the motor. Nothing happened, which gave me some confidence that there was an actual break somewhere.
Step 2: Examining and Testing Internal Components
With the top cover off, the first thing noticed was a small yellow block. Searching for the part number identified it as a capacitor. It didn't look to have any physical problems (distortion, holes, smoke stain) so I checked it with a meter and it looked OK. Time to push on.
Step 3: Accessing and Testing the Fuse
To get access to the fuse required removal of the switch. To remove the switch required access to two screws right inside the base of the casing. To get access to those screws required removal of the control knob. To remove the control knob, about four hands were required to bend and stress various plastic catches at the same time, which is why there is no photograph of that..
Step 4: Replace Fuse, Insulation and Case
After an afternoon of driving around, I sourced a replacement. Thank you Jaycar! (Other suppliers are available. They just don't carry 2A slow-blo)
