Fix a broken ceramic mug
- Gather the pieces of mug. Assemble all the pieces of the broken ceramic coffee mug. Place the prices aside. ...
- Set the broken mug. Put the main body of the ceramic coffee mug into a bucket of sand with the part that needs to be repaired pointed up.
- Clean out dust from the broken pieces. Brush all debris or dust out of the broken edges with a toothbrush or paintbrush.
- Make the epoxy solution. Make a solution with a small amount of epoxy and the same amount of hardener. Epoxy usually comes with a hardener.
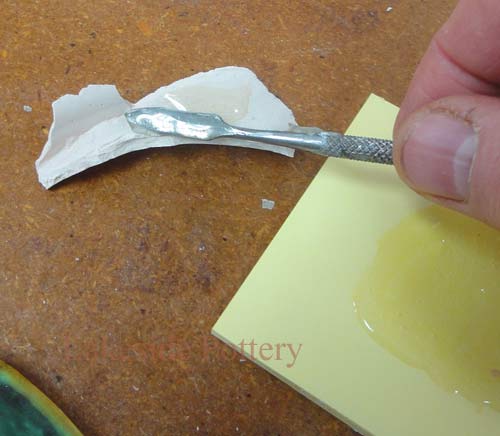
- Apply epoxy mixer on the main broken body. Apply the epoxy mixture to the edges of the break of the main body of the mug by using a ...
- Repair the mug. Set the broken piece into the main body of the ceramic mug and hold it at least 30 to 40 seconds. ...
- Let the epoxy mixer to dry completely. Find out a plain surface and place the mug on it. ...
How to repair a broken ceramic mug?
How To Repair A Cracked or broken Mug With Epoxy
- Mix up two-part epoxy as well for several minutes.
- Apply the mixed epoxy between bigger cracked or broken pieces carefully.
- Let the epoxy soak in for 3 to 5 minutes.
- Wipe off all the excess applied epoxy next to the crack before it dries.
How can I repair this cracked ceramic piece?
With the broken piece
- Lightly sand the surface to be glued using high grit sandpaper.
- Clean and dry the surface.
- Most epoxy glues feature a double-piston design to activate the glue. ...
- Mix the compounds using a popsicle stick or other disposable tool. ...
- Apply glue to both the back of the broken piece and the sink. ...
- Wipe away the excess. ...
How to repair broken ceramic?
The best way to Repair a broken ceramic mug
- Apply super glue into the crack. You are going to require a significant amount to maintain the mug from draining.
- Set the coffee cup into a saucepan and cover it with milk. Take to a boil, then let rumble for a couple of minutes.
- Use PVA (polyvinyl acetate), also known as white adhesive, to fix the crack. Put simply enough to pay the damage ultimately.
How to replace a cracked ceramic GE cooktop?
How to Replace a Cracked Ceramic GE Cooktop. Unplug your stove from the wall outlet if possible. Open the oven door to access the screws holding the ceramic cooktop to the stove. Remove the burners attached to the underside of the cracked cooktop. Remove the brace. Remove the screws holding the metal bracket to the front of the cracked cooktop.

Can a broken ceramic mug be fixed?
You need gap-filling adhesive/touch-up glaze, an emery board, and soap and water. Wash and dry chipped surfaces. Apply glue. Complying with the instructions in the product information, fill in chips or cracks and rebuild any lost material to protect the mug or object from further chipping.
What kind of glue should you use to fix a broken ceramic mug?
There are all types of glue, but the most common types for ceramic repair are super glue and epoxy. Super glue uses cyanide-derived cyanoacrylate to create a strong bond. This convenience product dries in seconds and, unlike epoxy, requires no mixing.
Can broken ceramic be repaired?
The first step to fix broken pottery or a ceramic object is by mending the pieces with two-part epoxy adhesive. With modern adhesives, fillers, paints and cold glaze, it's possible to perform seamless repairs to damaged ceramic and pottery objects.
How do you fix a chipped ceramic mug?
2:524:15How to fix chipped ceramic - YouTubeYouTubeStart of suggested clipEnd of suggested clipMix the epoxy. With the pastel. Dust working quickly use a toothpick or other fine tipped object toMoreMix the epoxy. With the pastel. Dust working quickly use a toothpick or other fine tipped object to fill in the gaps on the ceramic.
What is the strongest glue for ceramic?
If you have a project that requires gap bonding or filling, surface repairs or laminating, the best glue for porcelain or ceramic repairs will be an epoxy. An epoxy consists of two parts: resin and hardener. When mixed together, they produce a durable, high strength bond.
Is Gorilla Glue good for ceramics?
White Gorilla Glue is a 100% waterproof glue, safe for indoor and outdoor use and strong enough to stand up to the elements. The white glue easily bonds foam, wood, metal, ceramic, stone and much more!
Can you glue a mug back together?
When used correctly, quality ceramic glue can restore a broken piece to the point at which you cannot even see the damage. A good ceramic glue or epoxy in tandem with a clamp or duct tape to hold the pieces in place while they dry can be a winning combination.
Can you glue ceramic back together?
Place all the pieces of the broken item back together, making sure you have all the parts. Add ceramic glue in a thin layer on both sides of the broken ceramic. Press the glued pieces back together and hold in place to secure the bond, as per the manufacturer's instructions. Be careful not to move the pieces.
Can hot glue fix ceramic?
Hot Melt Glue for Ceramics - Easy to Use & Cost Effective Hot melt glue sticks are easy to use and cost-effective. Not all hot melt glue sticks are strong enough to take on the job of bonding ceramics. Make sure to find a glue stick that is specially formulated for difficult substrates like ceramic, metal, or glass.
Can a cracked mug be repaired?
When you fix a broken mug, you need to look for a glue that can bond those materials (probably ceramic or porcelain). A contact adhesive like Loctite Stik'n Seal Indoor Adhesive is ideal for fixing ceramic mugs and many other objects. If you are filling in a chip, reach for a gap-filling adhesive or a touch-up glaze.
Can a chipped mug be repaired?
1:316:44FIX CHIPPED MUG - YouTubeYouTubeStart of suggested clipEnd of suggested clipNow with the milliput. It comes in two parts. And you have to mix two parts together for it to toMoreNow with the milliput. It comes in two parts. And you have to mix two parts together for it to to then harden. So what we'll do. First is take say the two small pieces one piece like this. Now i tend
Can you fix a broken mug?
You'll need mild dish soap and water, a clean dry cloth, and a quality porcelain glue. Make sure the mug is clean and dry. Apply adhesive to the handle and the mug. Make sure the handle is lined up properly before gluing, then press the two parts firmly together.
Does super glue work on ceramic mugs?
Loctite Super Glue Liquid Universal is ideal for repairing ceramic. It's a strong, versatile adhesive which is also waterproof and dishwasher safe.
What glue is food safe?
Permabond food grade adhesives cure to a rigid solid which is non-porous for ease of cleaning, and are FDA compliant to FDA CFR 175.105 & 175.300. These epoxy adhesives offer excellent resistance to water, food, cleaning fluids and heat.
Can I use super glue on a mug?
Definitely do not use Super Glue or other cyanoacrylate adhesive for a repair like this. It doesn't fill gaps as well as two-part epoxy and isn't so resistant to sideways pull, an important factor for a cup handle. Question: I purchased a stained glass panel (approximately 16 by 32 inches) at a craft fair years ago.
Is super glue Food Safe?
While super glue works with most common materials, avoid using it with cotton, wool, or items that will be placed in a microwave, oven, or dishwasher. Remember that super glue is generally not food safe.
How to fix a broken coffee mug handle?
How to fix a broken handle on a coffee mug. Handle detached and broken into 3 pieces. If your coffee mug handle is broken into several pieces, each piece must be glued together before the final assembly. The steps are as follows: Make sure that the broken surfaces are all perfectly clean before gluing.
What to do if you break a surface before gluing?
Make sure that the broken surfaces are all perfectly clean before gluing. Even the tiniest impurity, a molecule of dirt, or a trace of old adhesive will prevent a perfect join. There is no more important step than making sure the broken edges are perfectly clean.
How to fix a leaky coffee pot?
To fix a stubborn leak use transparent DAP silicone adhesive which is microwave, dishwasher-safe and non-toxic. Squidge the DAP adhesive firmly into the crack from both sides, wipe off the excess, allow to dry overnight, and get ready for a stimulating cup of coffee.
How deep do you drill a hole in a mug?
The hole only need to be 3/16″ to 1/4″ deep to be effective. Inserting pins. In order to allow some leeway in case the holes are not exactly lined up, you can use a pin whittled down out of a bamboo or wooden toothpick to a diameter a little under 1/8″. Practice pinning the handle to the mug in a “dry run”.
What percentage of people say they have an emotional attachment to a mug?
Nearly 60 percent of people said in a survey by Heinz that they have an emotional attachment to a mug. More than 40 percent said their special kitchenware was “irreplaceable”, while about one third told researchers that they’d be “devastated” were their mug to break.
What is the best way to strengthen glued joints?
Method 2: using “biscuit” joints. Biscuit joints are used by woodworkers for strengthening glued joints. Use this equivalent method in ceramics if you would like an extra-strong joint. This method is optional and we recommend it for earthenware or low-fired pottery rather than vitreous bone china.
Can you use tape on a gilded handle?
If the join is “wobbly” and the handle does not seem to fit perfectly, or, simply for extra security, you can make sure the handle does not move by adding pressure-sensitive tape, (as always, do not use tape on a gilded surface (it may take off the gold)).
Step 1: Finding the Crack
Lookout closely for the crack on the ceramic mug. Don’t try to budge or separate the crack with your hand. If the crack appears to be too small or isn’t loosened, you might not have to repair it at all. If there appears a little space between the cracks, a repair is necessary as the edges can be even more pulled apart.
Step 2: Mixing the Epoxy Solution
The next step is to mix a little amount of epoxy with the same amount of hardener. To distribute an equal amount of both materials, a dual syringe applicator is applied. Pour the hardener and epoxy into a paper plate, a piece of cardboard can also be used instead of a paper plate. Mixing both these items thoroughly using a stick.
Step 3: Push the Cracked Edge
Now it is time to push the cracked edge a little wider. Use a razor blade into the crack to make it a little open. For this purpose, hold the blade tightly using your fingers and gently forth it straight down. The main purpose of this step is to open the crack to get the adhesive inside it.
Step 4: Applying the Epoxy Solution
You have already made the epoxy solution, it is time to apply the solution into the crack with a toothpick. To do this step, you need to work faster as you only have 3 to 4 minutes for completing it. If you take more time then the epoxy solution will start to cure.
Step 5: Wrapping the Cracked Area
You need to wrap the body of your ceramic mug with a rubber band. It will help to hold the edges of the crack together tightly. Clean up the excess epoxy from repair areas with a soft dry cloth. Try to avoid pushing the crack area when you are cleaning it.
Step 6: Dry the Epoxy Solution
You are done with the fixing process, now place the ceramic mug on a plain surface. Allow the coffee mug to sit until the applied epoxy is cured completely. It is time to remove the rubber band from the coffee mug, clean it and the mug is ready to use. This repaired mug can be easily used on the best mug warmers and it will not break its integrity.
Step 1: Gather the Mug Pieces
The first step is to gather and assemble all the pieces of the broken ceramic coffee mug. Place all the pieces safely aside. It is better not to pick up the sharpen pieces of the ceramic mug with empty hands. Always use hand gloves for picking up the sharpened broken pieces.
How To Fix A Cracked Ceramic Coffee Mug?
Fixing cracks on ceramic mugs are less complex than repairing broken ones. Most of the things you need are available in your home. Here is a step-by-step guideline to help you.
How To Fix A Broken Ceramic Mug?
Fixing a cracked ceramic mug is one thing. But fixing a broken mug requires a different level of skill and patience. Lucky for you, there is an easy solution for that as well.
How To Fix A Cracked Mug With Milk?
I know it sounds unbelievable. But using milk does work for fixing hairline cracks on ceramic mugs.
How To Repair A Cracked Or Broken Mug With Super Glue?
Cyanoacrylate glue or super glue or crazy glue, whatever you call it, is suitable for quick ceramic crack repair. Here is how you can fix a cracked or broken ceramic mug with this glue:
Advice For Repairing Chipped Ceramic Mug (Tips & Tricks)
Knowing how to fix ceramic mug will help you get the job done. But nothing beats the feeling of repairing a cracked and broken piece like a pro. Check out the following tips and tricks to do the job better.
Frequently Asked Questions
There is hardly any proof of milk fixing bigger ceramic cracks. If it is a hairline crack, milk is reliable to repair it. However, it would be best if you use glue to repair such cracks.
Final Words
Fixing a cracked or broken ceramic mug does not require rocket science. If you do some necessary research, you will know how to fix ceramic mug at home without going through a lot of hassles.
Repair chipped ceramic coffee mug
Chipping occurs in most mugs due to mishandling sometimes. If you have a small chip on one specific area of your mug, don’t fret – here’s an easy way to fix it:
Repair broken mug
Do you have a broken mug at home or work? Here’s an easy way to repair your mug with a couple of tools and procedures.
How to fix a broken mug handle
There will be a time when the mug handle is the one that’s broken. So, with nothing to hold your hot drink, how do you fix a broken mug handle? Here’s the procedure:
Can you fix a broken cup with milk?
You might find the idea of milk as a mug fixing ingredient a little weird, but is it possible? In this section, we’ll learn more about this method.
How to Repair a Cracked Mug with Epoxy
If your mug has a ton of cracks and is deemed dangerous to use or to drink from, they are still repairable with certain procedures. Here’s how you can repair your cracked mug with epoxy:
How to Repair a Cracked Mug with Cyanoacrylate Glue
If you are looking for a durable repaired mug, a great way to piece it together is to use cyanoacrylate glue, which is stronger than most epoxies out there. Gorilla glue is a common brand of this type of glue that most people use.
How to fix a ceramic mug handle?
If you are fixing a ceramic mug handle, let the bonds sit a while after you have glued all the pieces together. This gives the handle time to stabilize. Keep everything in place. You don’t want pieces moving around, so if some of them are unstable, hold them in place with masking tape until the bonds set. Clean-up.
How to fix broken ceramics?
Gather your materials. You need the right adhesive, a paper towel or rag, soap, and water. Stay safe.
How to dry fit a ceramic vase?
In other words, recreate the figurine or vessel (as much as possible) without gluing the pieces into place. Glue ceramic back together. Apply adhesive to adjoining surfaces and hold them in place according to the product information.
Is Loctite Superglue microwave safe?
If so, your product must be food safe, dishwasher safe, and/or microwave safe. For example, Loctite Super Glue Ultra Gel Control is ideal for repairing ceramic figurines, but it is not suitable for items that hold hot liquids. Therefore, that adhesive is great for keepsake figurines but not for your favorite mug.
Can you use loctite seal on ceramic mugs?
Therefore, that adhesive is great for keepsake figurines but not for your favorite mug. Loctite Stik’n Seal Indoor Adhesive is recommended for use on ceramic mugs.
How to fix a cracked ceramic mug?
Step 1: Observe the Affected Area (Crack) Hold the ceramic mug in your hands and give it a close look to determine its condition. If you find the crack tight enough or it appears like merely a scratch, don’t push it hard or never try to separate it.
How to fix a chipped mug?
Nail polish might not be the most effective solution but it can be the quickest fix to smoothen the edges of your chipped mug. Grab a good quality clear nail polish and paint the chipped area of the mug with it. Nail polish levels the sharp rims or edges of the mug.
How to use cyanoacrylate glue on mugs?
Now, take a look at how to use Cyanoacrylate Glue on cracked mugs: Spread the glue over the cracked pieces. Be sure you get enough glue to get soaked into the crack. Leave it for three to five seconds to dry and remove the excess glue with a cotton pad (be quick so that it does not dry)
How to put adhesive in crack?
To put the adhesive into the crack, you have to create little room in the tight space. Here, you will use the razor blade. Sincerely thrust the edges of the crack by your hand and place the raz or blade into it. Move it back and forth to create a space for the Epoxy mixture.
Is mug glue harmful?
The added heat can level up the toxicity and mugs fixed with this glue can turn harmful to human health. If you intend to use the mug or ceramic piece for any other purpose except drinking from it, you can go for this glue. It gives a more defined and polished result than most of the glues in the market.
Is it safe to drink from a ceramic mug?
Ceramic mugs are painted with a substance that contains lead thus drinking from a ceramic mug that is chipped inside can be dangerous. If the mug is chipped from outside, it is relatively safe unless you don’t cut your lips. 2.