- Breaking the ceramic tile. The steps of repairing the tiles are the same, even on the wall or the floor. ...
- Wear protection while breaking the tile. Ceramic is a brittle material. When you hit ceramic tiles with the hammer, small pieces go flying. ...
- Break the grout, repair ceramic tiles. When you remove the entire tile along with scratches, it’s time to remove grout underneath. Break the grout and take it out.
- Removal of old adhesion, repair cracked ceramic tile. A cold chisel I used to remove old adhesive. ...
- Installing the adhesion to repair ceramic tiles. The next step comes of installing the new tile. For this, we spread adhesion on the surface equally.
- Application of mortar, repair broken ceramic tiles. We spread mortar on the surface of the floor or wall. We should remember to spread the mortar equally on all surfaces.
- Setting the ceramic tile properly. Now it comes to setting up the tile on the surface. ...
- Leave it dry. Adhesive will take some time to dry. Usually, it takes 2-3 hours to completely dry. ...
- Applying grout again to repair ceramic tiles. Once all the adhesion applied is dry, we will re-grout the ceramic tile. ...
- Leave the grout to dry. Setting time for grout is different for sanded grout and un-sanded grout. Generally, we give 10-15 minutes to grout to set completely on ceramic.
- Super glue uses cyanide-derived cyanoacrylate to create a strong bond. ...
- Epoxies include a hardener and a resin that, when mixed, provide a strong bond that's ideal for ceramics.
How to repaint ceramics?
To spray paint ceramic:
- Start by spraying the primer on it. ...
- Once your primer is done, grab your spray paint and aim at your ceramic piece from about an 8-inch distance.
- Then, lightly coat it with the paint by moving in a sweeping motion.
- Take a break for 5 minutes before spraying another coat.
- Repeat that process until you’re satisfied with how coated the ceramic piece is.
How do you repair a crack in a ceramic sink?
Part 3 of 3: Filling in Chips and Cracks Download Article
- Use the kit’s brush to apply a thin coat of epoxy to hairline cracks. Dip the tip of the brush into the tray to cover it in epoxy.
- Push epoxy into deeper gouges and chips. Use the tip of the repair kit’s brush or a toothpick to scoop up a dab of epoxy.
- Wait 45 minutes for the first coat of epoxy to set. ...
How to fix ceramic mug properly?
How to Fix a Broken Ceramic Mug?
- Gather the Mug Pieces. The first step is to gather and assemble all the pieces of the broken ceramic coffee mug. ...
- Setting Up the Broken Mug. Put the main body of the ceramic coffee mug into a bucket of sand. ...
- Epoxy Solution. Make an epoxy solution using equal amounts of epoxy and hardener. ...
- Applying the Epoxy Mixer. ...
- Repairing the Mug. ...
- Make it Dry. ...
How to repair a chip in a ceramic cooktop?
How to Repair a Ceramic Glass Cooktop
- Dampen a cloth with denatured alcohol and rub it over the cooktop surface to remove grease and other buildup.
- Rub the damaged area gently with the fine-grit sandpaper. ...
- Combine the filler paste and hardener in the container, using the spatula. ...
- Smooth the compound into the crack with the popsicle stick. ...
What is the best glue for repairing ceramics?
If you have a project that requires gap bonding or filling, surface repairs or laminating, the best glue for porcelain or ceramic repairs will be an epoxy. An epoxy consists of two parts: resin and hardener. When mixed together, they produce a durable, high strength bond.
How do you repair cracked ceramics?
Mix a 2-part epoxy adhesive to fill cracks and reattach broken pieces. Squeeze the epoxy onto a non-porous disposable surface, like a thin sheet of plastic, and use a wooden or plastic stick to mix together the 2 components as quickly as possible. It'll start to harden after 3 to 4 minutes, so you need to work fast.
How do you repair a ceramic surface?
Cementing Ceramic Broken Pieces Mix epoxy well with a pin tool, paper clip or a wooden stick. Quickly join the pieces together while applying light pressure to squeeze extra epoxy out. You only have about 60–90 seconds from start of epoxy mixing to placement before the epoxy becomes gummy and unworkable.
Can Gorilla Glue fix ceramic?
Option Two: GORILLA Two-Part Epoxy Syringe An adhesive that comes in two components, be it ceramic glue, porcelain glue, or glue for metals, is needed for the most optimal results for your ceramic repair. 2-K Epoxy is the best option for this.
Does epoxy work on ceramic?
Epoxies include a hardener and a resin that, when mixed, provide a strong bond that's ideal for ceramics. While a little extra effort is required to prepare, and drying times are longer, epoxy is more durable than super glue, so it's the better choice for fixing items that get a lot of handling.
Can you glue ceramic back together?
Place all the pieces of the broken item back together, making sure you have all the parts. Add ceramic glue in a thin layer on both sides of the broken ceramic. Press the glued pieces back together and hold in place to secure the bond, as per the manufacturer's instructions. Be careful not to move the pieces.
Can you repair chipped ceramic?
0:144:14How to fix chipped ceramic - YouTubeYouTubeStart of suggested clipEnd of suggested clipFavorite we can fix this ceramic mug with epoxy.MoreFavorite we can fix this ceramic mug with epoxy.
How do you repair a ceramic plate?
0:021:17The Best Trick for Fixing Broken Ceramic - YouTubeYouTubeStart of suggested clipEnd of suggested clipThe thicker glue you'll want to use you'll also want to use the thicker glues on plastics. Now thisMoreThe thicker glue you'll want to use you'll also want to use the thicker glues on plastics. Now this particular one that i'm using takes about 10 to 15 seconds to set up.
Can you fix a chipped ceramic mug?
A contact adhesive like Loctite Stik'n Seal Indoor Adhesive is ideal for fixing ceramic mugs and many other objects. If you are filling in a chip, reach for a gap-filling adhesive or a touch-up glaze. Your glue must be food safe since it will come into contact with drinks or food.
Can you fix ceramic with super glue?
Loctite Super Glue Liquid Universal is ideal for repairing ceramic. It's a strong, versatile adhesive which is also waterproof and dishwasher safe. Perfect for fixing a broken plate!
Is Loctite good for ceramic?
The best glue for broken ceramics The ideal glue for fixing broken ceramic is Loctite Super Glue Liquid Precision. This high-strength super glue forms strong and transparent bonds, which means that all repairs, however big or small, are barely noticeable and will last for a long time.
Influences
As a graduate student, I was getting frustrated with frequent cracks appearing in my sculptural work. I went to my professor Chris Boger, a beloved mentor and figurative artist. I said, “Chris, am I terrible at clay? Am I the only person who has this problem?” And she said, “Heck no, all of us figure people repair stuff.
Favorite Part of the Process
My favorite repair techniques are to use Bray Patch ( www.archiebrayclay.com/bray-patch) slip for a pre-firing fix (bisque, glaze, or refiring), and various epoxies for a post-firing fix. The Bray Patch slip is amazing because it can be used on bone-dry, bisqued, and even glaze-fired pieces if you glaze over and re-fire it.
Techniques
I do a lot of sgraffito illustration and other complicated surface work with underglazes on my pieces at the leather-hard stage. Because of that, matching a mend to the existing complex surface presents a challenge. I always try to get a perfect mend in at the earliest possible stage.
Influences
For a long time, I had a bias against repaired ceramics. I grew up learning about ceramics in a world of potters and I suppose I adopted their feelings about cracks and breakage. When something breaks, such as a ceramic mug, it becomes a second or it becomes garbage.
Favorite Part of the Process
I use a combination of accelerated cyanoacrylate glue (super glue), two-part liquid epoxy, and epoxy putty for most of my post-fired cold welds.
Techniques
My ceramic surfaces, by design, are intended to have an aged, antiqued, and weathered allure to them. I often find that the repairs I make easily camouflage within my work, both aesthetically and conceptually. Sometimes trying to hide and disguise the repair takes away from the authenticity.
Mentors
I feel truly lucky to have an extremely supportive family. From my earliest inclinations of wanting to pursue a career in the arts, my family has always been there to encourage me. I have been mentored by some incredible people over the years.
What to wear when breaking ceramic tile?
Wear protection while breaking the tile. Ceramic is a brittle material. When you hit ceramic tiles with the hammer, small pieces go flying. They can even hit your eyes and face. So, it is better to cover the face and wear protective goggles.
How long does it take for grout to set on ceramic tile?
Leave the grout to dry. Setting time for grout is different for sanded grout and un-sanded grout. Generally, we give 10-15 minutes to grout to set completely on ceramic. After this, we wipe down the entire surface using a sponge. A damp grout sponge is used to clean the whole surface.
How long does it take for a tile to dry?
Adhesive will take some time to dry. Usually, it takes 2-3 hours to completely dry. You can use a fan to speed up the drying process, but air dry is the favorite method of all the time. You will move to the next step when the ceramic tile and its adhesion are completely dry.
Can you use a chisel to break ceramic tiles?
However, please don’t use an excess of force as it can break the other good tiles as well. So, it is better to use light force. You can also use a chisel for this process. Use a chisel with care because chisel is a tough material. If you try using the chisel harshly, all the nearby ceramic tiles will be affected.
Is ceramic tile brittle?
Ceramic tiles are brittle and durables. They are widely used in floor coverings, as they are tough material. They are multi-functional and give a unique look upon installing. As they are brittle, so they can be cracked. This causes trouble as they need to be repaired or replaced immediately.
How to repair chipped ceramic?
Mix pastels to repair chipped ceramic. Once you have your colors on your palate, put a dab of the epoxy in the center of the palate. Mix the epoxy together thoroughly. Add a little bit at a time to each color mixture. Blend colors together making sure pastel oils are blended smoothly without any particles left.
How to fix a dish with epoxy?
Place dishes in order to be repaired. Scrape colors onto a mixing tray (plastic lid in example) Open epoxy and squeeze equal parts on middle of tray and together thoroughly. Put small dabs of epoxy on each color being mixed. Mix one color at a time using separate toothpicks for each mixture.
How long does it take to mix epoxy?
Mix one color at a time using separate toothpicks for each mixture. Epoxy has about a 5-10 minute working time before it sets up. It starts to harden and becomes more difficult to work with it. Apply color to chipped area. Some chips are deeper and will need a second application.
How long does it take for epoxy to dry?
If so, allow each coat to dry before applying addition coat. Although the epoxy dries in 10 minutes, allow it to harden (cure) overnight. If it is still tacky to the touch after several hours, it is because the equal parts of epoxy were not mixed thoroughly. The process will have to be re-applied.
Why does epoxy need to be remixed?
Some colors need remixing to get a better match. Epoxy needs to be remixed because in hasn’t dried completely. Epoxy gets on other areas and be sticky due to handling.
Can you repair a chip on a cup?
Here is a simple solution that can hide some of the damage.If there is a chip on the inside center of a dish or on the rim of a drinking cup, it wouldn’t be a good candidate for repair. You have to consider the direct contact with the mouth, food, and the extra daily wear of the dish being repaired. However, most chips on plates are found on the ...
Mix up the epoxy
So now we’re going to proceed, now we’re going to mix up a little bit of our epoxy. And we’ve already tested a few of these pieces. Then we’re going to start with a few pieces that we think we can put in first and see how it moves along. Read more, ceramic sink repair. Step one is to make some epoxy.
Start with small pieces
So we’re gonna start with small pieces, that to do your epoxy, typically wood epoxies, you take equal parts of both bottles. So we’re going to do that here. That’s about two equal parts of the two colors, we’ll take a small stake, we’re using a little mode, popsicle stick, which is part of alcohol, we won’t small stakes here.
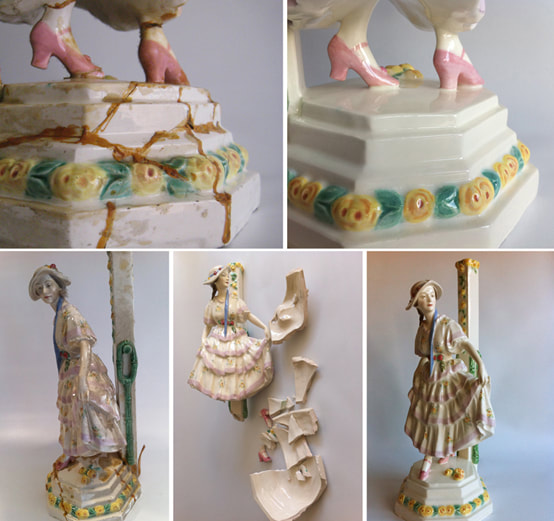
Collect those broken pieces and prepare them
Alright, now what we’re going to do, we’re not gonna start with a little figurine yet, we’re gonna start with this piece right here because we’ve determined that this piece right here goes right there. And because of the way they’re gonna have to fit back together, if I put the big piece in first, I may not be able to get this piece in.
Remix the epoxy glue for the final step
At this point, we’ve taken our time and glued a couple of small pieces into the larger pieces before we tried to put the larger pieces into the little figurine. And so now we’re going to take our epoxy, we’re going to mix up some more to make our final gluing of the larger pieces into the main part of the statue.
How epoxy sit
One thing we did notice was these epoxies supposed to set in five minutes, it’s taken a little longer than that. I don’t know if it’s a little bit cooler temperatures or humidity or whatever. But it is taken longer to sit in, and the five minutes is supposed to sit. But it’s probably just our conditions or something.
Apply glue on broken pieces
But anyway, we’re gonna proceed here, with a little glue down to their little bit over here, I know it makes up a lot more than I’m going to need. Read more, ceramic neti pot. But I don’t want to run out, run inside there. But the top piece and first set it in place. Mo, get some more glue. And we’ll do the same thing on the bottom.
Place the pieces back on the figurine
Alright, that should give us enough glue. And like I said, I’ve already glued a couple of little pieces that we had broken charge to this piece. And I want to the upper piece. Now that should fit in there. And there we go. And fitting together pretty well.
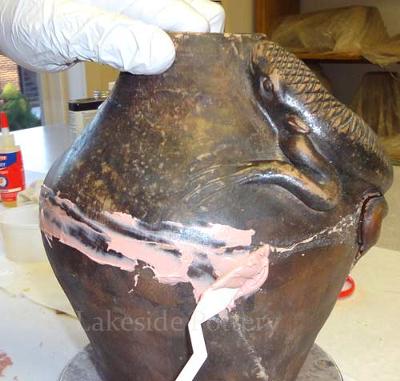
How to repair broken pottery?
The first step to fix broken pottery or a ceramic object is by mending the pieces with two-part epoxy adhesive. With modern adhesives, fillers, paints and cold glaze, it's possible to perform seamless repairs to damaged ceramic and pottery objects.
How to match broken pieces?
We use PVC pebbles. "Dry run" proper matching of broken pieces. Place the larger broken part in the pebbles (rice or sand) so that gravity will hold the top piece in place.
What temperature do you heat epoxy to?
Note: When mending more porous materials such Terra Cotta, stone or plaster, epoxy is required to be placed on both sides and heating the surface to 100 or more degree F prior to the epoxy application that will improve bonding (but will also reduce workability and cure time!!
How long does epoxy cure?
Allow filler epoxy to cure for 12 hours or more at a temperature of 75 degrees F or warmer. We place our filled projects in a 140 degrees F oven over night.
What is Lakeside Pottery?
About: Lakeside Pottery, a nationally recognized Ceramic and Sculpture Repair and Restoration studio, established in 2001 as a ceramic art and pottery teaching facility. We are also craft Kintsugi / Kintsukuroi Japan… More About lakesidepottery »
Is ceramic restoration food safe?
IMPORTANT: Ceramic restoration materials are not food safe, liquid or heat proof (over 190 degree F) and repaired items should not be used on cooking or food serving ware more... Ask Question.