Fixing a Laptop Charging Cable
- Slice Off the Old Sheath. Unplug the charger! Slice away the old rubber sheath. ...
- Slide Things on for Future Use. You will need the magnet on the wire as well as the large pieces of heat shrink tubing on the cord for ...
- Figure Out Which Wire Goes Where. On my connector the negative is the outer part of the connector and the center is the positive. ...
- Solder the Connections. In the fist picture below the outer part is still connected, but I cut away the tubing i had installed before.
- Test Plug in Laptop. Plug everything in and see if the charging light turns on. It should work now. ...
- Build the Connector. Slide up the other tubes one at at time and shrink them in place. ...
- Install the Magnet. I don't really know what the magnet is for, but the manufacturer thought it was important enough to put it on, so I did too.
- Finished! The connector is ready to use! Give it a try. It looked way better with black tubing, but I didn't have any more.
Full Answer
How to strengthen a charging cable?
Why do phone chargers break so easily?
- Unlike other devices, you tend to move and use your phone more often than other electrical devices. This puts stress and strain on cables, increasing their chances of getting damaged.
- Phone charger cables are relatively small and thin. ...
- You tend to carry phone charger cables around a lot more than other cables. ...
How do you fix a charging cord?
- If your iPhone won't charge, make sure to check the cable, lightning port, and AC adapter.
- You can also try restarting your iPhone, updating the software, or restoring it.
- If your iPhone stops charging at 80%, it's because of the Optimized Battery Charging feature.
- Visit Insider's Tech Reference library for more stories.
How do I fix a loose charging port?
- Remove the back cover, SIM card and microSD card
- Remove the battery
- Unscrew the midframe and disconnect various cables and screws
How does a fake charging cable affect your phone?
- The cable might be easily damaged
- The connector end might fall off, get very hot, or might not fit properly into your device
- You might not be able to sync or charge your device

Can a charger cable be repaired?
You can fix a broken charger by applying electrical tape to frayed portions of the cord, restarting your devices, and more.
How do I fix my charging cable?
0:241:43How to fix fraying cables / charging cords - 5 diy methods - YouTubeYouTubeStart of suggested clipEnd of suggested clipShrink tube amazing how it shrinks when heated. Find the right size and place over the broken partMoreShrink tube amazing how it shrinks when heated. Find the right size and place over the broken part heat with the hairdryer or a lighter until the tube shrinks.
Why charging cables stop working?
Usually, USB cables stop working when they've been physically damaged (internal wires get bent or broken). Cheaper cables are made of lower-quality materials and aren't as reliable or safe (especially for charging). If your cable breaks, you can repair it, but it's far easier to replace it.
Can USB cable be repaired?
If one of your cables begins to break, you can repair it using Sugru. Sugru – a mouldable glue formula – turns into rubber so your cable will last much longer and will prevent further breakages. Repairing a USB cable in place of buying a new one, is an inexpensive alternative to prolonging the life cycle of your cable.
Can I put tape on my charger?
You can fix a broken charger by applying electrical tape to frayed portions of the cord, restarting your devices, and more. Your charger may not be connected properly or it might be too dirty to make the connection. But it may also be because the power source, rather than the charger, isn't functioning.
How can I charge my phone without a charger?
All of these methods require either a charging cable that's compatible with your iPhone or Android device or a wireless charging pad.Use a USB Port to Charge Your Phone.Charge Your Phone With a Battery Pack.Hand-Crank Chargers for Emergency Phone Charges.Use an Eco-Friendly Solar-Powered Charger.More items...•
How long do charging cables last?
On average, an iPhone charger lasts one year in perfect working condition. After one year or so, the cable part near the port starts fraying. In extreme cases, the cable sheath may expose the conductors inside. And that's when using that cable becomes dangerous.
Why is my phone not charging even when plugged?
Test your Android's wall adapter If there's nothing wrong with the cable, the charger could still be the problem. Look at the wall adapter and make sure the cable is plugged totally into the port. If that's not the issue, next inspect it and make sure nothing is stuck inside and that none of the pieces are bent.
How do you fix a split USB cable?
1:423:07How to Repair a Severely Damaged USB Cable - YouTubeYouTubeStart of suggested clipEnd of suggested clipUse a heat gun to shrink the shrink tubing around the connections. Then reconnect the shield withMoreUse a heat gun to shrink the shrink tubing around the connections. Then reconnect the shield with some solder.
How do you repair damaged cable insulation?
The most professional repair for wire insulation involves heat shrink tubing. As long as you can disconnect one end of the wire, you can simply slip a piece of tube over the wire, reconnect the other end, and then apply a heat to the tube with a heat gun or even a common hair dryer.
What do I do if my charger pin is loose?
0:232:31How to Fix a Loose USB Cable / Phone Charger Port - YouTubeYouTubeStart of suggested clipEnd of suggested clipThe way to sort it is to take a paper clip. You need to be very very careful when you're doing thisMoreThe way to sort it is to take a paper clip. You need to be very very careful when you're doing this obviously I accept absolutely no liability whatsoever for any circumstances.
How do you fix a loose USB C cable?
0:315:04Fix loose and non charging USB C port with this simple guide! - YouTubeYouTubeStart of suggested clipEnd of suggested clipIt's like I took it up here it's kind of like the letter O right and the part that is the actualMoreIt's like I took it up here it's kind of like the letter O right and the part that is the actual letter is a part you can touch the rest is card so to get in these thin ports.
How do you fix a broken android charger cord?
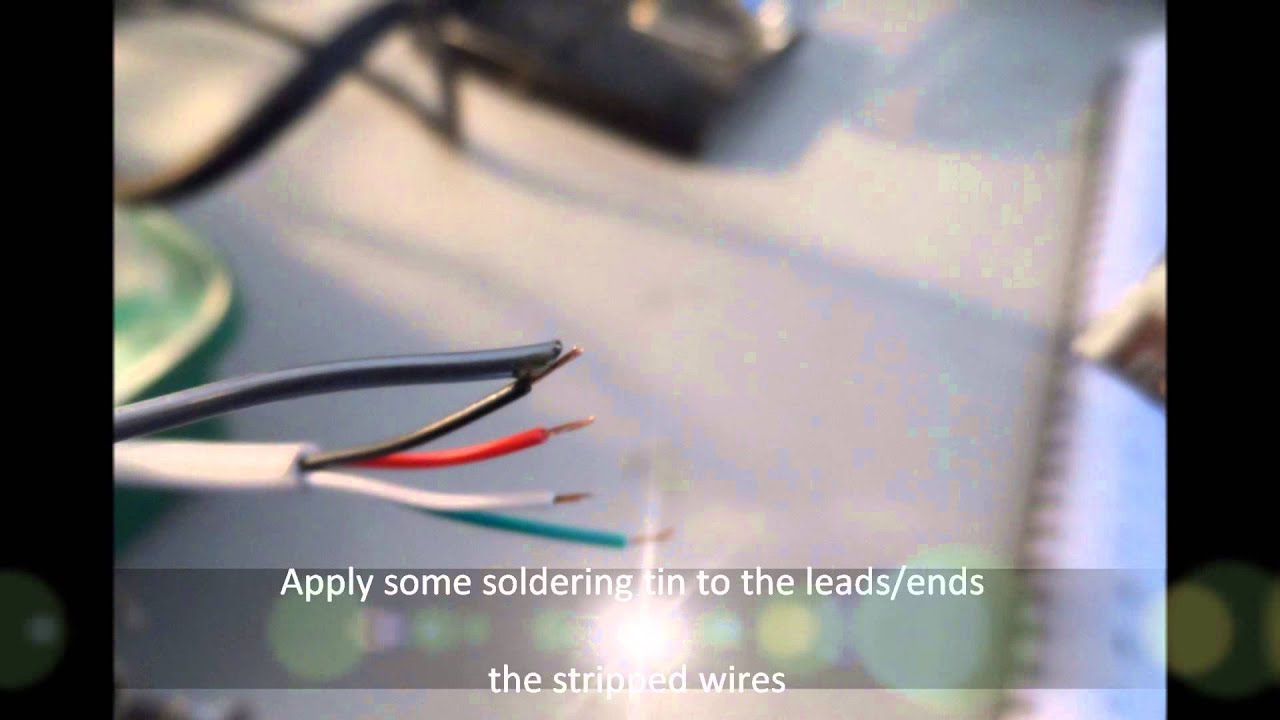
Remove the outer sheath. Remove damaged parts of wires and align the length for easier connection. Remove around 2mm of insulation from both sides of the cable. Connect the wires again.
How to Fix a Broken iPhone Charger
Replacing your iPhone’s charging cable with another officially-branded Lightning Cable is an expensive endeavor. By fixing the cable, you have the chance to save yourself a few dollars while extending the life of your product.
How to Fix a Broken Android Charger
While Android charging cables are more generic than Apple’s Lightning Cables, they operate similarly. As such, some of the fixes described above will work for an Android cable too. For example, the electrical tape and heat shrink tubing solutions are just as effective for Android cables.
Complete the Fix
Whether you fix your charger cable or not may depend on the extent of the work you need to put into the task. If you can fix the cable using electrical tape or heat sink tubing, you achieve an inexpensive and timely fix that may extend the cable’s life by several months.
How to fix a broken charger?
Start with putting the glue into one of the halves of the cover. Then press the charger in and hold firmly for 30 seconds or until connected. Repeat with the other half. Add glue on to the outside where you may see some cracks just to hold everything more firmly.
Is it bad to have a frayed charger?
Not only is it annoying to have a frayed charger, but it can also be dangerous. In this Instructable, I will show you 3 ways to fix or protect a broken charger. Let's get started!
Step 1: Slice Off the Old Sheath
Unplug the charger! Slice away the old rubber sheath. Underneath there is the metal plug, and it should have 2 wires soldered to it. One is the center of the wire from the charger, and the other is a short one that connects to the metal strands from the outer part of the charger.
Step 2: Slide Things on for Future Use
You will need the magnet on the wire as well as the large pieces of heat shrink tubing on the cord for later. Slide the magnet first, then the heat shrink tubing.
Step 3: Figure Out Which Wire Goes Where
On my connector the negative is the outer part of the connector and the center is the positive. In the cable the negative is the sheath of strands, and the middle wire is the positive. I think both are normal. There is a diagram on the transformer box as well, pictured below. You can use a multimeter to insure you have the wires correct.
Step 4: Solder the Connections
In the fist picture below the outer part is still connected, but I cut away the tubing i had installed before. Slide the new tubing onto the wire, and solder them in.
Step 5: Test Plug in Laptop
Plug everything in and see if the charging light turns on. It should work now. If it does, leave it plugged in and slide the first piece of large tubing down the cord and line it up with the computer. The metal on the plug sticks way out, so it is good to do this while plugged in.
Step 6: Build the Connector
Slide up the other tubes one at at time and shrink them in place. The tube gets tight and hard when it shrinks, so it holds the wires in place, and makes your new connector resist bending and breaking. Below is my connector with all 5 large tubes shrunk on. It feels pretty solid.
Step 7: Install the Magnet
I don't really know what the magnet is for, but the manufacturer thought it was important enough to put it on, so I did too. I slid it to about the location in was before and zip tied it tightly in place with the two zip ties.
