
How to Repair a Cracked Coolant Reservoir.
- Step 1 - Remove Coolant. Using your siphon hose and bucket, the first thing you will need to do is siphon all coolant out of the reservoir itself.
- Step 2 - Find Leak.
- Step 3 - Release Pressure.
- Step 4 - Remove Overflow Tube.
- Step 5 - Remove Coolant Reservoir.

How do I replace coolant reservoir?
Part 2 of 3: Remove and replace the coolant reservoir
- Combination wrench set and extensions
- Coolant collection pan
- Flat head screwdriver
- Funnel
- Locking pliers
- New coolant
- Replacement coolant reservoir and clips
- Safety equipment including safety glasses and gloves
- Socket wrench set
- WD-40 or other penetrating oil
How can I Clean my coolant reservoir?
best thing to clean INSIDE of coolant recovery tank?
- Spaceman Spiff. Doing the water pump and all hoses saturday, core has already been flushed. ...
- jayoldschool. Ice. ...
- KW Baraka. Click to expand... ...
- Mr pogo. I removed mine and let a solution of CLR soak in it for awhile. ...
- 96SSbbb. ...
- Corralez96ss. ...
- JOHNER. ...
- Eracer. ...
- 1slow96. ...
- Eracer. ...
What if I put too much coolant in the reservoir?
What Happens When There Is Too Much Antifreeze In Overflow Tank?
- Pressure Build Up When there is too much antifreeze in overflow tank, there won’t be much space left for the heated coolant to expand. ...
- Damage To The Stray Animals And The Environment In general cases, the excess of coolant when the coolant reservoir tank is overfilled goes out through the overflow hose. ...
- The Electric Damage
How to replace a coolant reservoir?
Procedure
- Allow the engine to cool down.
- Drain the engine coolant until the overflow tank is empty. ...
- Use channel lock pliers to disconnect the hose that connects to the bottom of the overflow reservoir.
- Disconnect the return line at the top of the reservoir. ...
- Install the new reservoir in reverse order. ...

Can you repair a cracked coolant reservoir?
Fixing the coolant reservoir tank on your vehicle may be easier than removing dirt and grime from the interior of your vehicle. It's a quick and simple fix that will save you money in costly repairs, like a bad water pump. Before you start your repairs, contact your local auto parts store to find plastic epoxy.
What happens if the coolant reservoir is broken?
If the coolant reservoir has any issue that prevents it from properly holding coolant, or from properly pressurizing the system it may cause the engine to overheat. Any issue that causes engine overheating should be addressed as soon as possible in order to prevent any possible damage to the engine.
Can you JB Weld a coolant reservoir?
0:098:26J-B Weld Fail, dont use JB Weld near coolant - YouTubeYouTubeStart of suggested clipEnd of suggested clipBut what happens to jb weld I realized is that once you dip it in coolant hot coolant for about aMoreBut what happens to jb weld I realized is that once you dip it in coolant hot coolant for about a week it actually dissolves it turns into now it's hard again.
Is it OK to put stop leak in my coolant reservoir?
Can I install Bar's Leaks in my overflow reservoir? Yes, if direct access to the radiator cap is not available, install in overflow tank.
How much does it cost to fix a reservoir?
The Best in Auto Repair The average cost for coolant reservoir replacement is between $411 and $435. Labor costs are estimated between $59 and $75 while parts are priced between $351 and $360.
Do you need a coolant reservoir?
The coolant reservoir is a plastic reservoir, mounted in the engine bay for storing the coolant required by the engine. A coolant reservoir is necessary because every vehicle's engine goes through cycles of expelling and absorbing the coolant as it cools down its heated body.
How do you fix a broken reservoir?
0:002:47How To Fix A Leaky Coolant Overflow Tank - YouTubeYouTubeStart of suggested clipEnd of suggested clipHere's how to fix a leak in a coolant overflow tank this is a Ford Focus.MoreHere's how to fix a leak in a coolant overflow tank this is a Ford Focus.
Is JB Weld water resistant heat?
PRODUCT FEATURES AND STRENGTH: J-B Weld WaterWeld has lap shear strength of 1300 PSI, can withstand continuous temperatures up to 300F (149C) and intermittent temperatures of 350F (176 degrees Celsius) and is chemical resistant against petroleum, hydraulic fluids and other chemicals when fully cured.
How do you use WaterWeld?
0:061:05J-B Weld™ WaterWeld - YouTubeYouTubeStart of suggested clipEnd of suggested clipUnder water apply water well to the repair surface recap the putty tube for next use this repair isMoreUnder water apply water well to the repair surface recap the putty tube for next use this repair is now done water weld is a versatile epoxy putty that's strong and permanent.
Can I put K-seal in coolant reservoir?
0:402:17How to use K-Seal to stop coolant leaks and fix head gaskets - YouTubeYouTubeStart of suggested clipEnd of suggested clipKCl is suitable for use with all water-cooled engines including bikes automobiles trucks and otherMoreKCl is suitable for use with all water-cooled engines including bikes automobiles trucks and other heavy-duty vehicles. And even marine engines for cooling systems over 20 quarts use case eel HD.
Does putting an egg in your radiator work?
If the leak is small enough and you drop a raw egg into the radiator, pieces of the egg might “cook” and harden, clogging the hole that's letting coolant leak out.
What can I use to stop coolant leak?
5 Best Radiator Stop LeaksBest Overall: Bar's Leaks Liquid Aluminum Stop Leak.Runner-Up: K-Seal ST5501 Pour & Go Leak Repair.Best Powder: AlumAseal Radiator Stop Leak Powder.Best Tablet: Bar's Leaks HDC Radiator Stop Leak Tablet.Best Upgrade: ATP AT-205 Re-Seal.
Can you drive without a coolant reservoir cap?
The eventual result of driving without the radiator cap is that the cooling system will lose its fluid and not be able to replenish this loss. So if driven for an extended period if time, the vehicle would run out of coolant and potentially overheat, and worse-case blow a head gasket or cause irreparable engine damage.
Can low coolant in reservoir cause overheating?
The most common cause of an overheated engine is low coolant. Even in a sealed system, there is always a small amount of coolant loss. Today's engines use sealed systems, but the reservoir, also known as the overflow tank, is open to the atmosphere, so there is some loss simply due to evaporation.
Can a broken reservoir cap cause overheating?
If the cap can't maintain the correct pressure for your vehicle, the engine will start to overheat. An overheating engine could also be a symptom of air pockets within the cooling system. If the radiator cap doesn't have a good seal, air can make its way into the system, creating little pockets.
How to fix a coolant reservoir?
Step 1 – Remove Fluid from Coolant Reservoir. Before you begin, make sure your car has been turned off for a while and has cooled. You do not want to work on your car and start to fix the coolant reservoir if your car is still warm. Remove all of the coolant from the reservoir. In order to remove the coolant properly, ...
Can a crack in the coolant reservoir cause a car to overheat?
When your car cools, the excess coolant will cool as well and return back to the radiator, typically leaving the reservoir tank 1/3 full. A crack in the coolant reservoir could cause a slow leak of coolant and could also cause your car to overheat. You can easily diagnose and fix a coolant reservoir tank leak.
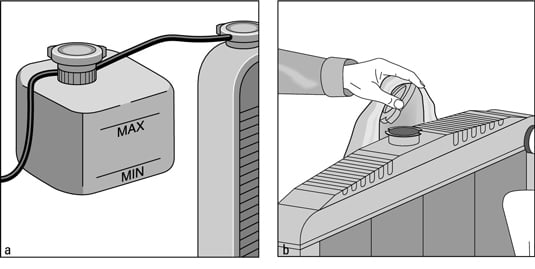
First, determine whether your coolant reservoir tank is pressurized
In older vehicles, the coolant reservoir served only as a reservoir to receive and hold expanding coolant from the radiator. As the coolant heated and expanded, a valve in the radiator cap would open and the pressure would force the expanding coolant into the reservoir.
Repairing an un-pressurized coolant reservoir tank
Locate the crack and mark it Clamp off the radiator overflow hose and disconnect from the tank. Remove the tank from the vehicle and pour out the coolant. Wash the tank with a degreaser followed by dishwashing detergent Using a soldering gun or iron, melt a “V” down the center of the crack.
Coolant reservoir tank replacement cost
Coolant reservoir tank replacement is fairly inexpensive, especially if you can find an aftermarket reservoir. Most coolant reservoir tanks are located in easy to access locations, so replacement is just a matter of clamping off one or to hoses and then removing two or three bolts.
What is a coolant reservoir?
Coolant Reservoir. A coolant tank acts as a regulating component to the excess coolant that’s produced from the heat in your engine. As the warmth rises, coolant expands and overflows into the coolant reservoir and is then sucked back into the radiator as your car cools down after shut-off. Your vehicle relies on your coolant tank ...
What does it mean when your coolant tank is cracking?
Your vehicle relies on your coolant tank to readily accept the excess coolant with each cycle, and a crack or leak means constant replenishing and the possibility of overheating your engine.
Why should you clean your coolant reservoir?
Over time your coolant reservoir tank can be filled with dirt, mud, and sludge. These contaminants deposited inside the reservoir can affect the quality of the coolant in it. This, in turn, can negatively affect the car’s performance.
How to clean a coolant reservoir?
We’ve mentioned the important steps in cleaning your coolant reservoir below. Follow these steps to clean it without any hassle.
Step 1 – Remove Fluid from Coolant Reservoir

Step 2 – Note Leak Area
- Examine the tank and determine where the leak is located. You should take a marker and circle this area.
Step 4 – Disconnect Overflow Tube
- Use a pair of pliers to move the clamp along the tube, and then twist the tube to remove it from the reservoir.
Step 5 – Disconnect Any Other Fittings and Remove Tank
- You may find that your car has some additional fittings holding the tank. You will need to remove any of these before you proceed. You may even have to remove additional items to gain access to the tank and remove it.
Step 7 – Wash The Tank
- Use the water hose to wash the tank thoroughly inside and out. You will need to let the tank dry completely.
Step 8 – Apply Epoxy
- Lightly scuff the cracked area with sandpaper for better epoxy adhesion. Blow sanding particles off area to be patched. Mix the epoxy and allow it to set up according to the manufacturer’s instructions. When the epoxy is ready to apply, use an applicator and apply to the leak, pressing it into the crack as needed. Be sure the crack is completely filled. Allow epoxy to cure according t…
Step 9 – Replace Tank
- Once the epoxy is dry it is time to replace the tank. Be sure to replace all fittings that you took out when you removed the tank.
Step 10 – Replace Coolant
- Using a funnel, pour the coolant from the collection bucket back into the reservoir. Add new coolant to fill the tank to the fill line.