
- Take a bucket: Prepare to repair a ceramic bowl. Take a bucket and fill one gallon off sand, which will work as a Holder. ...
- Identification of broken edge: Identify the place from where your ceramic bowl was broken. ...
- Mixing the adhesives to fix a ceramic bowl. Take two parts of epoxy adhesives in a nonporous sheet, and mix them up using a wooden or plastic stick.
- Attaching the broken edges: As mentioned before, take a wooden stick or a plastic stick to spread the epoxy over broken ends. ...
- Pressing the edges: Hard press the broken pieces together firmly. Apply more pressure as you can to squeeze them off. ...
- Wear protection: Just don’t worry about the adhesive that can stick with your hands. ...
- Remove the adhesives from sides: Take a sharp razor, sharp enough to scrap all the epoxy from the surface. Repairing of the bowl is almost on completion.
- Using the sand: Before finishing, there comes a step to smooth the surface of the ceramic bowl. The cracks we just filled aren’t smooth yet as epoxy is used here.
- Coloring the ceramic bowl: The last step for fixing bowl. It is the final step to painting the cracks. Painting the crack will entirely make it new. ...
How to make a ceramic bowl without a wheel?
You can do the following to make these better for you:
- Use something to smooth them out and give them a better profile
- Carving designs
- Glaze the pot
- Fire this
How to make a hole in ceramic bowl?
What Will You Need - cementing and filling large gap - ceramic vessel
- Two-part clear 5 minutes PC-Clear epoxy
- Wooden stick, paper clip or a pin-tool
- A container with pvc pebbles, rice or sand
- Razor blade
- Denatured or 91% Alcohol
- Paper pad to mix PC-Clear Epoxy on
- Good light
- Protective eyewear
How to repair a cracked Bowl?
Instructions
- Drain the Toilet Turn off the water supply to the toilet at the shutoff valve below the toilet tank. ...
- Clean and Sand the Repair Area Clean the area around the crack thoroughly to ensure there is nothing on the porcelain surface. ...
- Mix and Apply the Epoxy Mix the two parts of the epoxy (catalyst and resin) as directed by the manufacturer. ...
How to fix ceramic mug properly?
How to Fix a Broken Ceramic Mug?
- Gather the Mug Pieces. The first step is to gather and assemble all the pieces of the broken ceramic coffee mug. ...
- Setting Up the Broken Mug. Put the main body of the ceramic coffee mug into a bucket of sand. ...
- Epoxy Solution. Make an epoxy solution using equal amounts of epoxy and hardener. ...
- Applying the Epoxy Mixer. ...
- Repairing the Mug. ...
- Make it Dry. ...
How do you fix a cracked porcelain bowl?
“You place your cracked piece in a pot and cover it with two cups of milk (or more if needed). Next, heat over low for an hour. Allow to cool in milk and then remove and rinse. Your piece, if the crack wasn't too far gone, should now have resealed itself!
What is the best way to repair broken ceramic?
The first step to fix broken pottery or a ceramic object is by mending the pieces with two-part epoxy adhesive. With modern adhesives, fillers, paints and cold glaze, it's possible to perform seamless repairs to damaged ceramic and pottery objects.
How do you repair a hairline crack in ceramics?
0:016:31How Can a Ceramic Vessel Hairline Crack Be Cemented ... - YouTubeYouTubeStart of suggested clipEnd of suggested clipSome damaged vessels have a hairline crack that did not break all the way through. And the questionMoreSome damaged vessels have a hairline crack that did not break all the way through. And the question is how to fix it how to let epoxy seep into that crack this lesson apply only to pc clear uh given
What to use to fill cracks in ceramics?
Here is how I fix cracks: Mix up some paper clay from your clay body. Add a few drops of clear glaze and some finely grounded bisque from the same clay as the mug. Clean any dust away and add some clear glaze on the chip. As it dries, it may open up some cracks again, but keep filling it with more paper clay.
Is it possible to repair broken ceramic?
Most pottery that was broken can be fixed! If you have all the pieces and a high-quality adhesive, you can put it back together. Repairing pottery requires high-quality ceramics glue. In cases with valuable pottery, you may want to take it to a professional.
What is the strongest glue for ceramic?
If you have a project that requires gap bonding or filling, surface repairs or laminating, the best glue for porcelain or ceramic repairs will be an epoxy. An epoxy consists of two parts: resin and hardener. When mixed together, they produce a durable, high strength bond.
How do you cover a hairline crack in porcelain?
Clean the entire sink thoroughly. ... Sand down the area directly around the crack with a medium-grain sandpaper. ... Create a solution using small amounts of the alkyd-based paint and the porcelain repair compound. ... Dip the tip of a single-edge razor blade into the mixture and slowly fill in the crack.More items...
How do you fix a hairline crack in a mug?
How to Repair a Cracked Coffee CupApply super glue to the crack. You'll need a heavy amount to keep the mug from leaking. ... Put the coffee cup into a saucepan and cover with milk. Bring to a boil, then let simmer for a few minutes. ... Use PVA (polyvinyl acetate), also called white glue, to repair the crack.
What can I do with broken ceramics?
Donate: While just some facilities that recycle bricks and concrete can recycle ceramics, ceramics cannot be recycled at most standard facilities. In this case, you can donate them. Consider dropping your unwanted ceramic pieces off at a donation center or thrift store, so they can start a new life in a new home.
Is Loctite good for ceramic?
The best glue for broken ceramics The ideal glue for fixing broken ceramic is Loctite Super Glue Liquid Precision. This high-strength super glue forms strong and transparent bonds, which means that all repairs, however big or small, are barely noticeable and will last for a long time.
Can you superglue porcelain?
Loctite Super Glue Liquid is a fantastic glue for porcelain. This rubber-infused gel super glue can form powerful, precise and invisible bonds between porcelain and other porous surfaces and can even be applied vertically thanks to its non-drip formula.
How to fix cracks in ceramic bowl?
Mixing the adhesives to fix a ceramic bowl. Take two parts of epoxy adhesives in a nonporous sheet, and mix them up using a wooden or plastic stick. Quickly mix them instead of doing this slowly. Be alert because if you fail in mixing, it’ll be hardened in a3 or 4 minutes. Now, fill up the crack in a ceramic bowl to re-attach.
How to repair a ceramic bowl?
Take a bucket: Prepare to repair a ceramic bowl. Take a bucket and fill one gallon off sand, which will work as a Holder. It is unnecessary for all the equipment, but it is necessary for the cracks that develop on some angle. It will make you enable to use both your hands to clear up the repairs. In case you lack the sand, then you can have ...
How to spread epoxy over broken edges?
As mentioned before, take a wooden stick or a plastic stick to spread the epoxy over broken ends. Dot get afraid of the overflow of that epoxy over edges as you can remove it later on. Additionally, if you are dealing with cracks instead of breaking, you must use a toothpick. A toothpick will push the epoxy deep into the cracks. Any other tool can’t perform this job better than a toothpick. After putting the epoxy, squeeze both pieces together tightly. People also search, how to make ceramic pan nonstick?
Why use a syringe for cracks?
Syringes ensure the quick and proper distribution of epoxies on the broken part. In case you lack the syringe, be sure to use the stick and use eyes for equal distribution. Many people commit the mistake of using glue as a binder for ceramic cracks. Such type of cracks is irreparable with glue, as glue sticks them up.
How to clean epoxy bowl?
Take a sharp razor, sharp enough to scrap all the epoxy from the surface. Repairing of the bowl is almost on completion. The epoxy presents an odd view when it comes out of the cracks and requires cleaning. Take a razor and clean it up. I don’t have any razor, so take a blade and clean it up. A sharp knife is also a better option.
How to make cracks in ceramic bowls look new?
Choose the paint exactly similar to the paint already installed. Moreover, if your cracks are visible, you must use acrylic paint for this purpose. Try mixing the colors to get the color that matches your ceramic bowl’s color.
How to get epoxy off a broken vessel?
Hard press the broken pieces together firmly. Apply more pressure as you can to squeeze them off. Don’t immediately release the vessel on squeezing because the epoxy takes some time to get attached permanently. So, you must wait for some time and don’t show hurry. Try getting in line and keep holding it. Many people ask about the holding time for epoxy. Well, it relies on the type of epoxy, as instructed. At least squeeze it for at least 30 seconds.
How to seal cracks in ceramic bowl?
Paint over the cracks with ceramic paint and allow to dry. Cover the area with a matte or shiny spray on or paint on glaze to seal the area and match the finish of the bowl.
How long does epoxy take to dry?
Mix the 2 part epoxy according to the package instructions, usually one part hardener to one part epoxy. Epoxy begins to dry within minutes so work quickly.
Can you repair a broken ceramic bowl?
Masking tape. When a favorite ceramic bowl is cracked or broken, it may seem impossible to repair. If you have only cracked it or you find all the pieces, the repair is fairly simple and will only take a few minutes. Hairline cracks may still be visible but those can often be covered.
How to fix broken ceramics?
Gather your materials. You need the right adhesive, a paper towel or rag, soap, and water. Stay safe.
How to glue ceramic back together?
Glue ceramic back together. Apply adhesive to adjoining surfaces and hold them in place according to the product information. Some products require direct application to both surfaces while others need to be applied to only one surface.
How to fix a ceramic mug handle?
If you are fixing a ceramic mug handle, let the bonds sit a while after you have glued all the pieces together. This gives the handle time to stabilize. Keep everything in place. You don’t want pieces moving around, so if some of them are unstable, hold them in place with masking tape until the bonds set. Clean-up.
What do you need to make a sanding board?
Gather tools. You need gap-filling adhesive/touch-up glaze, an emery board, and soap and water.
Can you use loctite super glue on ceramic figurines?
For example, Loctite Super Glue Ultra Gel Control is ideal for repairing ceramic figurines, but it is not suitable for items that hold hot liquids. Therefore, that adhesive is great for keepsake figurines but not for your favorite mug. Loctite Stik’n Seal Indoor Adhesive is recommended for use on ceramic mugs.
How to fix a ceramic bowl?
After the bowl is soaked and softened, you can smooth out the bowl with a wet rag. We tend to drop ceramic and it breaks into pieces. You’ll need to fill the gap with a compatible adhesive. Try using a wood filler or a bonding agent depending on the piece’s age. The filling process is quite easy, but you must be sure to use the right materials for the best results. You can use self-hardening epoxy or polyurethane glue. These are the best glues that will form a hard compound on the surface of a ceramic bowl, thereby fixing the bowl.
How do you reattach a broken ceramic?
If the broken ceramic piece is big and thick, you may attach it back using either epoxy or super glue. First of all clean up the area, you want to fix to ensure that there is no dirt or other particles that can affect the bond. Then apply the glue just to the back of the broken piece. Do not apply it to the surface of the new tile. Press the broken ceramic piece to its original location and hold it for several minutes. Once it is secured take the piece away from the surface immediately to avoid the glue from drying.
How to repair chipped ceramic?
First, you’ll want to mix up a small batch of super glue and water. The ratio should be around 1:1, and you’ll want to mix it in a cup or a bowl. You’ll want to apply this to the chipped area, and then use a q-tip or a cotton ball to apply it to the areas around the chip. This will allow the glue to sort of melt the ceramic’s surface and repair it . The goop that forms will be clear, so you’ll want to make sure it’s perfect or extra glue will be visible.
Can super glue fix ceramic?
Well, the only way to know for sure is to try it yourself. It should work because ceramic is a hard material. The preparation for the repair is to first remove any ceramic pieces that may have broken off when the bowl broke. After that you mix up a thin batch of Super Glue. I would recommend using a non-drip brush to make the repair. Just brush the Super Glue mixture into the crack and then place the ceramic pieces back in place. Let it set and you should be left with a good repair. Good luck!
What can I use to glue ceramic back together?
Both Super Glue and Gorilla Glue are quick-drying, high-strength adhesives. Vila suggests them for thin, lightweight ceramics. Ceramices.com also suggests Gorilla Adhesive, notably Gorilla Micro Precise Super Glue, as the best glue for ceramics.
Can a ceramic baking dish be glued?
A ceramic baking dish can be glued in certain conditions. It’s mostly ok to use commercial grade super glue, but only if the 2 ceramic pieces do not have any cracks. So, if you have a broken dish that needs to be fixed, glue is your only choice. The superglue will only hold for a few days, but it’s strong enough for this purpose. Remember not to place it in the microwave oven because it will not hold and you will have to repeat the process.
How to fix cracks in mug?
Place the mug so that the crack and the grinded channels are on the bottom before placing the mixed 2-part epoxy. After applying the epoxy, inspect the other side of the crack to verify that the epoxy went through the walls of the crack. Remove the razor blade while the epoxy is still very liquid. Place the clamp before the epoxy hardens and put back in the oven (120-140 degree F) for optimum cure strength.
How to fill gaps in epoxy?
After cleaning the excess epoxy with a razor blade, fill all gaps with 2-part filler epoxy and sand with a Dremel and than by hand graduating to a very fine sand paper.
What to do if playback doesn't begin?
If playback doesn't begin shortly, try restarting your device.
Is ceramic restoration food safe?
IMPORTANT: Ceramic restoration materials are not food safe, liquid or heat proof (over 190 degree F) and repaired items should not be used on cooking or food serving ware more...
How to repair cracks in porcelain?
Drill a hole through the ceramic porcelain at the end of the crack. Wipe the surface frequently during the drilling, using a wet sponge. Water reduces dust, heat and friction near the grinding site.
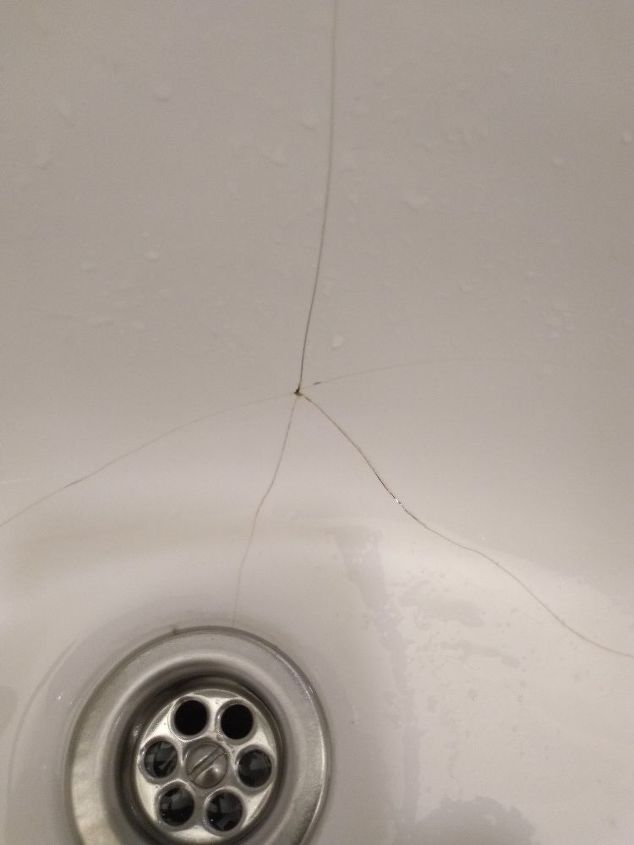
What causes cracks in porcelain?
Water pressure, temperature and user weight can cause cracked ceramic porcelain to rupture. But, superficial cracks in the ceramic finish or a crack in a tank lid can be repaired with a rotary tool, a grinding bit, epoxy and meticulous care. Before making the repair, assess the depth, direction and location of any toilet crack.
How deep should a crack be for epoxy?
Grind a U-shaped channel with the diamond rotary bit along the length of the crack. The channel should be no more than 1/8 inch deep and 1/8 inch wide. Grinding a channel along the crack creates more surface area for the adhesion of epoxy.
What to do before applying epoxy?
Wipe the surface free of dust and debris before applying epoxy.
What is the easiest crack to repair?
Assess the depth of the crack. The easiest cracks to repair are straight, superficial and relatively short.
How to give a repair surface a glossy appearance?
To give the repair surface a glossy appearance, apply a clear finishing spray.
How to smooth epoxy?
Sand the dried epoxy-filled surface with 60-grit sandpaper to remove ridges and air pockets. As the surface grows smoother with sanding, switch to 600-grit sandpaper. Continue sanding until the surface is level and smooth.