How can I fix Joy-Con drift myself?
- Update your controllers. Sometimes controller drift can be due to a minor software issue. ...
- Recalibrate the Joy-Con thumb sticks. Another way to correct Joy-Con drift is to recalibrate the thumb sticks themselves. ...
- Clean your Joy-Con controllers. The drift in your Joy-Con could be due to natural buildup of dirt and grime inside the thumb sticks.

How to get joycons repaired?
- Deal Value: Drift repair for Joy-Con controllers is now free; customers who previously paid for drift repair can receive a refund.
- Time Frame: Until further notice.
- Things to Remember: To receive a repair refund, you’ll need to provide proof of the transaction. You can only claim this deal if you live in North America.
How to repair Joycon?
How to Submit a Repair Claim:
- Fill out an intake form on Nintendo’s website.
- When you receive your UPS label, package your damaged Joy-Cons in a padded box or envelope.
- Drop off your package at any UPS facility and wait for further updates from Nintendo
How to fix drifting Joy Con?
- Use a Tri-Wing Screwdriver to open your drifting Joy-Con and be careful to remember where each screw goes.
- Cut out a small square of foam or cardboard. ...
- Use some adhesive to attach this square cut out to the back of the metal casing. ...
- Screw the Joy-Con casing back into place. ...
How to fix a broken Joycon?
Required spare parts
- Unscrew the four screws circled in red that secure the rear case of the Joy-Con with a Tri-wing screwdriver.
- Insert the nylon spudger between the front and back case. Carefully lever up the spudger to separate the two parts.
- Use the point of the nylon spudger to gently lever up the battery connector in order to disconnect it from the controller.

Is Nintendo fixing joy cons for free?
After pressure from several class-action lawsuits, Nintendo has started to offer free Joy-Con repairs through its customer service portal. The process is straightforward; fill out an online form (or call a customer service representative), mail out the equipment, and then wait.
Is Nintendo still fixing joy cons for Free 2022?
As a reminder, Nintendo is still offering free Joy-Con repairs in North America. All you need to do is fill out an easy form, and live in the USA or Canada, and you're good.
How do you fix a broken Joy-Con?
Calibrate or recalibrate your Switch Joy-Cons. The first thing you should do if you notice Joy-Con drift (especially on the left Joy-Con) is calibrate your controllers. ... Clean your Joy-Con's joystick. ... Nintendo will fix Joy-Con drift for you. ... Buy a new Joy-Con for your Switch. ... Replace the joystick yourself.
How long do Joycons last before drifting?
The real question is how long do these Nintendo switch controllers last before they break? Most Joy Cons will last 2–4 years depending upon how often they are used before they break. If they are dropped often or thrown around, it is possible that they will not even last a year before breaking.
Do Joycons still drift?
Nintendo has made minor updates to Joy-Cons over the years, but the ones in the Switch OLED are the same as the controllers that came with the Switch V2, so they're still susceptible to drift. Players can purchase new controllers, but Nintendo's services also repair Joy-Cons with drift for free.
How much does joy repair cost?
How Much Does Nintendo Charge to Repair Joy-Con? All Nintendo products have a limited hardware warranty which covers manufacturing defects for twelve months from the date of purchase. So, any repairs required during that time are free. If repairs are needed after the warranty has expired, it costs $40.
Does replacing joystick fix drift?
If you're still having Joy-Con drift issues after using the canned air method, foam fix, and recalibrating the controllers, you may need to replace the analog sticks. Some cheap options are available on Amazon, but remember that replacing the joystick will void any active warranty your Joy-Cons may have.
How long does Joy-Con repair take 2020?
48 hoursIt is important to remember that it can take up to 48 hours between when your package is delivered to a repair facility and when the status is updated. Overall turnaround time for repairs can vary depending on seasonality, total repair volumes, inclement weather, and other unexpected events.
Do Joy-Cons still drift 2022?
Nintendo Switch Joy-Con stick drift is an issue that has been there since the device's release. Even though Nintendo has claimed to have made changes to the Joy-Con to fix the issue, many users still come across stick drifts and it affects the console's lifespan.
How do you fix a Joy-Con Drift 2022?
How to Fix the Drifting problem in Nintendo Switch Pro Controller & Joy Con Drift 2022First, go to the Home Menu and head towards the System Settings.Under System Settings, scroll down till you can find Calibrate Control Sticks.Now the Menu for Calibrate Control Sticks should appear once you have clicked the option.More items...•
How long is Joy-Con warranty?
The dock, the Joy Con, the adapter, and any other extra devices are considered as accessories, and thus are warrantied for only three months. The warranties are reserved for the original purchaser, meaning the person registered as the buyer either at the point of sale, which is the store, or on the receipt.
How long do Nintendo switch Controllers last?
approximately 20 hoursThe Joy-Con controllers take approximately three and a half hours to fully charge. When fully charged, the battery for the Joy-Con controllers can last approximately 20 hours. This may be shorter depending on the software application and functions being used.
Featured Guides
Replace the joystick on the left Joy-Con for the Nintendo Switch. This repair fixes the notorious "Joy-Con drift" issue. iFixit has the parts needed too!
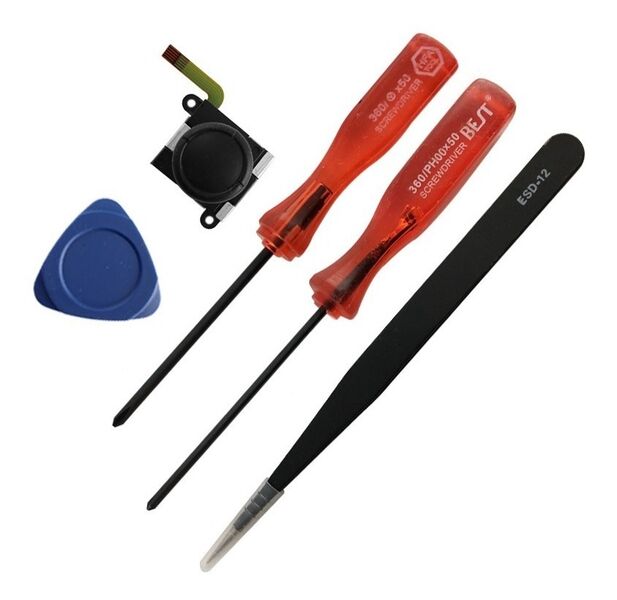
Tools
These are some common tools used to work on this device. You might not need every tool for every procedure.
Troubleshooting
Something wrong with your Joy-Con? Diagnose the problem at our troubleshooting page.
Background and Identification
Joy-Con are the primary controller (s) of the Nintendo Switch video game console. They consist of two individual units, each containing an analog stick and an array of buttons.
Personal Information
Your repair instructions and shipping label will be emailed to you. Please enter your Nintendo Account email or primary email address below and ensure it is accurate.
Shipping Details
The address you provide will be used to ship the Joy-Con back to you. If you live outside of the US or Canada, you must use a repair center in your area.
Repair Terms (required)
Please carefully read and check each one of the repair terms below before submitting your Joy-Con repair.
Where is the gasket on a Joystick?
There is a thin black gasket around the hole where the joystick pokes through the Joy-Con. Do your best not to disturb this gasket as you remove the joystick!
Can you reconnect a ZR button?
The ZR button cable in this Joy-Con is short and can be tricky to reconnect. If you are worried about not being able to reconnect it, you can skip this step and leave it connected, which we recommend.
Introduction
The Nintendo Switch comes with two Joy-Con controllers. This guide shows how to replace the joystick of the left Joy-Con. The procedure for repairing the right Joy-Con is different, so be sure to follow the correct set of instructions for your controller.
Step 1 Left Joystick
Remove the four Tri-Point Y00 screws from the back panel of the Joy-Con.
Step 2
Insert an opening pick into the seam at the bottom edge of the controller (opposite the L and ZL buttons).
Step 3
With the charging rail facing away from you, open the the Joy-Con like a book.
Step 4
Use a spudger to gently pry the battery connector straight up from its socket on the motherboard. This will keep the Joy-Con from powering on during the repair.
Step 7
Carefully flip the midframe over, away from the motherboard, as if you were turning the page of a book.
Step 8
The ZL button cable is locked in place by a small ZIF connector on the motherboard. Use tweezers or a spudger to flip up the ZIF connector lock opposite the cable.
Why is my Joy Cons drifting?
You see the reason Joy Cons generally start drifting in the first place is because dust and grime gets into the controller mechanism and starts making it put out false inputs. Ninety percent (90%) of the time, if you clean out the mechanism, you’ll totally fix the problem. First thing’s first: You’ll want to lift up the rubber guard at the base of the stick exposing the white mechanism beneath.
How to disconnect ribbon cable?
You’ll see that the connector has a little black latch. To disconnect the cable just flip this latch up and gently pull out the cable. This is easier with tweezers, especially if you have large hands.