- Tighten retaining nut. If you're lucky, you can fix your leaking faucet by simply tightening the nut under the handle. Don't crank it hard, though.
- Remove the stem. Next, remove the faucet stem. It's easier if you reinstall the handle temporarily so you'll have something to grip.
- Replace washer assembly. Keep track of the parts as you disassemble the faucet so you can install the new ones in the same order.
- Remove the vacuum breaker cap. Pop off the vacuum breaker cap to access the parts underneath. Pry from both sides with a pair of screwdrivers.
- Vacuum breaker parts. Unscrew the retainer and pull out the vacuum breaker. You may be able to fix the leak by simply cleaning the parts and reinstalling them.

How can you fix a leaky faucet?
The general guide on how to fix a leaky shower faucet includes the following steps:
- Turn off the water supply
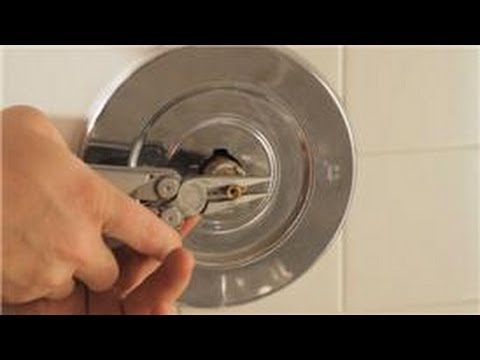
- Remove the handle and faceplate
- Remove the locking clip
- Replace the cartridge
- Reassemble the parts
How to fix leaky washing machine faucets?
Remove the Post Gasket
- Note: If the leaking occurs only when the machine is agitating, a bad center post gasket (“doughnut”) is the culprit. Remove the outer tub to replace the center post gasket. ...
- Squeeze the center post gasket together and pull it from the bottom of the outer tub.
- Install a new center post gasket.
- Reassemble the washing machine and run a test cycle.
How do you fix a leaking faucet valve?
Start with the retaining nut, then look for other problems
- Tighten retaining nut. If you're lucky, you can fix your leaking faucet by simply tightening the nut under the handle. ...
- Remove the stem. Next, remove the faucet stem. ...
- Replace washer assembly. Keep track of the parts as you disassemble the faucet so you can install the new ones in the same order.
- Remove the vacuum breaker cap. ...
- Vacuum breaker parts. ...
How to fix a leaking bathtub faucet quick and easy?
- Clear any rust, wax or caulk from around the base.
- Use an adjustable wrench to loosen the bolts that hold it together. ...
- Remove the stem and install a new one in the fitting using new bolts. ...
- If the bathtub faucet is still dripping after replacing the handle, washer and stem, you may need to replace the entire bathtub spout.
Can a dripping faucet be repaired?
Fixing a leaky faucet is quick and inexpensive; even the most amateur DIYer can tackle this task. The most common sources of a leaking faucet – a worn out washer or gasket, a loose O ring, corrosion in the valve seat – can be detected and fixed easily with most faucet repair kits.
How do you fix a leaky faucet valve?
First shut off the water to the leaking water valve. Next remove the handle from the stem and then loosen and remove the packing nut. Remove the old washer and slide on the new one. Reinstall the packing nut, tighten lightly with a wrench (don't over tighten at this or any other point) and reattach the handle.
Why is my faucet dripping when off?
If you notice your bathroom sink drips or leaks out of the faucet head when turned off, there is likely an issue with the seal inside the faucet head, allowing the water to run through or drip. Before calling a professional plumber, consider whether you're able to repair the leak in your bathroom sink yourself.
How do you fix a leaking single handle kitchen faucet?
0:423:11How to Repair a Leaky Single Handle Ball Kitchen Faucet - YouTubeYouTubeStart of suggested clipEnd of suggested clipFirst you will need to turn off the hot and cold water supply valve under the sink. Next. You willMoreFirst you will need to turn off the hot and cold water supply valve under the sink. Next. You will need to remove the single lever handle. This may require using an allen wrench to loosen the hammer.
What tools do I need to fix a leaky faucet?
You'll probably need an Allen wrench to remove the handle. Buy a set of small Allen wrenches and you'll be prepared for all kinds of leaking faucets. Most repairs also require screwdrivers and a pair of large slip-joint pliers.
How do you fix water valve that won't shut off?
0:061:10How to fix a stuck water shut-off valve | Roto-Rooter - YouTubeYouTubeStart of suggested clipEnd of suggested clipSo it will move freely and easily in any emergency that requires that the water be turned off. ButMoreSo it will move freely and easily in any emergency that requires that the water be turned off. But if the valve won't budge be careful forcing it counterclockwise.
Why does my new faucet drip after I turn it off?
When you replace a dripping faucet and the newly installed one still drips, the cause is usually a piece of something that got into the pipe during the installation. You need to flush out the pipe. Turn off the water and remove the valve stem that is leaking.
Where is cartridge on kitchen faucet?
0:352:55How to Clean a Kitchen Faucet Cartridge - YouTubeYouTubeStart of suggested clipEnd of suggested clipUnder your sink.MoreUnder your sink.
How do I change the O-rings on my kitchen faucet?
0:251:34Leaky Faucet Base – O-Ring Replacement - YouTubeYouTubeStart of suggested clipEnd of suggested clipApply silicone grease to the faucet spout base where the o-rings will be reinstalled slips. And u o-MoreApply silicone grease to the faucet spout base where the o-rings will be reinstalled slips. And u o-rings onto the faucet body within their group slots making sure the o-rings are not twisted.
How to Fix a Dripping or Leaky Double-Handle Faucet
Learn how to repair three types of double-handle faucets: ceramic disc, compression/reverse-compression and cartridge.
Repairing Different Types of Faucets
Keep in mind that some cartridge bodies and ceramic disc bodies/cylinders can look similar. In most cases, the cartridge body doesn't have moving parts. The ceramic disc body/cylinder does have moving parts that pivot to open the ports on the bottom.
Locate the Leak
Determine which side of your faucet is leaking by shutting off the water supply valves one at a time. If the leak doesn’t stop after the first valve is turned off, it’s the other line that’s leaking.
Ceramic Disc Faucets
This type of faucet uses a cylinder with tiny discs on the bottom that control water flow. The most successful repair typically replaces the entire cylinder.
Compression & Reverse-Compression Faucets
In this repair, you’ll replace the washer and O-ring or gasket on the valve stem, as well as the valve seat in the faucet.
Aerator
After reassembling your faucet, run the water for a few minutes to clear debris from the new parts. Replace the aerator.
How to Fix a Dripping or Leaky Single-Handle Faucet
Learn to repair three types of single-handle faucets: ball, cartridge and ceramic disc.
How long does water run in a faucet?
The water needs to run for one minute. For kitchen & bathroom faucets, be sure to put a bucket upside down over top of the faucet in order to direct the water down to the sink, or water will spray everywhere. Turn the water off at the supply lines again before re-assembling. 8.
Do you need an adjusting ring for a faucet?
Depending on the age of your faucet, you may not have an adjusting ring. For those with newer faucets that don’t contain adjusting rings, please skip this step. If you have an older faucet with an adjusting ring, it will not be needed after the repair if the cam/packing is replaced.
Learn to fix the most common causes of a leaking faucet
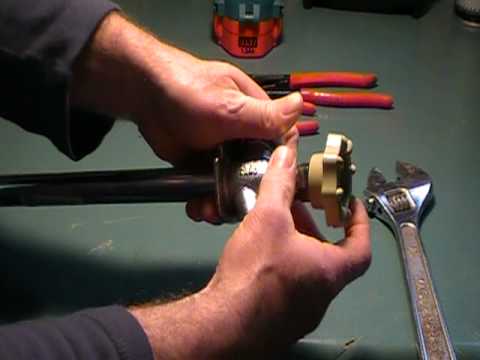
Fix a dripping laundry faucet by replacing the faucet washer or the valve stem O-ring. You can replace both in ten minutes with a wrench and screwdriver.
Fix a drippy laundry faucet
Remove the handle. Then turn the valve counterclockwise with a wrench. Pull out the valve.
Required Tools for this fix a leaking faucet Project
Have the necessary tools for this DIY fix a leaking faucet project lined up before you start—you’ll save time and frustration.
Required Materials for this fix a leaking faucet Project
Avoid last-minute shopping trips by having all your materials ready ahead of time. Here’s a list.
Shut Off the Water
The type of faucet in your kitchen or bathroom may be a single or double handle, has a modern pull-down wand design or is a twisting ball faucet on your shower or tub. Before you begin to fix a dripping faucet, your first step is to shut off the water supply.
Remove the Cartridge or Stem
The faucet cartridge or faucet stem is found in most two-handled kitchen and bathroom faucet styles. This is the part that regulates the flow of hot and cold water.
Install New Cartridge
Now that you’ve inspected the cartridge or stem and identified it as the source of your dripping kitchen faucet or bathroom faucet leak, you’ll have to replace it.
Reattach Faucet Handle
Once you’ve installed the new cartridge or stem, return to the previous steps and reattach the faucet handle. Turn your water line back on and remove any debris or towels from your sink.