How to disable automatic repair on Windows 10
To disable automatic repair during the third unsuccessful boot of Windows 10, use these steps:
- Open Start.
- Search for Command Prompt, right-click the top result, and select Run as administrator.
- Type the following command and press Enter: bcdedit.
- Make note of the reoveryenabled and identifier values under the "Windows Boot Loader" section.
- Type the following command to disable automatic repair and press Enter: bcdedit /set {current} recoveryenabled...
- Open the Command Prompt as administrator and run the bcdedit command: ...
- To disable automatic repair at Windows 10 startup, execute this command: bcdedit /set {current} recoveryenabled no.
How do I bypass automatic repair on Windows 10?
So, here is how to go about it:
- Open the Control Panel, choose System, and then select Advanced System Settings.
- Look for the Advanced tab and head into the Startup and Recovery section. ...
- In the dialog box that will appear, head on down to the System failure section and proceed to uncheck the Automatic Restart checkbox.
- Click OK to apply and save the changes.
How to fix Windows 10 not booting?
Windows 10 Not Booting After Update
- Revert Installed Updates. Wait patiently for the Windows 10 booting procedure to begin after turning on your machine. ...
- Recover Using Startup Repair. Windows 10 will not start can be fixed by running automatic startup repair in the recovery environment.
- Boot in Safe Mode. ...
- Checking For Errors Using Command Prompt. ...
- Check Errors in Hard Drive. ...
How to start automatic repair?
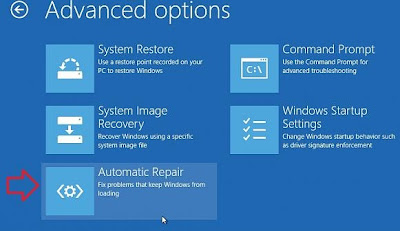
While in the Advanced startup environment, use the following steps to use Startup Repair:
- Click the Troubleshoot button.
- Click the Advanced options button.
- Click the Startup Repair button.
- Select your account.
- Type your account password.
- Click the Continue button. Quick Tip: If your computer is loading correctly, using this tool, you'll get the "Start Repair couldn't repair your PC" message because there's nothing that needs ...
What to do when a Windows PC won't start?
It's true that the most common reason a computer won't start is because a piece of hardware has failed or is causing a problem, but that hardware isn't usually a hard drive, the part of your computer that stores all of your files. In other words, your music, documents, emails, and videos are probably safe-they're just not accessible at the ...
How do I get out of automatic repair in Windows 10?
Click on “Advanced Options” Click on “Command Prompt” In the command prompt window, type “bcdedit /set {current} recoveryenabled No” and hit “Enter” (this command deletes problematic system files) Type “exit” and press Enter.
How do I get my computer out of automatic repair mode?
1:527:27How to Fix Automatic Repair Loop in Windows 10 - YouTubeYouTubeStart of suggested clipEnd of suggested clipSimply use this restart option to try to boot your PC back to Windows. But if that fails or if youMoreSimply use this restart option to try to boot your PC back to Windows. But if that fails or if you keep getting such errors over and over again then you can proceed with your the solutions in the
Why does my computer keep saying preparing automatic repair?
'Preparing for automatic repair' Infinite loop Automatic Repair is a built-in feature in Windows 10 to deal with some system problems when the computer cannot boot properly.
How do I bypass a repairing disk error?
What to Do on Stuck “Repairing disk errors” Issue in Windows 10?Let It Finish Overnight. First of all, “Repairing disk errors” is triggered by automatic CHKDSK on booting. ... Restart from Safe Mode. It is known that safe mode can solve myriad problems in computer. ... Automatic Repair. ... System Restore. ... Replace Drive.
How long does preparing automatic repair usually take?
If the Automatic Repair is working as intended, the repair process can take anywhere from 5 minutes to over an hour, depending on your hard drive specs. If it's stuck in an endless loop, you can just hard-reboot following the steps in our guide and try out some of the fixes.
Why does Windows 10 automatically repair?
The cause of Automatic Repair is if you PC crashes 2 times consecutively or fails to boot, Windows 10 will run Automatic Repair by default. Disabling automatic repair will only mean that you will have to manually run automatic repair if wanted or needed instead if it automatically being run when the above is true.
Is there a matter of when or not a device should be enabled or disabled?
There really isn't a matter of if when or not it should be enabled or disabled, but just a matter of personal preference.
Do you have to be an administrator to enable or disable automatic repair?
You must be an administrator to enable or disable automatic repair.
How to fix Windows 10 startup?
Windows from scratch may be the best way to fix a Windows 10 startup repair problem. It's a good idea to backup any files and folders you can before doing so, as doing a fresh install deletes everything on your boot drive. Replace your hard drive. You could have a damaged or degraded hard drive.
What is Windows 10 repair?
Windows 10 includes a host of different troubleshooting and repair tools designed to make the process of fixing everyday Windows problems much more accessible than in older versions of the operating system. One of those tools is Startup Repair, which can fix issues with your Windows startup. If there's a problem with a driver, service, or file that might be causing an issue when booting your PC, Startup Repair should fix it for you.
What Causes The Windows 10 Automatic Repair Loop?
The repair loop itself is caused by Startup Repair failing to fix the Windows startup problem. A failed Windows update degraded hardware like memory or a hard drive or missing or damaged system files corrupted by malware. You may also encounter this problem due to a driver issue for a specific piece of hardware or a registry error.
How to fix Windows 10 startup repair loop?
Reset your PC. A more dramatic way to fix the Windows 10 startup repair loop is to reset your Windows 10 installation. Doing this will effectively reinstall Windows, but keep all your files, folders, and settings —you will need to reinstall your applications, however.
How to get out of automatic repair loop?
Run the Fixboot and Chkdsk commands. Two commands worth trying to get you out of the automatic repair loop are Fixboot and Chkdsk. They can target and repair any errors in your hard drive and your Windows boot directory. Although you can run them in Windows using the Command Prompt, since automatic repair can't repair your PC, you'll need to run them using the Advanced Startup Options .
How to disable startup repair?
To do so, you'll need to access the Startup. Settings menu and press the corresponding number key to disable it. Run Startup Repair from USB/DVD. There's always a chance that your Startup Repair function itself is not working, but your PC is.
How to fix memory issues on PC?
Although you should try to switch the slots your existing memory is in first and booting with just a single stick in (try both of them individually), you can also replace your memory to see if that gets your PC working again.
How to stop Windows 10 from auto repair?
Method 1: Disable Automatic Repair Before Windows 10 Fails to Boot 1 Open the Command Prompt as administrator and run the bcdedit command:#N#Make note of the identifier value under the " Windows Boot Loader " section. 2 To disable automatic repair at Windows 10 startup, execute this command:#N#bcdedit /set {current} recoveryenabled no 3 Now, the automatic repair feature will no longer run automatically after the third unsuccessful boot of your PC.
How to disable auto repair on Windows 10?
To disable the automatic repair feature on Windows 10, type the following command and press Enter: The major drawback of the automatic repair feature is that Windows 10 tells you nothing about what exactly it's trying to repair.
Does auto repair work after third boot?
Now, the automatic repair feature will no longer run automatically after the third unsuccessful boot of your PC.
Why does Windows 10 have a self-initiated fix?
Windows 10 full version has the self-initiated fixing process meant to solve various PC issues that prevent the machines from booting. The self-initiated fixing in the OS assists in fixing booting issues but many at times it does not function.
How to get boot menu on a computer that won't start?
Put a USB on the machine which failed to start. Upon powering on, press a function key (F2 or F12) to display boot menu.
What happens when self-initiated fix fails?
Once self-initiated fixing fails, it leaves a machine stuck on the startup fixing state. There exist 2 simple methods of windows 10 automatic repair loop fix:
What does "current" mean in Windows 10?
On the last command, “current” is used to refer to the specific Windows 10 part at the startup loader and the “yes” value will re-activate self-initiated fixing.
What is self-initiated fixing?
The self-initiated fixing feature exists when users download windows 10. That feature troubleshoots and repairs every usual issue which could stop a machine from functioning well.
Can Windows 10 Home License Key be used for assistive technology?
Provided users are having a full operating system which contains the windows 10 home license key, they can be able to achieve all that has been explained above. They can even be able to perform windows 10 upgrade for assistive technology without any challenges whenever they want it.
Can you deactivate self-initiated fixing?
There are processes which users must follow if they want to deactivate self-initiated fixing in the OS. Besides that, if self-initiated fixing was deactivated before and you would like to make changes, there are steps which you must follow also to re-activate the feature.
How do I get my computer out of automatic repair?
Download and install Windows Installation Media. Restart your PC. Upon rebooting, press “F2,” “F11,” or “Delete” to enter BIOS. Boot using “Windows Installation Media” Under the Windows Setup window, choose “Next”.
How long does automatic repair take on Windows 10?
2. Click Startup Repair. Windows will take anywhere from a few seconds to a few minutes to attempt to fix the problem.
How do I bypass startup repair?
Fix #1: Boot into Safe Mode Insert the disc and reboot the system. Press any key to boot from the DVD. Choose your keyboard layout. Click Repair your computer at the Install now screen. Click Troubleshoot. Click Advanced options. Click Startup Settings. Click Restart.
What happens when Windows 10 Startup Repair Fails?
If you are unable to perform a startup repair, then your next option is to try using your Windows 10 installation media to fix the boot error. Once you have the command prompt up on the screen, you will need to issue a set of commands to find and resolve issues that might be preventing your computer from booting.
How do I get rid of the blue screen on Windows 10?
To uninstall a Windows 10 update causing a blue screen, use these steps: Open Control Panel. Click the Uninstall a program option . Source: Windows Central. Click the View installed updates option from the left pane. Select the most recent update (refer to the “Installed On” column). Click the Uninstall button.
What if Startup Repair just keeps running?
Boot sector viruses and other malware that targets the bootloader or the booting chain can cause errors in the bootloader settings and state that result in an infinite loop of Startup Repair. The virus may then block Startup Repair from either launching or carrying out its repairs successfully.
How do I stop startup repair is checking for problems?
Step 1: Restart your PC as you do it usually. Wait for the BIOS to show the manufacturer logo or system info. Step 2: Start to press pressing F8 continuously unless and until the list of boot options is displayed. Step 3: Choose “Disable automatic restart on system failure”.
Why does my computer go into auto repair?
Normally, by running Automatic Repair, Windows diagnoses the start-up problem (missing or corrupt system files, drivers, registry settings, etc.), fix it and then restart the PC automatically. But when Windows didn't shut down properly, it gets into automatic repair loop. For example, if your PC powered off improperly because of a power outage, system crash, data in the registry could be incomplete and corrupt, which lead to the automatic repair loop.
How to fix a computer that is stuck in repair loop?
Sometimes, your PC gets stuck at automatic repair loop or is attempting repair forever because Windows thinks that there is a problem with your PC while there is not, so you may just restart the PC. Step 1. Restart the PC and keep pressing F8 to get it into Windows Boot Manager. Step 2.
How to get out of auto repair loop?
Perform Command Prompt. If you see "your PC did not start correctly", you can go into Boot Options menu and use Command Prompt to get out of automatic repair loop. Step 1. Click Advanced Options; Choose Troubleshoot > Advanced Options > Command Prompt;
What to do if bootrec.exe doesn't fix auto repair loop?
If the bootrec.exe command doesn't fix the automatic repair loop, some suggest that you should run chkdsk commands as well.
Why won't my computer repair?
When Windows shows "Windows Automatic Repair couldn't repair your PC", it could indicate a corrupted registry on your computer. Therefore, you can get your Windows out of automatic repair loop by restoring the registry from RegBack directory.
What Is Automatic Repair Loop and Why Does It Happen?
The tool is designed to launch automatically when a start-up problem comes up on Windows system.
Why is Windows 8 stuck in a loop?
Usually, Windows starts automatic repair when it fails to boot twice consecutively. But sometimes an error occurs during the repair process making it unable to proceed further and so it gets stuck in a loop.
What to do after chkdsk is finished?
After chkdsk reports that it has finished, you can reboot your PC and try to start the installed operating system. It should work as expected. If some operating system files are corrupted or damaged, you can try to run the following command before rebooting normally:
The OS Self-Initiated Fixing
Deactivating Self-Initiated Fixing on Windows 10
- Though it may seem useful at first, self-initiated fixing isn’t always that helpful, especially for the advanced users. Thus if you are a user who wants to deactivate self-initiated fixing on their 3rdfailed startup you can follow these main steps: 1. Click on start button 2. Look for Command Prompt 3. Right-click on the top finding result 4. Pick ...
Enabling Self-Initiated Fixing on The OS
- Users who intend to re-activate self-initiated fixing in the OS should do this: 1. Click on start 2. Look for Command Prompt 3. Right click on the top finding 4. Pick Run as administrator 5. Write the command “bcdedit” and press enter 6. Note the reoveryenabled and identifier values within the OS Startup Loader region. The values should be the same as: identifier: {current} recoveryenable…
Conclusion
- Provided users are having a full operating system which contains the windows 10 home license key, they can be able to achieve all that has been explained above. They can even be able to perform windows 10 upgrade for assistive technology without any challenges whenever they want it. About the author: Derrick Ketter is a content writer from Philadelphia, United States. He enjoy…