How to disable automatic repair on Windows 10
To disable automatic repair during the third unsuccessful boot of Windows 10, use these steps:
- Open Start.
- Search for Command Prompt, right-click the top result, and select Run as administrator.
- Type the following command and press Enter: bcdedit.
- Make note of the reoveryenabled and identifier values under the "Windows Boot Loader" section.
- Type the following command to disable automatic repair and press Enter: bcdedit /set {current} recoveryenabled...
- Open the Command Prompt as administrator and run the bcdedit command: ...
- To disable automatic repair at Windows 10 startup, execute this command: bcdedit /set {current} recoveryenabled no.
How to disable automatic repair on Windows 10 [Guide]?
So, here is how to go about it:
- Open the Control Panel, choose System, and then select Advanced System Settings.
- Look for the Advanced tab and head into the Startup and Recovery section. ...
- In the dialog box that will appear, head on down to the System failure section and proceed to uncheck the Automatic Restart checkbox.
- Click OK to apply and save the changes.
What to do if automatic repair is not working?
Resolution
- After Automatic Repair fails to repair your PC, select Advanced options and then Troubleshoot.
- Select Advanced options and then select Command Prompt.
- If prompted, enter in the password for the user name.
- At the Command Prompt, go to the \windows\system32\config folder by typing the following command: Console cd %windir%\system32\config
How to exit automatic repair?
- Method 1: Using Command Prompt to Access Boot Menu Options. ...
- Method 2: Boot in Safe Mode to Repair the Error. ...
- Method 3: Run the Windows Startup Repair. ...
- Method 4: Run System Restore Option. ...
- Method 5: Disabling Early Launch Anti-Malware Protection. ...
How to stop automatic restart Windows 10 issue?
Top 4 Fixes for Windows 10 PC Automatically Restarting After Shutdown
- Disable Fast Startup. Fast Startup is a feature designed by Microsoft to help your Windows computer boot up faster. ...
- Check Registry Configuration. PowerdownAfterShutdown is a registry key/file that helps to keeps your Windows PC powered off after you shut it down.
- Disable Automatic System Failure Restart. ...
- Update Windows. ...

How do I stop the automatic repair loop in Windows 10?
Click on “Advanced Options” Click on “Command Prompt” In the command prompt window, type “bcdedit /set {current} recoveryenabled No” and hit “Enter” (this command deletes problematic system files) Type “exit” and press Enter.
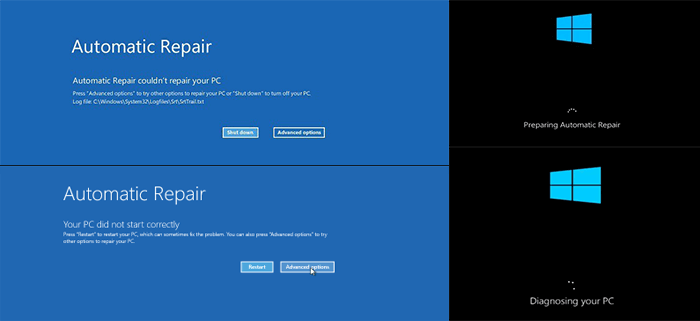
Why is my computer stuck on preparing automatic repair?
If your Windows cannot boot because of the "Preparing Automatic Repair" or "Diagnosing your PC" error, you can do a hard reboot. Remove the battery and AC adapter. Press and hold the power button for 20 seconds and see if it will boot up normally.
Why does Windows 10 go to automatic repair?
There are many reasons why the tool gets stuck in the dreaded automatic repair loop. This could be due to missing or corrupted systems files, including problems with Windows Registry, incompatible hard drives, file corruption in Windows Boot Manager, or even a faulty Windows update.
How do I cancel preparing automatic repair?
Here are the steps:Upon the 'Preparing automatic repair' window, press-and-hold Power button three times. Force to shut down the machine.The system will enter the boot repair page after 2-3 times reboot.Choose "Troubleshoot", then go on to "Refresh PC or Reset PC."
How do I disable automatic repair in BIOS?
How to Disable Windows 10 Automatic Repair at StartupOpen the Command Prompt as administrator and run the bcdedit command: ... To disable automatic repair at Windows 10 startup, execute this command: bcdedit /set {current} recoveryenabled no.More items...
How to fix Windows 10 startup?
Windows from scratch may be the best way to fix a Windows 10 startup repair problem. It's a good idea to backup any files and folders you can before doing so, as doing a fresh install deletes everything on your boot drive. Replace your hard drive. You could have a damaged or degraded hard drive.
How to disable startup repair?
To do so, you'll need to access the Startup. Settings menu and press the corresponding number key to disable it. Run Startup Repair from USB/DVD. There's always a chance that your Startup Repair function itself is not working, but your PC is.
Should I disable anti-malware?
It's rarely advisable to disable anything related to your anti-malware software, as it's an essential component of keeping you and your data safe. However, when your PC no longer boots, and you're encountering a repair loop error, then disabling early launch anti-malware protection can help.
Can I run auto repair on my PC?
Although you can run them in Windows using the Command Prompt, since automatic repair can't repair your PC, you'll need to run them using the Advanced Startup Options . Disable early launch anti-malware protection.
How to stop Windows 10 from auto repair?
Method 1: Disable Automatic Repair Before Windows 10 Fails to Boot 1 Open the Command Prompt as administrator and run the bcdedit command:#N#Make note of the identifier value under the " Windows Boot Loader " section. 2 To disable automatic repair at Windows 10 startup, execute this command:#N#bcdedit /set {current} recoveryenabled no 3 Now, the automatic repair feature will no longer run automatically after the third unsuccessful boot of your PC.
How to disable auto repair on Windows 10?
To disable the automatic repair feature on Windows 10, type the following command and press Enter: The major drawback of the automatic repair feature is that Windows 10 tells you nothing about what exactly it's trying to repair.
How do I bypass automatic repair on Windows 10?
How to Fix a Windows 10 Automatic Repair Loop Disconnect or Remove Recently Installed or Connected Devices. Run System Repair Tools (Chkdsk, SFC) Run the Windows 10 DISM tool. Disable Automatic Startup Repair to Limit Boot Loops.
How do I get my computer out of automatic repair?
Fixing automatic repair loop error on a black screen Turn off your PC. Download and install Windows Installation Media. Restart your PC. Upon rebooting, press “F2,” “F11,” or “Delete” to enter BIOS. Boot using “Windows Installation Media” Under the Windows Setup window, choose “Next”.
How do I bypass startup repair?
Fix #1: Boot into Safe Mode Insert the disc and reboot the system. Press any key to boot from the DVD. Choose your keyboard layout. Click Repair your computer at the Install now screen. Click Troubleshoot. Click Advanced options. Click Startup Settings. Click Restart.
How long does automatic repair take on Windows 10?
2. Click Startup Repair. Windows will take anywhere from a few seconds to a few minutes to attempt to fix the problem.
How do I stop Windows 10 repair disk?
How to disable automatic repair on Windows 10 Open Start. Search for Command Prompt, right-click the top result, and select Run as administrator. Type the following command and press Enter: Make note of the reoveryenabled and identifier values under the “Windows Boot Loader” section.
What happens when Windows 10 Startup Repair Fails?
If you are unable to perform a startup repair, then your next option is to try using your Windows 10 installation media to fix the boot error. Once you have the command prompt up on the screen, you will need to issue a set of commands to find and resolve issues that might be preventing your computer from booting.
How do I get rid of the blue screen on Windows 10?
To uninstall a Windows 10 update causing a blue screen, use these steps: Open Control Panel. Click the Uninstall a program option. Source: Windows Central. Click the View installed updates option from the left pane. Select the most recent update (refer to the “Installed On” column). Click the Uninstall button.
Why does my computer go into automatic repair loop?
For example, if your PC powered off improperly because of a power outage, system crash, data in the registry could be incomplete and corrupt, which lead to the automatic repair loop .
How to fix a computer that is stuck in repair loop?
Sometimes, your PC gets stuck at automatic repair loop or is attempting repair forever because Windows thinks that there is a problem with your PC while there is not, so you may just restart the PC. Step 1. Restart the PC and keep pressing F8 to get it into Windows Boot Manager. Step 2.
How to get out of auto repair loop?
Perform Command Prompt. If you see "your PC did not start correctly", you can go into Boot Options menu and use Command Prompt to get out of automatic repair loop. Step 1. Click Advanced Options; Choose Troubleshoot > Advanced Options > Command Prompt;
Why is Windows 8 stuck in a loop?
Usually, Windows starts automatic repair when it fails to boot twice consecutively. But sometimes an error occurs during the repair process making it unable to proceed further and so it gets stuck in a loop.
Can I install Windows 10 from a USB stick?
How to install Windows 10 from a bootable USB stick. If you have an installation DVD with Windows 10, you can also use it. Note that if your PC has a UEFI BIOS with Compatibility Support Module turned off, then it is also likely to have a GPT disk partition.