
How to Repair a Textured Ceiling
- Preparation. Repairing a textured ceiling can be a very messy job. ...
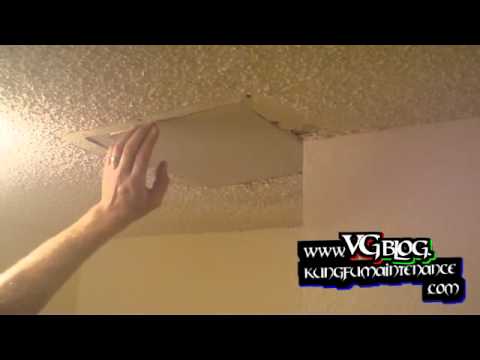
- Sanding. Sand down the areas around the damaged patches which have now been removed. ...
- Filling the Crack. Apply drywall compound to the damaged areas of the ceiling by using a putty knife. ...
- Sanding the Compound. ...
- Dealing with Stains. ...
- Re-Texturing. ...
- Repainting. ...
- Cleaning up. ...

What is the best way to repair a textured ceiling?
Wall and Ceiling Repair Simplified: 11 Clever Tricks
- Cure for Chronic Cracks. Some cracks keep coming back no matter how well you repair them. For those pesky recurring cracks, we prescribe Good-Bye Cracks.
- Whole Wall Cover-Up. Some walls are so bad that the best fix is to tear them out and install new drywall. ...
- Chair Rail
- Bigger Cover Plates
- Texture in a Jar to Repair Cracks in Ceiling
How to repair a textured ceiling the right way?
The benefits of a textured ceiling
- A unique style
- Easy coverage of imperfections
- Great for repairs
- Adds dimension
- Better sound proofing
- Many design choices
- An elegant look (in certain cases)
How to retexture a textured ceiling?
Texture additives can be mixed into most oil-based and latex paints. Touch up spray is available for repairing acoustic or popcorn ceilings. Powdered texture compounds are best for heavy-duty texturing jobs. Smooth eggshell or satin paint can be applied on top of the textured wall or ceiling to highlight the depth of the effects.
How to smooth out a textured ceiling?
Textured Ceilings: Cons
- The Look is a Bit Dated. Although textured ceilings are currently used in many homes, some people might view its appearance as outdated or unappealing.
- Repair Is More Difficult. If a portion of your ceiling becomes damaged, replacement isn’t as easy as painting over it. ...
- Older Ceilings Could Have Asbestos. ...
How do you apply texture to a ceiling?
2:576:27Best and Fastest Way to Texture a Ceiling - YouTubeYouTubeStart of suggested clipEnd of suggested clipThe texture on first okay then what you want to do is you want to go back over it just with theMoreThe texture on first okay then what you want to do is you want to go back over it just with the regular nap roller and distribute the joint compound evenly.
How do you repair a peeling textured ceiling?
How To Fix Peeling Paint On A Ceiling In 4 StepsScrape off peeling paint on the ceiling with a putty knife. Use 150-grit or higher sandpaper. ... Patch the peeling area with a thin layer of patching compound and putty knife. Let dry. ... Prime the area with an oil-based primer. Let dry.Paint with a flat acrylic paint.
Do you need to sand ceiling before texturing?
Before applying texture to a drywall finish, the surface should be sanded. The smoother the finish on the drywall compound as the mud is applied, the easier and quicker the sanding job will be.
What causes ceiling texture to fall off?
Because the texture is applied over the existing dry wall on the ceiling, it can peel off over time due to moisture, impact damage or simply old age. Repairing a peeling popcorn ceiling involves removal of the damaged portions and reapplying a new coat of texture.
How do you repair a water damaged textured ceiling?
0:0010:18How to repair texture on a water damaged drywall ceiling step by stepYouTubeStart of suggested clipEnd of suggested clipWelcome back to the channel in today's video how to repair texture on a water damaged drywallMoreWelcome back to the channel in today's video how to repair texture on a water damaged drywall ceiling step-by-step I'm going to show you the tools needed to apply a skip trout texture.
What is the most common ceiling texture?
Popcorn Ceiling Texture- Popcorn is the most common ceiling we see, also known as "cottage cheese" to some. This texture seems to be the most detested of homeowners we meet with on a regular basis.
Do I need to prime after texturing?
You should prime over textured walls before painting. Primer prepares your textured wall to take a fresh coat of paint. Painting and priming a textured wall can be a pain.
Should I prime my ceiling before texturing?
You could prime before texture if you want, but it is an unnecessary step when the fresh bare drywall is the perfect surface to accept texture as it is. Just brush the surfaces down with your hand or a dust brush beforehand so as to remove as much of the surface dust as possible.
How do you repair a peeled popcorn ceiling?
0:403:37Popcorn Ceiling Patch Repair Video - YouTubeYouTubeStart of suggested clipEnd of suggested clipYou want to make sure you take off the loosened popcorn some material. You don't want to put newMoreYou want to make sure you take off the loosened popcorn some material. You don't want to put new popcorn ceiling material over existing popcorn material that's loosened up it just won't hold.
Why is my popcorn ceiling peeling when I paint it?
Popcorn texture is sprayed onto the ceiling, and it absorbs moisture rapidly. This can pose a problem, particularly if you're using a water-based paint. As it absorbs the moisture in the latex paint, the texture weakens and may peel off as you're painting.
Why is my ceiling paint peeling?
The most common causes are excess moisture and improper painting techniques. No matter what actually causes the paint to peel, you will need to remove all of the peeling paint to start. Then, you'll need to fill and plaster the surface, sand it until smooth, prime, and then apply a new coat of paint.
How do I know if my popcorn ceiling has asbestos?
Unfortunately, you generally can't tell whether a popcorn ceiling contains asbestos by examining it visually. If your home was built before the mid-1980s, there's a good chance your popcorn ceiling has asbestos in it. The best way to determine if asbestos is present is to have your ceiling professionally tested.
How is popcorn ceiling different from other textured ceilings?
Popcorn ceilings are different from other textured ceilings because popcorn is usually sprayed on, whereas textured ceilings are created from applying plaster in a pattern with a decorative brush.
How to smooth knockdown ceiling?
If you have a knockdown ceiling, you will have to use a large putty scraper to go across the texture to smooth it to the knockdown texture. Wait a few minutes after the applied texture is set before knocking-down.
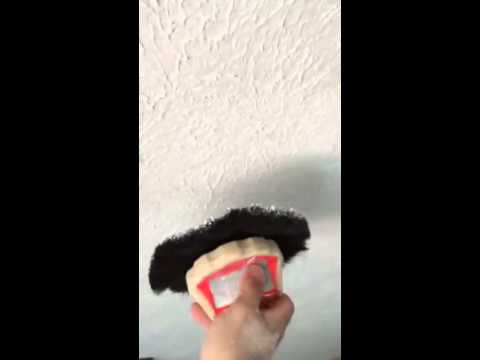
How to make a texture on a ceiling?
1. Soak Ceiling Texture Brush. With the exception of the orange peel and popcorn ceilings, all of the other textures use joint compound and corresponding brush to create the pattern. For brush textures, soak the brush in warm water for at least an hour, or overnight.
How do I apply joint compound to drywall?
3. Apply Joint Compound 1 Mix the joint compound with a paddle and drill or small portion with a paint stick or large spoon to loosen and remove bubbles. 2 Test out your pattern on a spare board or extra piece of drywall until you get the right texture. I find that first working the compound into the brush makes the pattern more even when applying. 3 Once your ready to move on to the real area, spread the joint compound on with a putty knife across the area to be patched. Try to blend any edges with the existing texture. You aren’t trying to create texture yet, just get it up on the ceiling relatively smooth. Don’t be shy with it either, put it on at roughly as thick as the existing texture. 4 Using your texture tool, stomp the texture into the applied joint compound in the same fashion as the practice board. 5 If you have a knockdown ceiling, you will have to use a large putty scraper to go across the texture to smooth it to the knockdown texture. Wait a few minutes after the applied texture is set before knocking-down.
How to remove plaster from paint?
Remove any loose plaster by scraping off with a dry putty knife. If you have stains, use a stain blocker like this spray stainblocker to keep the damage from bleeding into paint.
How much does it cost to smooth a ceiling?
Materials required to make ceilings smooth is about $100-150, including stripper, scrapers, and sanding materials. However, this job can be extremely labor intensive if the ceilings have been painted multiple times. Truthfully, in a few cases, I have considered re-drywalling easier than removing the texture because it can be so labor intensive.
How to get bubbles out of a joint?
Mix the joint compound with a paddle and drill or small portion with a paint stick or large spoon to loosen and remove bubbles.
How to use a hopper gun?
There are a few different versions of hopper guns, but they all have a mechanism at the nose that controls the diameter of the pattern, and a trigger control that helps govern the volume of spray. Start by setting both controls to the middle position. Then load the hopper about half full with texture material and practice on a piece of cardboard or drywall scrap (Photo 5). Adjust the spray pattern and trigger until you can get a nice, even pattern without runs or excess buildup. When you’re comfortable with the spraying technique, start on the ceiling.
How long does it take to spray a ceiling?
Once the room is masked off, the ceiling prepped and the texture mixed, it’ll only take you about 15 minutes to spray the ceiling. If any of the paper drywall tape is loose or the drywall is soft or damaged, you’ll have to repair and sand these areas first.
How to spray a wall with a gun?
Start by spraying the perimeter (Photo 6). Hold the gun about 18 to 24 in. from the ceiling and aim so that about two-thirds of the spray hits the ceiling and the rest hits the wall. Move quickly around the room, paying special attention to the inside corners where walls meet.
How to remove white residue from poly?
When you’re satisfied with the consistency of the texture, you can clean up the gun, hopper and hose with water and pull down the poly. If your masking job was a little off and there’s texture on the wall or flooring, wait for it to dry. Then carefully scrape it off and remove the white residue with a wet sponge.
How to mask a ceiling?
Speed up and simplify your masking job by applying the tape along the ceiling first. Leave the lower edge of the tape loose. Then roll out a length of lightweight poly along the floor, pull one edge up to the ceiling, and stick it to the tape.
How to make spray texture?
The key to a successful spray-texture job is mixing the texture to the right consistency. Don’t mix it too thick. Use the amount of water recommended on the bag as a starting point. Then adjust the thickness by adding more water or powder. Mix slowly using a mixing paddle mounted in a 1/2-in. drill (Photo 4). Mix thoroughly, adding water until the material reaches the consistency of runny yogurt—or thick paint—with tiny lumps in it. Let the texture sit for 15 minutes, then remix, adding more water if necessary.
How to minimize rental costs?
Minimize rental costs by getting all the prep work done before you pick up the compressor and hopper gun. Start by removing everything you can from the room. If you must leave large furniture in the room , stack it in the center and cover it with plastic. Cover the floor with sheets or a canvas drop cloth.
How to repair drywall texture?
Wet the drywall repair texture on the edges of your patch and allow it to soak in for several minutes before you scrape. Tape the joints and then reapply texture.
How to cut framing on a breakout?
Probe with a nail to find the framing on either side of the breakout. Mark the cut between the framing, then make those two cuts until you hit the framing. Then cut alongside the framing at the sides.
How to avoid last minute shopping trips?
Avoid last-minute shopping trips by having all your materials ready ahead of time. Here’s a list.
Can you patch a textured ceiling yourself?
But you can learn how to patch a textured ceiling yourself for a lot less. You’ll have to paint the entire ceiling afterward, and even then the patched area won’t match perfectly; even a pro can’t achieve that. Perfection calls for scraping off and retexturing the entire ceiling after the patch is complete.
How to mix textured paint?
But if you’re aiming for more depth or special effects, mix your own by combining paint with drywall mud. The standard rule of thumb is one part drywall mud to 10 parts paint. Pour paint into a bucket, add drywall mud, and blend, aiming for the consistency of pancake or biscuit batter. Depending on the look you’re going for, you might want a somewhat thicker consistency. Do a small batch first to practice getting it just right.
How to make a ceiling texture?
Working on one small section at a time, apply the mixture to the ceiling, and then dab a damp sponge or cloth into your work in a repetitive motion to create the texture you desire. Repeat this process around the room, one section at a time, being careful not to let the pattern become too uniform.
How to make stucco look like stucco?
For a stucco finish: To mimic the look of stucco, you’ll need a damp sponge or cloth as well as a wide compound knife or, if you’ve chosen a thicker-than-average consistency for aesthetic reasons, a trowel. Working on one small section at a time, apply the mixture to the ceiling, and then dab a damp sponge or cloth into your work in a repetitive motion to create the texture you desire. Repeat this process around the room, one section at a time, being careful not to let the pattern become too uniform.
How to protect furniture from splatters?
Empty the room as much as possible, which will also give you space to move around. Cover remaining pieces of furniture and the entire floor with drop cloths. Next, take off any faceplates, vent covers, ceiling fans, and/or light fixtures. Finally, apply painter’s tape around the edges of the ceiling, right where it meets the wall, being careful to keep it stick-straight all the way across.
Do you prime textured paint first?
You might think that because textured paint is part drywall mud it will adhere to any surface, but for a quality job, you still want to prime first. This step will make application easier and give lasting results.
Where to start texture?
It’s always wise to start in the least noticeable part of the ceiling when applying the texture—perhaps the darkest corner of the room, or the edge of the ceiling closest to the door. Position your ladder there and make sure you can work from a reasonable angle without arching backward. The exact technique (and subsequent tools you’ll need) depends on your desired effect.
Can you paint a ceiling with white paint?
It all too easy to slap a coat of white paint on your ceiling and consider it done. But to really pull a room together, it ought to be stylishly topped off — and putting a textured effect on the ceiling is a great way to add impact to your décor . Another plus? Textured ceilings perfectly camouflage imperfections like cracks or evidence of water damage.
How to keep a ceiling from cracking?
If the ceiling crack is near a wall, consider covering the wall with a plastic drop cloth to keep splatters off.
Do you need a dust mask when sanding drywall?
DON’T forget to stay safe. Sanding drywall compound can create billows of dust, and a DIYer should wear a dust mask in addition to eye protection before tackling the task. In addition, when working overhead, use only a sturdy step ladder (no wobbly chairs or stools) in order to reach the ceiling. istockphoto.com.
Can you dry wet drywall before applying a new coat?
DON’T shorten time for drying. Ceiling crack repairs made with wet drywall compound should be completely dry before another coating is applied. The general rule-of-thumb here is to apply the mixture in the thinnest coat possible, making sure to remove excess with a taping knife.
Can you cover popcorn ceilings with drywall?
Since this type of ceiling can actually reduce a home’s market value, this may be an excellent time to get rid of the texture or cover it up with drywall panels or rigid foam panels. Popcorn ceilings installed before 1978 may contain asbestos, so it’s vital to find out what type of popcorn texture is on your ceiling before making repairs.
Can you fix a crack in the ceiling?
While repairing cracks on walls is pretty straightforward, it’s a bit more complicated with ceilings, which typically have some type of texture applied and are overhead, making the repairs a (literal) pain in the neck. By following a few time-honored techniques, a savvy homeowner can often successfully repair cracks in ceilings without too much ...
Scrape and Prep The Ceiling, Then Texture
Required Tools For This Project
- Have the necessary tools for this DIY project lined up before you start—you’ll save time and frustration. 1. Air compressor 2. Air hose 3. Bucket 4. Corded drill 5. Dust mask 6. Paint roller 7. Paint scraper 8. Paint tray 9. Paintbrush 10. Putty knife 11. Roller sleeve 12. Safety glasses 13. Shop vacuum 14. Stepladder 15. Taping knife 16. Utility knife
Required Materials For This Project
- Avoid last-minute shopping trips by having all your materials ready ahead of time. Here’s a list. 1. 4 mil poly 2. Cardboard 3. Painter's plastic 4. Painter's tape 5. Primer 6. Spray texture 7. Stain-blocking sealer