[Solution] How to Stop Automatic Repair in Windows 10
- Open Start
- In the list of programs, search for Command Prompt, right- click it and choose Run as Administrator.
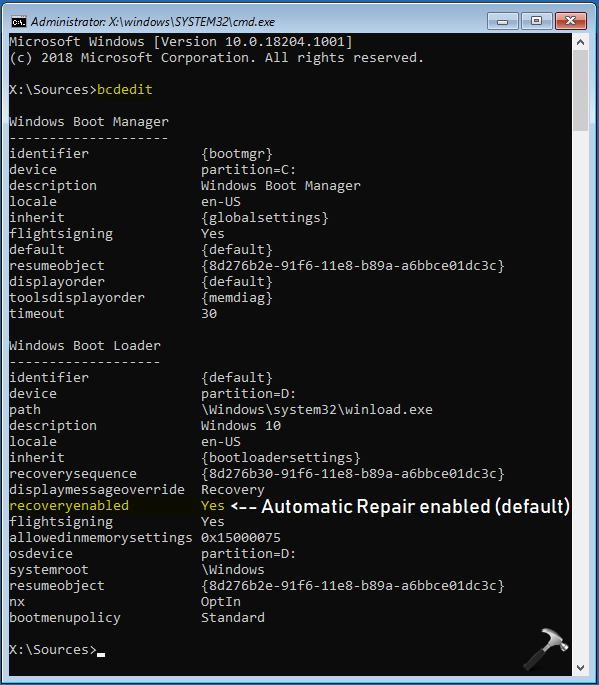
- Type the command "bcdedit" and press the Enter button.
- Under the Windows boot loaders section, look for the identifier and recoveryenabled values ...
- Open the Command Prompt as administrator and run the bcdedit command: ...
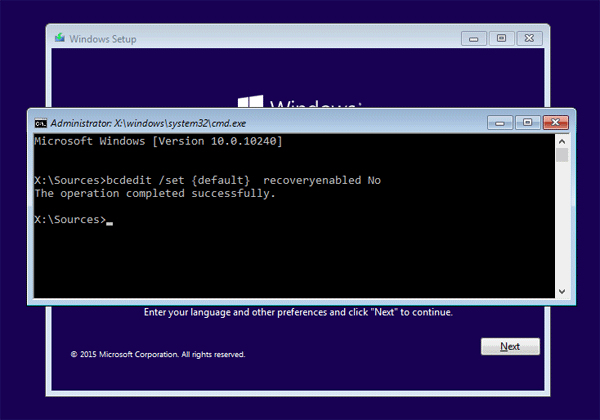
- To disable automatic repair at Windows 10 startup, execute this command: bcdedit /set {current} recoveryenabled no.
How to bypass automatic repair on Windows 10?
If the automatic repair feature is disabled, you can use these steps to re-enable it:
- Open Start.
- Search for Command Prompt, right-click the top result, and select Run as administrator.
- Type the following command and press Enter: bcdedit
- Make note of the reoveryenabled and identifier values under the "Windows Boot Loader" section. ...
How to disable Auto Restart win 10?
How to Disable Automatic Reboot in Windows 10
- Why Computer Reboots Automatically The most common reason behind this event is updates. ...
- How to Disable Automatic Reboot Press Windows key+I to open Settings and click on Update & Security. ...
- Edit Group Policy
How to disable BSoD Auto Restart in Windows 10?
What to Know
- Go to Control Panel and select System and Security > System > Advanced system settings > Startup and Recovery.
- Choose Settings.
- Uncheck the box next to Automatically restart.
What to do if automatic repair is not working?
Resolution
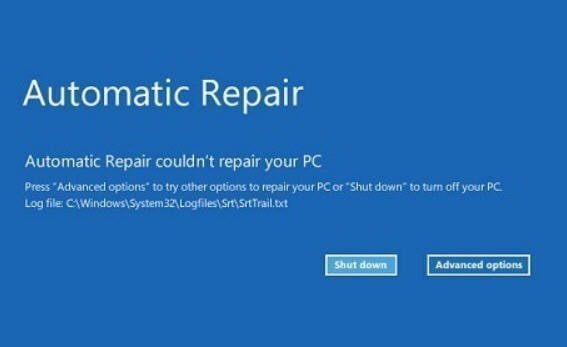
- After Automatic Repair fails to repair your PC, select Advanced options and then Troubleshoot.
- Select Advanced options and then select Command Prompt.
- If prompted, enter in the password for the user name.
- At the Command Prompt, go to the \windows\system32\config folder by typing the following command: Console cd %windir%\system32\config
How do I turn off preparing automatic repair?
At the Preparing Automatic Repair window, press the power button three times to force the computer to shut down.
Why does Windows 10 go to automatic repair?
There are many reasons why the tool gets stuck in the dreaded automatic repair loop. This could be due to missing or corrupted systems files, including problems with Windows Registry, incompatible hard drives, file corruption in Windows Boot Manager, or even a faulty Windows update.
How to disable auto repair on Windows 10?
To disable the automatic repair feature on Windows 10, type the following command and press Enter: The major drawback of the automatic repair feature is that Windows 10 tells you nothing about what exactly it's trying to repair.
How to stop Windows 10 from auto repair?
Method 1: Disable Automatic Repair Before Windows 10 Fails to Boot 1 Open the Command Prompt as administrator and run the bcdedit command:#N#Make note of the identifier value under the " Windows Boot Loader " section. 2 To disable automatic repair at Windows 10 startup, execute this command:#N#bcdedit /set {current} recoveryenabled no 3 Now, the automatic repair feature will no longer run automatically after the third unsuccessful boot of your PC.
How to stop auto repair?
Here is a step-by-step guide on how to stop automatic repair on Windows 10: 1 Open Start 2 In the list of programs, search for Command Prompt, right- click it and choose Run as Administrator. 3 Type the command “bcdedit” and press the Enter button. 4 Under the Windows boot loaders section, look for the identifier and recoveryenabled values. They should read:
How to stop Windows 10 from rebooting?
Here, you will click on the Settings button. In the dialog box that will appear, head on down to the System failure section and proceed to uncheck the Automatic Restart checkbox. Click OK to apply and save the changes. You can also disable automatic reboot directly from the registry.
The OS Self-Initiated Fixing
Once self-initiated fixing fails, it leaves a machine stuck on the startup fixing state. There exist 2 simple methods of windows 10 automatic repair loop fix:
Deactivating Self-Initiated Fixing on Windows 10
Though it may seem useful at first, self-initiated fixing isn’t always that helpful, especially for the advanced users. Thus if you are a user who wants to deactivate self-initiated fixing on their 3 rd failed startup you can follow these main steps:
Enabling self-initiated fixing on the OS
Users who intend to re-activate self-initiated fixing in the OS should do this:
Conclusion
Provided users are having a full operating system which contains the windows 10 home license key, they can be able to achieve all that has been explained above. They can even be able to perform windows 10 upgrade for assistive technology without any challenges whenever they want it.
How to disable automatic repair on Windows 10
To disable automatic repair mechanism of Windows 10, follow the steps below:
How to enable automatic repair on Windows 10
If the automatic repair feature is disabled, you can re-enable by using following steps. This process is very similar to the previously presented one.
How to disable startup repair?
To do so, you'll need to access the Startup. Settings menu and press the corresponding number key to disable it. Run Startup Repair from USB/DVD. There's always a chance that your Startup Repair function itself is not working, but your PC is.
How to fix Windows 10 startup?
Windows from scratch may be the best way to fix a Windows 10 startup repair problem. It's a good idea to backup any files and folders you can before doing so, as doing a fresh install deletes everything on your boot drive. Replace your hard drive. You could have a damaged or degraded hard drive.
Should I disable anti-malware?
It's rarely advisable to disable anything related to your anti-malware software, as it's an essential component of keeping you and your data safe. However, when your PC no longer boots, and you're encountering a repair loop error, then disabling early launch anti-malware protection can help.
Can I run auto repair on my PC?
Although you can run them in Windows using the Command Prompt, since automatic repair can't repair your PC, you'll need to run them using the Advanced Startup Options . Disable early launch anti-malware protection.
The OS Self-Initiated Fixing
Deactivating Self-Initiated Fixing on Windows 10
- Though it may seem useful at first, self-initiated fixing isn’t always that helpful, especially for the advanced users. Thus if you are a user who wants to deactivate self-initiated fixing on their 3rdfailed startup you can follow these main steps: 1. Click on start button 2. Look for Command Prompt 3. Right-click on the top finding result 4. Pick ...
Enabling Self-Initiated Fixing on The OS
- Users who intend to re-activate self-initiated fixing in the OS should do this: 1. Click on start 2. Look for Command Prompt 3. Right click on the top finding 4. Pick Run as administrator 5. Write the command “bcdedit” and press enter 6. Note the reoveryenabled and identifier values within the OS Startup Loader region. The values should be the same as: identifier: {current} recoveryenable…
Conclusion
- Provided users are having a full operating system which contains the windows 10 home license key, they can be able to achieve all that has been explained above. They can even be able to perform windows 10 upgrade for assistive technology without any challenges whenever they want it. About the author: Derrick Ketter is a content writer from Philadelphia, United States. He enjoy…