[Solution] How to Fix Preparing Automatic Repair Loop Windows 10
- Turn off your computer.
- Insert the Windows bootable installation disk to your PC and boot from it.
- When prompted to Press any key to boot from CD or DVD , press any key to continue.
- Select your language preferences in the Windows Setup interface, and click on Next button to continue.
- Tap or click on Repair your computer to continue.
- Use System Image Recovery or Windows Restore.
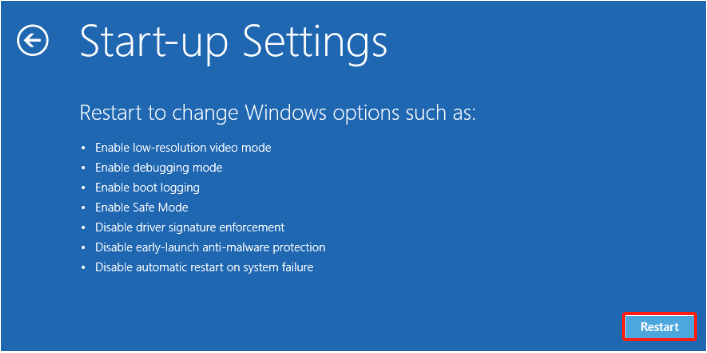
- Boot Into Safe Mode.
- Disable Startup Repair using CMD.
- Restore the Windows Registry.
- Run CHKDSK and Repair Corrupt System Files.
- Rebuild Boot Configuration Data (BCD)
How long does preparing automatic repair take Windows 10?
- Configure your language and other preferences. ...
- Select the Operating System you want to repair.
- At the recovery options menu, click on System Restore.
- Follow the on-screen instructions to restore the computer to an earlier point in time.
How to start automatic repair Windows 10?
How to initiate startup repair from the desktop or lock screen
- Click Start.
- Click the power button icon.
- Press and hold down the Shift key and then click Restart. ...
- Select Troubleshoot.
- Go to Advanced Options > Startup Repair.
- After the startup repair process is complete, reboot the computer.
- If the computer fails to boot into the operating system, initiate startup repair using the Windows installation disk.
How to fix windows automatic repair loop in Windows 10?
Scenario 1: You See A Black Screen with "Preparing Automatic Repair" Loop Message
- Method 1: Use Command Prompt to Erase Problematic Files. Deleting the problematic file from the system files helps in restoring the computer to working condition.
- Method 3: Restore Windows Registry. Restoring the Windows registry could solve most of the problems, including the automatic repair loop.
- Method 4: Refresh or Reset Your PC. ...
How to fix the 'preparing automatic repair'?
To suspend BitLocker for installation of TPM or UEFI firmware updates:
- Open an administrative PowerShell session.
- Enter the following cmdlet and press Enter: Suspend-BitLocker -MountPoint "C:" -RebootCount 0 where C: is the drive assigned to your disk
- Install Surface device driver and firmware updates.

How do I fix the automatic repair loop in Windows 10?
Click on "Advanced options” in the automatic repair blue screen. Navigate to “Troubleshoot” > “Advanced Options” > “System Restore” Choose the restore point created right before the blue screen appeared (Windows 10 creates a system restore point each time it installs an update, driver, or app) Click "Next"
Why is my computer stuck on preparing automatic repair?
If your Windows cannot boot because of the "Preparing Automatic Repair" or "Diagnosing your PC" error, you can do a hard reboot. Remove the battery and AC adapter. Press and hold the power button for 20 seconds and see if it will boot up normally.
How do you stop preparing automatic repair loops?
The official Windows solution for Preparing Automatic Repair is to update or reset the PC directly. This is how the repair works: At the Preparing Automatic Repair window, press the power button three times to force the computer to shut down.
How long does automatic repair take on Windows 10?
2. Click Startup Repair. Windows will take anywhere from a few seconds to a few minutes to attempt to fix the problem.
How to fix Windows 10 startup?
Windows from scratch may be the best way to fix a Windows 10 startup repair problem. It's a good idea to backup any files and folders you can before doing so, as doing a fresh install deletes everything on your boot drive. Replace your hard drive. You could have a damaged or degraded hard drive.
How to disable startup repair?
To do so, you'll need to access the Startup. Settings menu and press the corresponding number key to disable it. Run Startup Repair from USB/DVD. There's always a chance that your Startup Repair function itself is not working, but your PC is.
Can I run auto repair on my PC?
Although you can run them in Windows using the Command Prompt, since automatic repair can't repair your PC, you'll need to run them using the Advanced Startup Options . Disable early launch anti-malware protection.
What Causes the Preparing Automatic Repair Error?
Hardware failure is usually the primary reason behind this error. However, there are other reasons that may also lead to the problem, such as:
Simple Methods to Fix Preparing Automatic Repair Windows 10 Error
Here are some easy-to-use solutions to fix the Automatic Repair Windows 10 error.
How to fix a computer that won't turn on?
Select the correct time and Keyboard type. Click on Repair your computer in the lower left corner. Select Troubleshoot from Choose an option screen. Click on Advanced options in Troubleshoot screen. Click on Automatic Repair from Advanced Options screen. Next, choose the operating system by clicking on its button.
What causes a machine check exception?
Machine check exceptions are frequently caused by one of the following conditions: 1 You are running the processor or main board beyond its specifications. For example, you are over- clocking the processor or bus. We recommend that you run your hardware at the manufacturer-rated speeds. 2 Noisy power, overstressed power strips, outmatched power supplies and failing power supplies can destabilize your computer. Make sure that you have a stable, reliable power supply to your computer. 3 Extreme thermal conditions caused by the failure of cooling devices such as fans may damage your computer. Make sure that your cooling devices are all working. 4 You have damaged memory or memory that is not the correct type for your computer. If you recently changed the memory configuration, revert to the previous configuration to determine what is wrong. Make sure that you are using the correct memory for your computer.
How to fix a black screen on Windows 10?
After you boot your computer using Windows 10 CD/ DVD or System Repair Disc, a black screen appears with gray text "Press any key to boot from CD or DVD". Press any key. Select the correct time and Keyboard type. Click on Repair your computer in the lower left corner.
How to fix auto repair loop?
8 Solutions - Fix Preparing Automatic Repair Loop Windows 10 1 Remove the battery and AC adapter. 2 Press and hold the power button for 20 seconds and see if it will boot up normally.
How to fix a computer that won't boot?
If your Windows cannot boot because of the "Preparing Automatic Repair" or "Diagnosing your PC" error, you can do a hard reboot. Remove the battery and AC adapter. Press and hold the power button for 20 seconds and see if it will boot up normally.
How to re-build a boot record?
Step 1. Insert the Windows bootable installation disk into your PC that has "Preparing Automatic Repair" or "Diagnosing your PC" error message. Step 2. Boot your PC from the installation disk. Step 3.
How to install Windows 10 on a Windows 10 laptop?
Step 1: Turn off your computer. Step 2: Insert the Windows bootable installation disk to your PC and boot from it. Step 3: When prompted to Press any key to boot from CD or DVD, press any key to continue. Step 4: Select your language preferences in the Windows Setup interface, and click on Next button to continue.
How to make a bootable CD?
Step 1. Create bootable CD/DVD discs or USB flash drive by using MiniTool Bootable Media Builder.Install your MiniTool Power Data Recovery Personal Deluxe in a normal computer, and then click Bootable Media in the lower part of the main interface.
Why does Windows 10 have automatic repair?
Automatic Repair is a built-in feature in Windows 10 to deal with some system problems when the computer cannot boot properly. However, in some cases, Automatic Repair may not work and get stuck in the infamous Windows Automatic Repair loop.
How to force restart a computer?
- Force restart your computer by removing the battery and the AC adapter. Then plug the power back in and hold the power button for 20 seconds to see if the computer starts normally.
Why does my computer go into automatic repair loop?
For example, if your PC powered off improperly because of a power outage, system crash, data in the registry could be incomplete and corrupt, which lead to the automatic repair loop .
How to fix a computer that is stuck in repair loop?
Sometimes, your PC gets stuck at automatic repair loop or is attempting repair forever because Windows thinks that there is a problem with your PC while there is not, so you may just restart the PC. Step 1. Restart the PC and keep pressing F8 to get it into Windows Boot Manager. Step 2.
How to get out of auto repair loop?
Perform Command Prompt. If you see "your PC did not start correctly", you can go into Boot Options menu and use Command Prompt to get out of automatic repair loop. Step 1. Click Advanced Options; Choose Troubleshoot > Advanced Options > Command Prompt;
What is Windows startup repair tool?
The Windows Startup Repair tool is an excellent feature to fix problems that are preventing the PC from starting in the normal mode. Although it may not resolve issues related to hardware, it is an excellent place to begin the troubleshooting procedure. The steps include:
How to fix boot loop of death?
The steps include: 1. Right-click on the Windows symbol at the bottom and select "Command Prompt (Admin)" from the list. 2.
How to fix Windows installation error?
Prepare one and then proceed with the following steps: 1. Use the installation media, whether a DVD or USB drive, and connect to the system. 2. From the options, select boot from the installation media. 3.
How to set bcdedit to current?
Follow the steps below to proceed: 1. Search command prompt in the search window and open the application as an administrator. 2. In the command prompt screen, enter the following command and hit the "Enter" key: " bcdedit /set {current} recoveryenabled No ". 3.
