Drill the bracket into 2 sheets of plywood for a movable stand. Take your bracket and hold it 1 in (2.5 cm) from the edge of any side of the board in the middle. Drill the bracket into the board using wood screws that are long enough to go through the board. Cap the screws on the other side with nuts to brace them.
Full Answer
What is a DIY bike repair stand?
DIY Bicycle Repair Stand This DIY bike repair stand is very functional, simple, and durable. This type of stand is mostly for persons who just prefer the satisfaction that comes with making their own tools. This particular stand isn't that of a professional repair stand but the tools are readily available, easy to work with, and inexpensive.
What tools do I need to make a bike stand?
This DIY bike stand is simple to make, inexpensive and the making process is easy. The tools needed for this simple project include BRODER T Foot w/ Braces, BRODER Extendable 39″, BRODER Bracket, you will definitely need clamps so as to put them in place which is 2″ Ratcheting spring Clamp and one 8-32×1 ¾″ Rnd bolt and nut.
What size plywood do I need to make a bike stand?
Tip: If you want a freestanding bike stand that you can move around, buy or cut 2 pieces of thick plywood that are at least 16 by 24 inches (41 by 61 cm) to serve as the base. If you’re going to mount your bike rack in the ceiling, you don’t need anything else since the bracket can be drilled directly into a joist. [2]
What do you need to build a plumbing repair stand?
This wooden bench-mounted repair stand looks like a straightforward build. You’ll need a workbench and some pipe clamps. This one uses a bit of plumbing polyurethane in place of the foam pipe insulation of the previous builds.

How do you make a simple bike repair stand?
1:144:11How To Build Your Own Bike Work Stand in Just 30 Minutes - YouTubeYouTubeStart of suggested clipEnd of suggested clipWe're going to take our long pipe and screw the connecting elbow to one end so it looks a littleMoreWe're going to take our long pipe and screw the connecting elbow to one end so it looks a little something like this. Next we'll take the 12 inch pipe and screw it into the other end of the elbow.
What can I use as a bike repair stand?
A storage stand can make a pretty good repair stand, anything that lets the wheels and pedals rotate. A car rack will also work well.
How do you make a wood bike repair stand?
1:0612:52Blake Builds A DIY Mountain Bike Work Stand - YouTubeYouTubeStart of suggested clipEnd of suggested clipYou're gonna get one of these drills. So you can screw in all those screws to make this structureMoreYou're gonna get one of these drills. So you can screw in all those screws to make this structure structurally. Sound now let's move onto the materials.
How do you make a bike repair stand out of PVC pipe?
0:522:01How to Build a Bike Rack Out of PVC - YouTubeYouTubeStart of suggested clipEnd of suggested clipSide. Then you're going to connect the top piece to the 90 degree elbow on top of the side. You'reMoreSide. Then you're going to connect the top piece to the 90 degree elbow on top of the side. You're gonna fit your final 36 to 3600 piece into the open end of your 3-way T on the bottom.
Are bike repair stands worth it?
You do not need a bike repair stand if you are doing basic maintenance to your bike like; cleaning and lubing the chain, changing tires and replacing brakes – however, you will need a bike repair stand if you plan on adjusting the derailleurs, cables or anything that involves pedaling the bike.
How do you make a bike stationary?
All you need is a special stand that converts your bicycle into a stationary bike trainer. You can use this until the weather is good enough for riding outdoors again....Position Your Stationary Bike Stand. Find a spot in your home where you have enough space for your bike and the mount. ... Install the Bike. ... Check Your Work.
How do you make a wooden bike rack?
0:122:21How To Make A D.I.Y. Bike Rack - D.I.Y. At Bunnings - YouTubeYouTubeStart of suggested clipEnd of suggested clipDown your timber nice and tight cut off your taper on both ends. And continue on for all six pieces.MoreDown your timber nice and tight cut off your taper on both ends. And continue on for all six pieces. Remove any of the burrs or rough edges giving it a light sand.
How do you make a mountain bike work stand?
1:2827:32Building DIY Mountain Bike Work Stands! | GMBN Presenter Hacks ...YouTubeStart of suggested clipEnd of suggested clipBecause i was on a budget of 20 pounds and i didn't want to spend over that and i didn't want to iMoreBecause i was on a budget of 20 pounds and i didn't want to spend over that and i didn't want to i wanted to spend it on the wood more so so i've got these old little clamps that i found on my garage.
How do you make a bike storage rack?
1:006:03DIY Bike Rack for $20 / Bike Storage Stand & Cabinet for GarageYouTubeStart of suggested clipEnd of suggested clipThe upper 2x4 should be placed at 14 inches above the lower 2x4. Your hook placement should beMoreThe upper 2x4 should be placed at 14 inches above the lower 2x4. Your hook placement should be roughly 24 inches from the next hook on the same row.
How do you make a BMX stand?
1:196:0210 More Bike Hacks for MTB, BMX, and Road - YouTubeYouTubeStart of suggested clipEnd of suggested clipStand just got to pieces about 22 inches long and use two 12-inch pieces as crossbar. Fasten themMoreStand just got to pieces about 22 inches long and use two 12-inch pieces as crossbar. Fasten them together with screws and flip it over. This needs to be made to the width of your tire.10 More Bike Hacks for MTB, BMX, and Road - YouTubehttps://www.youtube.com › watchhttps://www.youtube.com › watchSearch for: How do you make a BMX stand?
How do you make a bike stand floor?
0:257:09How to Build a Wood Bike Stand! - YouTubeYouTubeStart of suggested clipEnd of suggested clipAlright guys start out you're going to need a 2x4 that is roughly. Three or four feet long and you'MoreAlright guys start out you're going to need a 2x4 that is roughly. Three or four feet long and you're going to need a piece of two by six that's roughly.
How do you make a motorcycle stand?
0:036:47Build a Wooden Dirt Bike Stand // Inexpensive & Bullet Proof! - YouTubeYouTubeStart of suggested clipEnd of suggested clipOn here to raise the bike for the wintertime. So we'll build one for this bike I'll show you how toMoreOn here to raise the bike for the wintertime. So we'll build one for this bike I'll show you how to build wooden motorcycle stand for this bike.
Step 1: Materials and Tools
10' length of 1 1/2" EMT (electrical metallic tubing) - $12.45 from Home Depot electrical dept.
Step 2: Clamping Mechanism
The clamping mechanism consists of modified locking pliers welded to the 1" steel pipe section. Steel pipe was selected due to its stiffness.
Step 3: Rotating Clamp Mechanism Support
The support for the clamp mechanism allows the clamp to rotate 360 deg. The 1" steel clamp pipe fits loosely into the 1 1/4" EMT. I cut a 4" length of 1 1/4" EMT to hold the clamp pipe. I cut a slot down the length of the 4" long EMT with a cut-of blade in the angle grinder and then made the slot a little wider.
Step 4: Base Stand
The base stand is made of 1 1/2" EMT. I cut a length about 4' long for the base post. and drilled (5) 3/8" holes about 3" apart near the top of the post. The holes allow for height adjustment of the clamp support post. I then cut two other pieces about 30" long for legs. The two legs project to the front at about 45 degrees on each side.
Step 5: Ready for Paint
I ran into some issues during painting due to cold, humid weather, so am posting the almost finished pictures for now. As you can see in the photos, the repair stand works for holding the bike by the top tube as well as by the seat tube.
Step 6: Final
Painted the whole thing blue. After paint I added the 3M heavy-duty double sided tape to each side of the clamp angles and adhered the rubber pads. I cut the pads so that they slightly overhang each edge of the angles. You can see how the placement of the T-handle bolts and the addition of the 1" steel spacer help the handles from interfering with each other and the side of the clamp support. All done.
Step 1: Parts and Tools
The materials and tools necessary to build this repair stand are readily available, easy to work with, and best of all, pretty inexpensive.
Step 2: Building the Base - Step 1
We begin by grabbing the tee fitting and two (2) of the ten (10) inch lengths of pipe. Screw the lengths of pipe into each side of the tee so the pieces are in line either each other (as opposed to perpendicular to each other - relax, you have a 50 percent shot at getting this right...there's really only one way to do it).
Step 3: Building the Base - Step 2
That's it! There's your completed stand! Just kidding. That'd be lame. That would also mean each piece cost about ten dollars. A bit of a ripoff if you ask me. Grab the two (2) 18" lengths of pipe and two (2) 90 degree elbows. Thread and hand tighten an elbow onto the end of one of the lengths of pipe.
Step 4: Build the Base - Step 3
It's time to put the base components together. Obtain the piece from Build the Base - Step 1. Onto one end, thread one of the pieces you made in BtB - Step 2. Now you should have what looks like an "L". Do the same with the other piece from Step 2, but do it on the other end.
Step 5: Up We Go! - Install the Vertical Pole
What's that extra port on the tee, you ask? That's for the big 60" length of pipe. This guy is responsible for bringing your bike to eye level, provided you are somewhere between five and seven feet tall. But hey, if you're not, they make different lengths of pipe, so get the length that best suits your hight.
Step 6: Ummm...Add the Other Thing!
We will now add the arm that will hold the clamp that will hold the bike. You should have, in terms of pipes and pipe fittings, one (1) 10" length of pipe and one (1) 90 degree elbow. Thread the pipe into the elbow.
Step 7: Clamp the Clamp
Grab your two hose clamps and the spring clamp. Slide the two hose clamps onto the 10" piece up top and slap the spring clamp on the top "side" of the horizontal pipe. Don't let go. The clamp will fall. Gravity works. Slide the two hose clamps over the lower handle of the spring clamp and tighten said hose clamps with all your might.
1. DIY Bike Repair Stand
Bike repair stands are very much useful, it secures and gives your bike defined balance causing it to be at the right height and angel. In making this repair stands you will need a 3*4inches pipe, for one end also you will need a 12inches pipe, clamps, screws, and most definitely woods, drilling machine, and a lot more.
2. Minimalist Bike Repair Stand DIY
Making a DIY minimalist bike repair stand is trying to create something different out of tiny things, these bike repair stands hold up bikes surprising well and the tools used in installing them don't cost at all, all you need are just simple tools which include hack saw, Dremel, heat gun, one and a half to two inches PVC pipe.
3. Cheap Bike Repair Stand DIY
This type of bike repair stand isn't expensive, super cheap, and very affordable to make but I won't advise this for a professional who needs something very durable. This bike repair stand is simple to make but won't last for a long time because of the tools used in making this.
4. DIY Portable Bike Repair Stand
The portable bike repair stands are very stable and not tippy at all, these portable stands are quite adjustable to the angle of the clam to accommodate different bike geometry and making it possible for the bike to be tilted at any angle you would love.
5. DIY Bicycle Repair Stand
This DIY bike repair stand is very functional, simple, and durable. This type of stand is mostly for persons who just prefer the satisfaction that comes with making their own tools. This particular stand isn't that of a professional repair stand but the tools are readily available, easy to work with, and inexpensive.
6. Portable Bike Repair Stand
This portable bike repair stand can be made from scratch, not intense to make, all you need to make this portable repair stand is a tripod, pony clamp ¾, seat post clamp, and other simple tools. This article shows how you could make this.
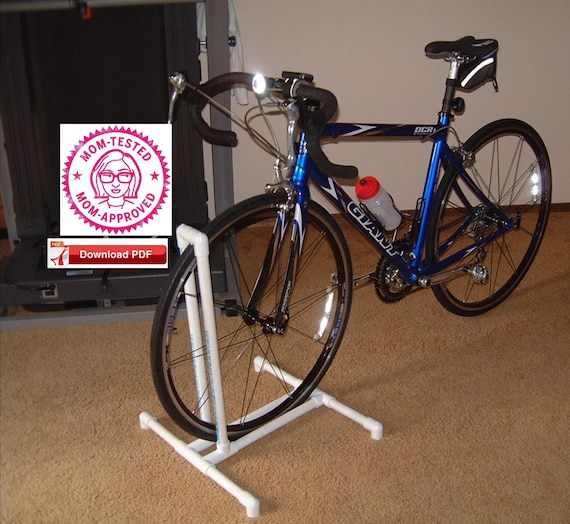
7. DIY PVC Bike Repair Stand
This bike stand is a European style stand with no adjustability & no rotation of the bike. But it also requires no clamp & has no moving parts. It can be used to do mechanical work, wash your bike, or for storage & display, very easy to make and inexpensive. All tools needed for this project are very much available which you may probably have.
Community Q&A
Include your email address to get a message when this question is answered.
About This Article
This article was co-authored by wikiHow staff writer, Eric McClure. Eric McClure is an editing fellow at wikiHow where he has been editing, researching, and creating content since 2019. A former educator and poet, his work has appeared in Carcinogenic Poetry, Shot Glass Journal, Prairie Margins, and The Rusty Nail.
