How to Repair a Leaking Faucet Stem
- Turn off the Water Supply. Locate the shut-off the valve located under the sink, behind the faucet assembly or behind a panel. ...
- Drain the Water. To ensure no water drips off to the floor during repairs, drain the water from the water supply lines.
- Detach the Faucet Handle. ...
- Remove the Stem. ...
- Replace the Washer and Stem. ...
- Turn on the Water Supply. ...

How do you remove a faucet stem?
- Flathead screwdriver
- Phillips screwdriver
- Hex key
- Pump pliers
How to fix a leaky STEM faucet?
How to Repair a Leaking Faucet Stem
- Turn off the Water Supply. Locate the shut-off the valve located under the sink, behind the faucet assembly or behind a panel. ...
- Drain the Water. To ensure no water drips off to the floor during repairs, drain the water from the water supply lines.
- Detach the Faucet Handle. ...
- Remove the Stem. ...
- Replace the Washer and Stem. ...
- Turn on the Water Supply. ...
How do you replace outside faucet?
Steps Download Article
- Turn off your home's main water supply valve.
- Spray lubricant onto the faucet where it connects to the pipe. Lubricant will help to loosen any rust that may have formed on the threads.
- Open the faucet completely to drain out all of the water.
- Place one pipe wrench onto the water pipe and one onto the faucet.
How to replace your faucet?
- Disconnect the hot and cold water supply lines to the faucet.
- Unscrew the mounting nuts under the sink that secure the faucet. ...
- Disconnect the faucet’s lift rod from the drain.
- Pull up the old faucet assembly from the top until it clears the sink. ...

How do I stop my faucet stem from leaking?
Stop a faucet stem leak A new rubber washer under the packing nut usually fixes leaks around the stem and handle. If a faucet leaks around the handle, you either have a loose packing nut or a bad packing washer. First try tightening the nut with a wrench or pliers.
How do you replace a faucet stem?
7:288:06How do I replace the stem in my double handle faucet? Part 3YouTubeStart of suggested clipEnd of suggested clipSo it faces forward push your cap back in same way on this one there's a C for cold. Put that oneMoreSo it faces forward push your cap back in same way on this one there's a C for cold. Put that one back in push it down now you've learned to change your stem.
How do you fix a stripped faucet stem?
How to Fix a Stripped Faucet Handle in 10 Minutes or LessTurn the Water Off. The valves to turn the water off to your sink should be right below the faucet. ... Remove Faucet Handles or Cover Plates. ... Remove Locking Nut. ... Remove Faucet Cartridge. ... Replace the Faucet Cartridge.
Can a faucet cartridge be repaired?
Worn cartridges or rubber O rings often lead to leaks. By swapping in replacement parts, your faucet won't leak at the base or around the handles anymore. Replacing a faucet cartridge is a plumbing fix you can do in less than an hour. All you need is a few simple tools.
How do I identify a faucet stem?
It is easiest for us to identify your stem or handle needs by measuring your stem from the left where the washer is attached to the right where the handle fits on the knurled end (The Broached end).Broached ends are unique by manufacturer and is critical when identifying your stem or cartridge.More items...
What does a faucet stem look like?
0:172:48What is a faucet stem and why would I need to replace it? Part 1 - YouTubeYouTubeStart of suggested clipEnd of suggested clipThe cartridge or stem is basically all the moving parts with inside this faucet it tells how big theMoreThe cartridge or stem is basically all the moving parts with inside this faucet it tells how big the openings are how much hot water how much cold water and allows you to change the temperature.
How do you fix a stripped water valve?
1:233:28HOW TO REPLACE A WATER SHUT-OFF VALVE - YouTubeYouTubeStart of suggested clipEnd of suggested clipWith the old valve removed remove. The old damaged teflon thread tape and replace it with some newMoreWith the old valve removed remove. The old damaged teflon thread tape and replace it with some new tape around the threads before screwing on the new valve.
How do you fix a faucet that keeps turning?
Spinning faucet handles can be caused by general wear and tear on the faucet stem, otherwise known as the faucet cartridge. This part can be replaced by removing the faucet from the sink and inserting the new cartridge.
How do you remove a kitchen faucet stem?
1:376:15How do I replace the stem in my single handle faucet? Part 2 - YouTubeYouTubeStart of suggested clipEnd of suggested clipNow you've got a hold of your channel locks just hold onto the body of your faucet. And undo thisMoreNow you've got a hold of your channel locks just hold onto the body of your faucet. And undo this nut. Once this nut comes loose you're going to want to back it all the way off and lift it up.
How do you fix a faucet cartridge?
1:293:02How to Replace Leaky Cartridges in a Bathroom Faucet - YouTubeYouTubeStart of suggested clipEnd of suggested clipFirst align the tab on the new cartridge to the slot on the faucet. Now screw on the bonnet nut andMoreFirst align the tab on the new cartridge to the slot on the faucet. Now screw on the bonnet nut and tighten with the crescent wrench reinstall the handle and pop the caps back.
How much does it cost to replace a faucet cartridge?
The cost to replace a shower cartridge is $100 to $350. A faucet cartridge costs $10 to $80, depending on the brand, material, and valve type. Plumbers charge $90 to $270 in labor to replace a shower cartridge....Shower cartridge replacement cost.National average cost$210Average cost range$100 to $3502 more rows•Sep 23, 2021
Are all faucet cartridges the same?
A cartridge has a standard lifespan and can be replaced or serviced on a preventive basis. This eliminates concern about failure in terms of messy leaks, which can cause more expensive problems. With applications in healthcare, education, food service, and commercial locations, not all faucets are the same.
Step 1 - Turn Off The Water and Faucet
Turn off the water supply to the house. The main water valve should be located by the water meter, usually outside the house. Turn the valve clockw...
Step 2 - Cover The Drain and Open Handle
Once the water pipes are empty, cover the drain in the sink with a rag or other item to keep small parts from accidentally falling into it. Then, l...
Step 3 - Take Notes and Remove Screw
It is a good idea to list on paper the order in which you remove parts so it's easier to reassemble the faucet later. Depending on the type you hav...
Step 4 - Remove Handle and Disassemble
Slide the decorative handle off of the stem and set it aside. Remove the collar from around the stem as well. Depending on the type of faucet you a...
Step 5 - Remove Stem and Go to The Store
Using a valve stem wrench or channel locks, remove the stem. Bring this part to your local hardware or plumbing supply store to buy a replacement....
Step 6 - Check The Washer and Replace Fittings
Before installing the new stem make sure the washer is installed in the bottom of the stem securely. It should be snug in the recess.Put the new st...
Step 7 - Replace Parts and Test
Replace the collar, decorative handle, and screw, making sure the screw is tight. Turn the main shut off back on, and test the faucet. If there is...
Why does my faucet leak?
Stem-type faucets usually leak due to issues in the faucet stem. Some stems are threaded to the faucet assembly, so in order to repair the leak, the stem has to be removed to inspect it for possible damage. For loose thread, stem or washer problem, here is a guide on how to fix the issue.
Do you have to replace a washer stem?
If the stem is to be replaced, the washer has to be replaced as well to ensure that the faucet does not leak due to a faulty or worn out washer. Take the washer and stem to a local plumbing supply store to obtain the correct replacement parts.
Where is the valve stem on a faucet?
The valve stem is located under the handle of the faucet. They can rust over time, or the threads could have stripped when a prior owner installed or worked on the faucet. Fortunately this is a fairly quick and easy fix for an annoying problem. Continue reading below Our Video of the Day.
Where is the main water valve located?
The main water valve should be located by the water meter, usually outside the house. Turn the valve clockwise until it stops. Then, turn the faucet on to release any excess water in the pipes.
Can a bathtub faucet be knurled?
In a newer simple system, there is usually only the collar, but older faucets, especially bathtub faucets, may have a knurled fitting that can be removed with a channel lock . There may also be some hexagonal parts that you will have to use a wrench to take care of.
How To Fix a Faucet Leaking from Stem
Before you get started, we recommend turning off the water at the shutoff valve located under the sink. Make sure no more water is coming out of the faucet before you begin.
Final Thoughts: Faucet Leaking From Stem
A steady, slow drip from the spout of a stem faucet signals the need for a new washer (O-ring) or packing. But with modest to intermediate plumbing skills (of the do-it-yourself variety!), this is a leak that you can fix yourself.
Call 1-Tom-Plumber
Don’t hesitate to contact us here or call us at 1-Tom-Plumber (1-866-758-6237) if you need help fixing a faucet leaking from its stem.
Step 1 – Turn Off The Water Supply
Step 2 – Drain The Water
- To ensure no water drips off to the floor during repairs, drain the water from the water supply lines. Turn on the faucet and let the water drain. If you turned the water off to the entire house, and there are faucets at the lower portion of the home, turn them on as well to completely remove the water from the pipes.
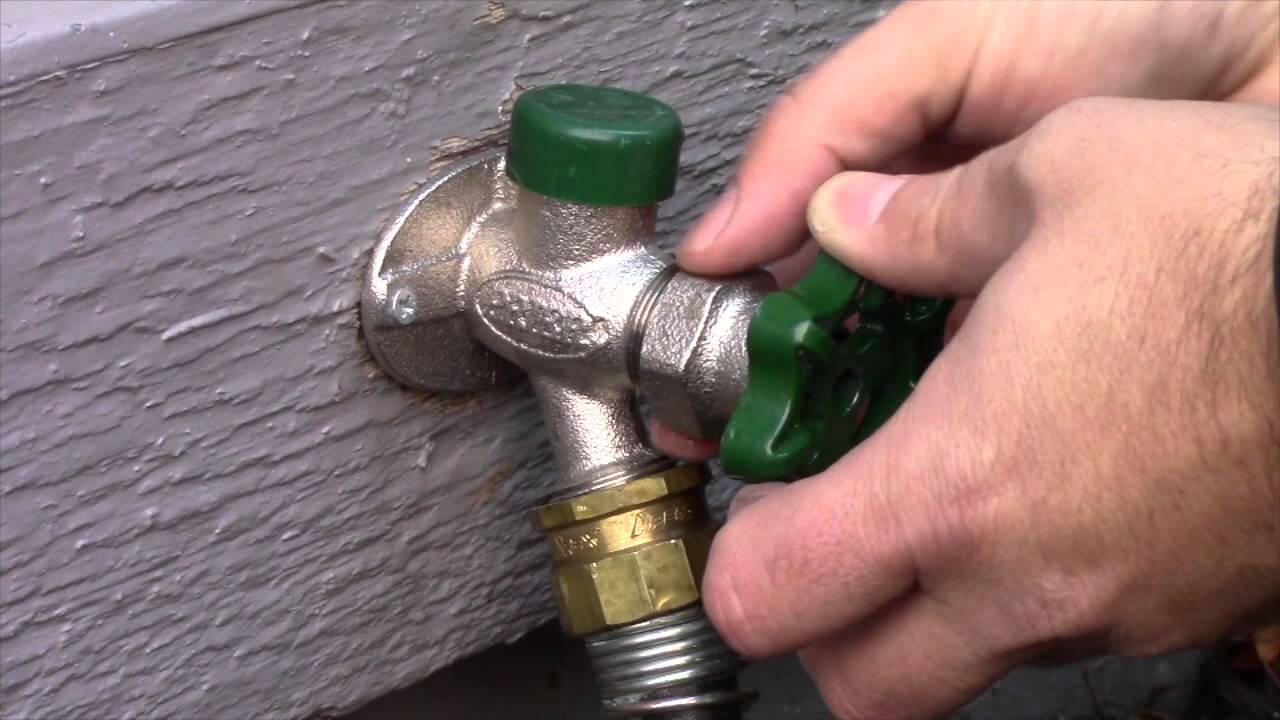
Step 3 – Detach The Faucet Handle
- Every handle is secured to the faucet with a screw. Locate the screw and loosen it with a screwdriver. If the screw is hidden by a cap, pry off the cap using the flat edge of the screwdriver. If the screw is corroded and hard to remove, apply some penetrating oil and wait for a few minutes. When the screw is removed, pull off the handle.
Step 4 – Remove The Stem
- Use a crescent wrench to remove the locknut fastening the stem in place. As soon as the locknut is removed, the stem can also be pulled out of the faucet. If the faucet stem is threaded to the assembly, turn it counterclockwise with a wrench until it disengages. Locate the rubber washer at the bottom of the stem. This may be secured using a small s...
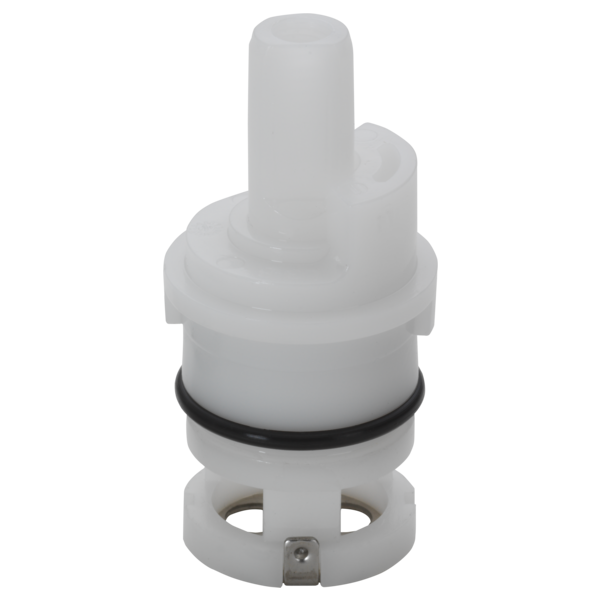
Step 5 – Replace The Washer and Stem
- If the stem is to be replaced, the washer has to be replaced as well to ensure that the faucet does not leak due to a faulty or worn out washer. Take the washer and stem to a local plumbing supply store to obtain the correct replacement parts. Install the washer to the stem. Position it into the faucet assembly and hand-tighten it first to ensure the threads are aligned correctly. Tighten it a…