How To Fix A Rear Window Defroster (11 Steps)
- Clean The Window. Wipe the window with a mildly damp cloth. Don’t use anything abrasive and do make sure that the...
- Sand The Tab Down. If the tab has broken off, use sandpaper to sand down the rough solder. Even if you have a...
- Clean The Tab. Use alcohol solution, usually provided with the repair kit, to clean the...

How to reattach a rear defroster tab?
What’s Included:
- 2000 Frost Fighter Tab Bonding Kit – Two part silver tab bonding adhesive, complete instructions, sandpaper, stir sticks, mixing pads and enough material for multiple repairs.
- Uni-Con Replacement Connector
- 2300 – URX Uni-Clip Defroster Tab – Universal tab that fits most Ford & Chrysler vehicles.
How to disconnect rear window defroster?
Use your fingernail or razor blade to lift the window film in a corner of the window and try to peel the film off in one entire piece. People often ask us if it is possible to successfully tint over rear defroster wires. Wipe down the inside of the window with a cloth once the tint is completely removed from the glass.
How do you reatach a rear window defrost wire?
when you push on the rear defroster button does it light up if so then you will have to use a test light and check for broken window grid wires on the rear window. you ground one end of the test light and using the other end start at one side of the window that lights it up then follow the grid line from one side to the other at 2 inch increments, the light should light up but get dimmer as you test the length of the grid, then go to the next grid line and repeat. when the light stops ...
How to repair the rear window defroster wire?
Repair broken electrical contacts on your defogger or car window defroster
- Sand the Tab. Even though the electrical tabs are soldered onto the defogger grid at the factory, avoid the temptation to solder the replacements.
- Apply Activator. ...
- Mix and Apply the Glue. ...
- Attach the Tab to Your Car Window Defroster. ...
- Repair a Broken Grid Line On Your Defogger: Paint a New Line. ...
- Defogger Repair Kit
Can I solder the rear window defroster?
Even though the electrical tabs are soldered onto the defogger grid at the factory, avoid the temptation to solder the replacements. If the heat cracks the glass, you will have to buy a new window.
Can you solder a defroster tab?
1:172:15How to repair broken or loose defroster tab - YouTubeYouTubeStart of suggested clipEnd of suggested clipLet it cool off for a second while on keeping pressure with this screwdriver. Until that that solderMoreLet it cool off for a second while on keeping pressure with this screwdriver. Until that that solder cools it really doesn't take very long.
How do you fix a rear window defroster grid?
0:036:08How to fix a broken Defroster Grid Line - YouTubeYouTubeStart of suggested clipEnd of suggested clipThe defroster grid as well as reglue in the defroster tabs now you can get a kid that's just for theMoreThe defroster grid as well as reglue in the defroster tabs now you can get a kid that's just for the grid lines.
How do you use Loctite rear window defogger tab adhesive?
Process summary:Remove wire from tab; then clean tab and attachment area on rear window with rubbing alcohol.Apply activator to tab and attachment area.Allow 5 minutes for activator to cure and then apply glue to attachment area.Push tab onto attachment area, hold in place for 1 minute and then reattach wire.More items...
How do you glue rear defroster?
3:287:34How to fix Rear Defroster Tabs - YouTubeYouTubeStart of suggested clipEnd of suggested clipColor just mix it around for a couple of minutes and then you're ready to apply it do your best toMoreColor just mix it around for a couple of minutes and then you're ready to apply it do your best to make sure you don't get sidetracked. Now you've already applied the activator to the window.
Can a rear defroster be repaired?
Good news: You can fix it yourself for less than 10 bucks. Really. Start by going to the auto parts store and picking up a rear-window defroster-grid repair kit and/or a defroster tab repair kit, depending on the damage you need to fix.
How much does it cost to fix rear defroster?
between $45 and $80In terms of both parts and labor, fixing a front or rear defroster will cost roughly between $45 and $80. Properly functioning defrosters are essential to safe driving, especially if you live in an area with a harsh winter climate.
Can you repair a heated rear window?
Rear window heaters fitted by manufacturers are printed on to the surface of the glass or stuck on with special adhesive. Small breaks in an element can be repaired with special conducting paint. One of the most common and simple problems is a blown fuse. Find the fuse protecting the heated rear window circuit .
Why does only part of my rear defroster work?
If the defroster clears only part of the rear window, this is usually a sign of a broken horizontal grid line. The first step in repairing this type of damage is to locate the break by visual inspection. The smallest break or crack can cause the defroster to fail. Be sure to have the work area well lighted.
Is permatex epoxy conductive?
Permatex Rear Window Defogger Electrically Conductive Tab Adhesive quickly and easily bonds defogger tab to grid on rear window. Provides a low-cost, high-quality repair for damaged rear window defogger tabs. Complete kit contains everything necessary for a quick repair.
Is permatex conductive?
Product Description. Permatex Electrically Conductive Rear Window Defogger Tab Adhesive quickly and easily bonds defogger tab to grid on rear window. This is a complete kit, providing a low-cost, high-quality, quick repair for damaged rear window defogger tabs.
How do defrost lines work?
2:564:20How A Rear Defogger Works On A Car-EASY Explanation - YouTubeYouTubeStart of suggested clipEnd of suggested clipBasically. You're using electricity to create a reaction amongst. The rear window which heats it upMoreBasically. You're using electricity to create a reaction amongst. The rear window which heats it up enough to either defog or defrost. The rear windshield.
What do you do when your defroster doesn't work?
Moving them back and forth until it moves into the defroster position may solve this problem. Blocked fresh air intake: The fresh air intake is at the base of the windshield. It draws in fresh air, which helps the defroster function. If leaves or other debris are blocking the air intake it will affect the defroster.
How do you defrost a window when defroster doesn't work?
Here's what you do: Mix ⅓ part water and ⅔ part isopropyl or rubbing alcohol together and pour into a spray bottle. Spray the solution onto your windshield, and voila! You'll see the ice disappear instantly.
How do I fix my rear window?
0:304:03Doctor Defroster, Repair Rear Window Defroster Tabs - YouTubeYouTubeStart of suggested clipEnd of suggested clipIf your defroster suddenly stops working take a close look at the metal tabs along the edges of theMoreIf your defroster suddenly stops working take a close look at the metal tabs along the edges of the back glass a loose or hanging tab will cause the defroster to fail.
How many amps does a rear window defroster use?
Rear-window defrosters draw a substantial amount of current—10 to 20 amps depending on the application. Most modern cars use a timer circuit to turn the grid off after a reasonable length of time. There are two reasons for this.
How much current does a rear window defroster draw?
Don’t try to bypass the timer. Rear-window defrosters draw a substantial amount of current—10 to 20 amps depending on the application.
How many amps does a defroster draw?
Defroster grids draw a lot of current (10 to 20 amps), and if the fuse is undersize, it won’t last. If the fuse doesn’t look blown, check with your voltmeter—with the key on and the defroster on, you should see 12 volts at both fuse terminals. If the voltage is fine, the problem is somewhere in the wiring or at the grid.
How long does it take for a rear window defroster to clear snow?
It takes a few minutes to clear the snow, and by then the engine has warmed up enough to melt the frost clinging to the inside of the windshield, and has actually made inroads to the frost on the side windows. But the rear-window defroster clears only a narrow strip near the top and bottom the window, leaving a wide strip ...
Can you scrape hard frost off a rear window?
Danger! Let us make this perfectly clear: Do not try to scrape hard frost from a rear window equipped with a heater grid. The resistance wires are silk-screened, essentially painted, onto the glass. They are very easy to scratch, and will not work properly if the scratch breaks the continuity along the wire.
Can you brush snow off your rear window?
I'm certain that the defrost grid is applied to the inside of the rear window. You can safely brush/scrape snow/ice from your rear windows exterior surface.
How to repair a defogger grid?
To repair the grid line on your defogger, simply attach the supplied stencil to the broken grid section and paint on the electrically conductive paint. Allow it to dry, then remove the stencil. You may want to touch up your work with a single-edge razor blade. But be careful.
How long does it take for a defogger to work?
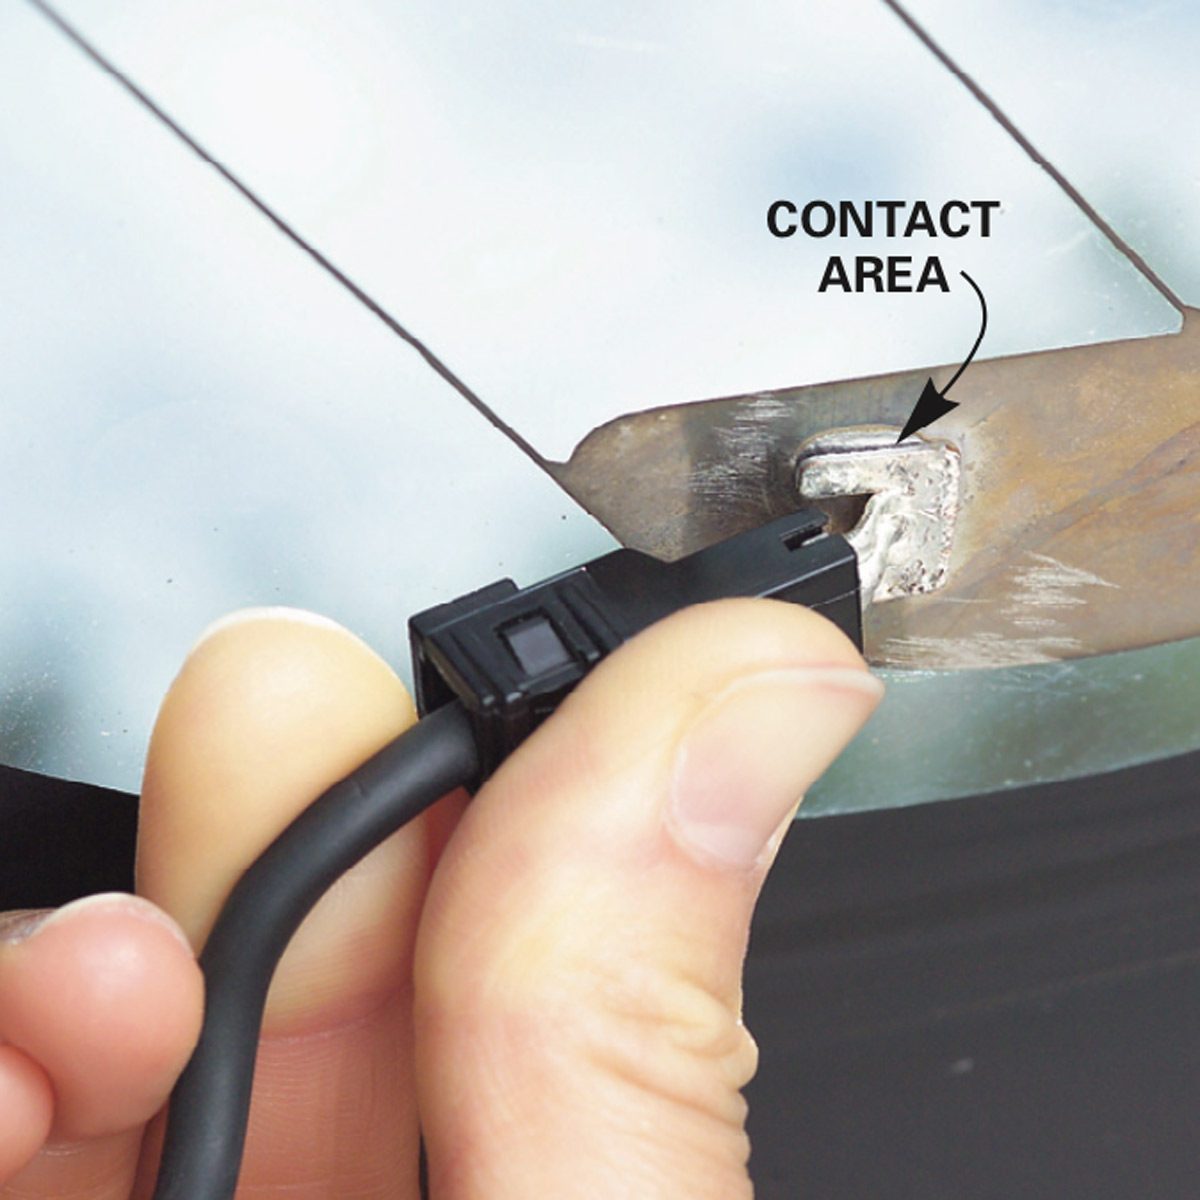
Press the tab onto the contact area. Hold it in place until the adhesive sets up, usually about two minutes. Wait 24 hours to use the defogger.
How to repair a broken grid line?
Allow to dry. Peel the wax paper liner off the stencil and apply the sticky side to the glass, aligning the stencil to the existing grid line. Brush on the conductive paint. As with the tab repair, let it dry for 24 hours before using the defogger.
Causes of Damage
- The defroster consists of electrical tabs, which are soldered onto the grid, and a length of wire. Any damage to the tabs or the wire can stop the defroster from working. Attempting to clear ice from the inside of the window can cause damage, and so too can any protruding items that might catch on the wires. The tabs can also come loose if they are knocked when you pack the trunk t…
Assess The Damage
- There are various repair kits available, including those that repair just the tabs and those that repair the wires. Both are relatively inexpensive and do the job, but before you start, you need to know the extent of the damage you’re dealing with. If part of your window still clears, there is a good chance that the wire has become damaged near where the ice ends and the clear window …
Materials and Tools Needed
- Be aware that some repair kits will include accessories like sandpaper, so open your repair kit to see what is included and what else you need. Some kits include everything, and they should include the glue or applicator that you will need. Otherwise, the only equipment you might need that isn’t included is sandpaper. In most cases, you will need t...
How to Fix A Rear Window Defroster
- Assuming it’s the right temperature and you have all the required equipment in your repair kit, the steps to repair the rear window defogger are as follows:
Conclusion
- A broken rear defogger can present you with a challenge. You will either need to carefully remove ice yourself, every time you want to drive in cold conditions, or may have to replace the rear window or entire rear panel. Alternatively, repair kits are available that provide you with everything you need in order to make the repairs. They are inexpensive but their instructions can be difficul…