
- Replace the thermostatic shower valve. Replacing the thermostatic shower valve with a new one can help solve the problem. ...
- Clear any blockage from the hot and cold inlet filter. A blocked hot inlet filter can make the thermostatic valve stop functioning. ...
- Try flushing the water heater. Flushing the water heaters in the shower will help remove any sediments causing clogging. ...
- Adjust the thermostatic shower valve. Adjustment of the thermostatic shower valve will help solve the issue. You can easily regulate the temperature to your desired degree.

How do I replace the thermostatic shower valve?
Follow the simple instructions below to replace the thermostatic shower valve with a new piece. Use your flat head screwdriver to take the cap off of the handle. You will see the Philips head screw that you can unscrew to remove the shower handle. Under this screw, you will find yet another screw which you can unscrew to remove the lever handle.
Why is my thermostatic shower valve stuck?
Thermostatic shower valve stuck is one of the common problems in a shower system. It can stick due to many issues like wear and tear. When the thermostatic shower valve is stuck, it cannot regulate the water temperature in the shower. In-balance in the water pressure also makes the shower valve fail.
Can a new shower valve be installed?
Installing a new valve can be tricky if you don’t have plumbing knowledge—it could be worth contacting a specialist who works with thermostatic shower repairs. Installing a new valve should help create consistent water temperatures. Does a cracked shower hose matter?
Why is my water temperature inconsistent in the shower?
Water temperature inconsistency is usually a sign of a faulty thermostatic shower valve. The thermostatic shower valve blends cold and hot water to create your ideal water temperature and it also gives you best shower controls. If it isn’t working correctly, your shower might randomly go from having scorching waters to frigid waters.
Can a thermostatic shower be repaired?
Just follow these simple steps to repair a thermostatic shower. 1. Secure the tools and materials that you will need, including Phillips and flat head screwdrivers, deep socket wrench, a pair of pliers and a new thermostatic shower valve.
Why do thermostatic shower valves fail?
Dirt or mess in the system could be one more cause responsible for thermostatic cartridge failure. The flux used by the plumber flushed through and made the thermostatic cartridges filled with debris. It can damage the delicate parts of the Aqualisa Quartz shower tap.
How do you fix a thermostatic shower tap?
0:049:44How To Troubleshoot A Thermostatic Shower Valve - Bathstore User GuideYouTubeStart of suggested clipEnd of suggested clipA Phillips screwdriver is required to remove the control knobs carefully remove these by turning theMoreA Phillips screwdriver is required to remove the control knobs carefully remove these by turning the screw anti-clockwise.
How do you fix a leaky thermostatic shower valve?
Turn off your hot and cold water supply. ... Open your bath mixer tap and let the excess water in the pipe run out. ... Now you can start dismantling the mixer tap. ... You can now remove any cover plates.Now you can get to the valve. ... Use plumber's putty to replace an old gasket. ... Replace any washers at the shower stem.More items...•
Can a thermostatic cartridge be repaired?
This is a thermostatic cartridge repair / reconditioning service. Before placing the order, please contact us with some good photos of the thermostatic cartridge you have to ensure it is a cartridge we are able to service. This service is ideal for shower cartridges which have been discontinued by the manufacturer.
How long do thermostatic shower valves last?
On average, the flow cartridge lasts 2 years.
How do you fix a thermostatic mixing valve?
0:132:05How do I clean a thermostatic mixing valve? - YouTubeYouTubeStart of suggested clipEnd of suggested clipOnce you get that mixing valve body out of there. It can actually be soaked in a vinegar. WaterMoreOnce you get that mixing valve body out of there. It can actually be soaked in a vinegar. Water solution or CLR a lime away for a few hours. And then the valve body can be put back into service.
Can you clean a shower thermostatic valve?
The shower valve the homeowner had in this piece was a DaVinci Thermostatic Mixer, which she sourced from AF Supply in Manhattan. In some cases, the cartridge might just need to be cleaned, which can be done with a little bit of vinegar and a toothbrush, which can be found at any grocery store.
How do you fix a seized shower valve?
0:202:38DIY plumbing tips fix a leaky or stuck shower faucet handle - YouTubeYouTubeStart of suggested clipEnd of suggested clipIt's causing you problems you should be able to easily remove the cartridge with a pair of pliersMoreIt's causing you problems you should be able to easily remove the cartridge with a pair of pliers now aside from using a brand new cartridge. You might be able to utilize your old cartridge.
Why is my thermostatic shower dripping?
Water leak: It is usually hard water and age that wears the seals down so they are probably due for replacement once the 1st one fails. A good coating of silicone grease over all the new seals is always good practice.
Why does my shower keep dripping?
More often than not, a dripping showerhead is the result of worn or damaged inner seals. The rubber washers or O-rings in your shower act as a seal between your showerhead and shower hose, preventing water from leaking out. Over time, these wear down, and when they do, water starts to leak out.
How do I stop my shower from dripping?
Gather Tools and Materials. ... Turn Off the Water Supply and Open the Faucet. ... Remove the Handle Cap, Handle and Faceplate. ... Remove the Locking Clip. ... Remove and Replace the Cartridge. ... Replace Other Parts and Test. ... Remove the Metal Stem in a Shower Faucet with Two Handles. ... Replace the Metal Stem if Needed.More items...
How do I know if my shower cartridge is bad?
There are a few ways to tell if your shower cartridge has gone bad:Dripping or running water when you turn your shower off (most common)Difficulty turning the shower handle, which worsens over time.Shower handle gets stuck or “slips” and doesn't turn on the water.
Are thermostatic showers worth it?
This is, therefore, a safe multi-generational shower. In short, if your shower is prone to running either too hot or cold or even consistently fluctuates in temperature and suffers from unusually low water pressure, a thermostatic shower could be the answer.
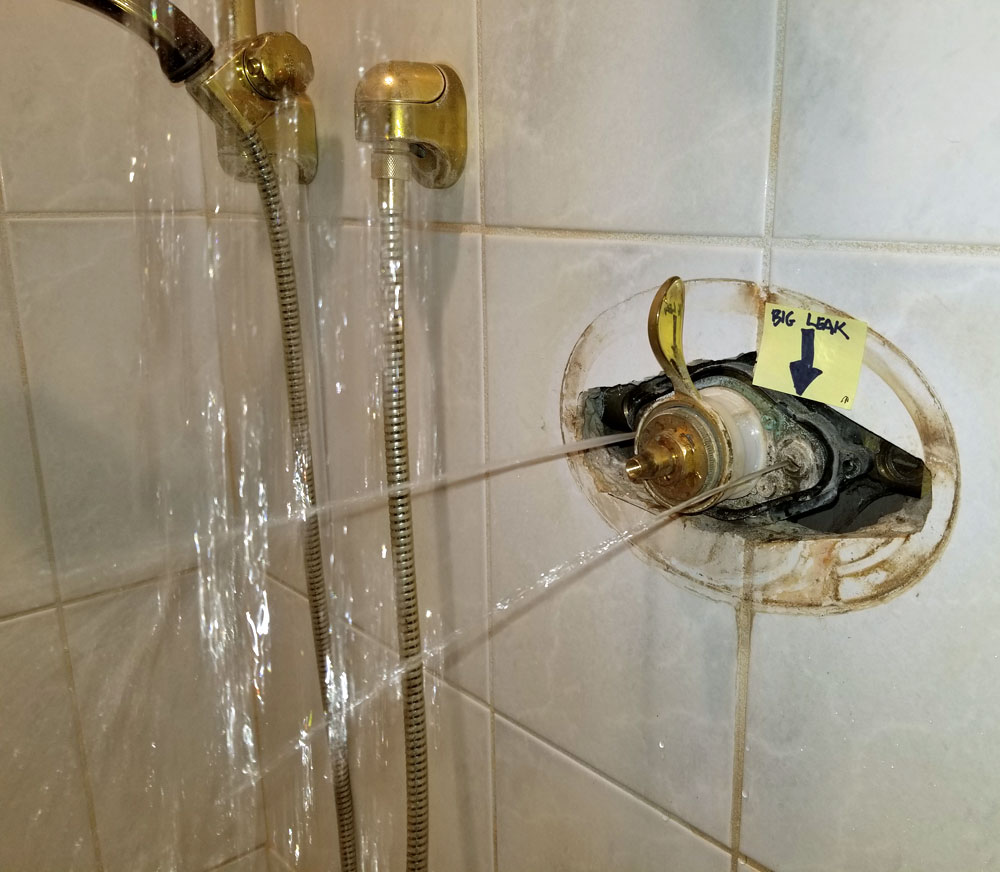
Introduction
A nearly zero cost fix of a stuck shower valve. See video and video description on YouTube for details.
Author
Choose a size and copy the code below to embed this guide as a small widget on your site / forum.
How Does a Grohe Thermostatic Shower Valve Work?
You can preset the water temperature in a thermostatic shower valve. It will ensure that the water doesn’t get hotter or colder. It will be just your desired adjusted preset.
What Are the Grohe Thermostatic Shower Valve Problems?
You might be having problems regarding the amount of hot water in your shower. In that case, it’s possible that your Grohe thermostatic shower valve is broken.
How to Replace Grohe Thermostatic Shower Valve?
To start the process, you have to gather the necessary equipment and materials. Such as the below tools-
Conclusion
Our journey ends here. We have shown you that you can’t fix the Grohe thermostatic shower problem yourself. Instead, you can replace it.
Exploring Thermostatic Mixing Valve Problems & Solutions
Let’s go through the possible causes that mean you are having a faulty thermostatic mixing valve issue.
The Temperature of Water Is Not Right
The very obvious scene that we basically started this piece of writing with. If you notice that suddenly your well working hot water shower is switched to cold temperature without any reason, then it must be the valve having a problem.
The Normal Flow Of Water Is Missing
Have you noticed the way the water comes out from the tap is somewhat different than usual? Such change in water flow is a very common indication of having a thermostatic mixing valve problem. Usually, the flow turns out less and the same goes for the pressure.
Drips Or Leaks Noticeable
One more common sign that you need to go for a thermostatic mixing valve repair is having water seeping out from parts. There could be water accumulated beneath on the floor as well. This is most probably due to a corrosion issue or even a faulty seal could be the reason.
Thermostatic Mixing Valve Troubleshooting
If you are having temperature being inconsistent issues, then you need to work on calibrating the valve properly. Follow the installation instructions to readjust the valve and the too hot/cold discharge should be solved.
How to Replace Thermostatic Mixing Valve?
You probably need to spend one or two hours to get the thing replaced. Anybody with a little bit of plumbing and soldering idea would be able to complete the task. Get a thermometer, a solder, hex wrench, adjustable wrench, and screwdriver.
Frequently Asked Questions
With constant usage, your holder model thermostatic mixing valves can get bad quite easily. And so, you must be prepared for a replacement sooner than later once it has served for quite a few years.

Step 1 - Remove The Handle
- Use your flat head screwdriver to take the cap off of the handle. You will see the Philips head screw that you can unscrew to remove the shower handle. Under this screw, you will find yet another screw that you can unscrew to remove the lever handle.
Step 2 - Remove The Faceplate
- After you have removed the handle completely, remove the handle faceplate. Make sure that you keep all the parts you have taken off in a safe space so you can reassemble them later.
Step 3 - Check The Valves
- Once the faceplate has been removed, you will see a hole in the wall behind which is the thermostatic valve. If you see stop check valves near the thermostatic valve, you will need to shut them off at this time. If you do not see any stop check valves, you must completely shut off the water supply to your house.
Step 4 - Remove The Valve Cartridge
- After you have shut off the water, you will need to take off the valve cartridge. In some units, this component is U-shaped and can be removed with pliers. Other units have nuts and bolts that attach to the cartridge; you must remove these pieces to get the cartridge off.
Step 5 - Remove The Valve
- Completely remove the thermostatic mechanism from the entire water supply, as well as the hose and showerhead. Disconnect the hot and cold water from the valve. Use your wrench to shut them off. After you have done this, remove the actual valve itself.
Step 6 - Finish and Test
- Attach your new thermostat valve where it belongs. Simply put the new valve on in reverse order than when you took the old one off. Turn the valves back on, replace the faceplate and handle.Then test your work by turning on the water and testing the temperature.