
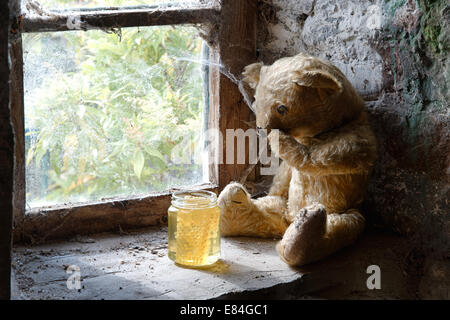
Teddy Bear Restoration
- De-stuff and Vacuum. First thing I did was get an Xacto knife and cut the rear seam in his back, then proceeded to de-stuff him.
- Wash and Dry. Next, I filled up my sink with cold water and soaked him in there. ...
- Sew and Repair. Now that he's all clean I started on his repairs. ...
- Re-stuff Head. ...
- Re-stuff Arms and Legs. ...
- Sew and Re-stuff Body. ...
- Stuff and Seal. ...
- Enjoy! ...
Full Answer
How do you fix a teddy bear that has holes?
Turn the teddy bear inside out to examine each seam for holes and to examine the thread which may be, if the teddy bear is very old, weak and rotten. Sew the holes closed and reinforce the seams as needed, using either a needle and thread or a sewing machine.
How do you remove stuffing from a teddy bear?
Steps If your bear does not already have a hole in a seam through which the stuffing can be removed, very carefully open a straight seam (such as the back seam) by cutting the seam thread with a pair of scissors, a very sharp knife, or a seam ripper. Remove all of the stuffing and discard.
What should I look for when buying a teddy bear?
First step is to take a good look as to what state the teddy bear is in. Mine was missing nearly all the fur on all the gold areas, but the brown fur was generally only missing at the seams. The bear also had a large hole in the crotch where styrofoam pellets were slowly falling out.
How do you fix a ripped stuffed animal with thread?
The excess thread can be hidden by running your needle inside the fabric and back out an inch away, cutting the thread close to the surface of the fabric, and then tugging on the fabric to make the end of the thread disappear inside the stuffed animal. This sewing technique can also be used to repair fallen or ripped limbs.
How do you fix a worn teddy bear?
30:2558:28HOW TO FIX AND REPAIR ANTIQUE AND VINTAGE TEDDY BEARS 101YouTubeStart of suggested clipEnd of suggested clipThis is called a blind stitch or a ladder stitch. And i pull it tight. Then i go in this side. And iMoreThis is called a blind stitch or a ladder stitch. And i pull it tight. Then i go in this side. And i make this stitch there like a ladder.
How can I restore my teddy bear fur?
1:233:53How to make an old stuffed animal look new again - YouTubeYouTubeStart of suggested clipEnd of suggested clipUsing some carpet cleaner on a rag. I didn't want to get him really wet. So I just like went overMoreUsing some carpet cleaner on a rag. I didn't want to get him really wet. So I just like went over him you kind of use a baby wipe as well or if it's not dirty.
How do you fix a bald spot on a stuffed animal?
Use a matted knife or precision scissor for extra accuracy. Sew the fake fur onto the animal with invisible thread. Make sure there is enough fake fur to cover the balding area, but not too much to cause a large, clump-like appearance. Align the fur and sew the seems with your invisible threading.
How do you preserve old teddy bears?
Wrap them in acid-free tissue paper or boxes By wrapping each stuffed animal in acid-free tissue paper or acid-free boxes, you can preserve the life of the stuffed animals when they are not on display or in use. To prevent matted fur, try using more than one box to put the stuffed animals in.
How do you clean a 50 year old teddy bear?
For most teddy bear cleaning, we recommend a surface clean. The best way to do this is with carpet foam or a mild shampoo and warm water solution. Do not get your toy very wet – just enough water to loosen the dirt. Apply the foam or suds with a toothbrush and wipe down with a clean cloth to remove dirt.
How do you make old stuffed animals soft again?
6 Techniques In Making Stuffed Toys Soft & Fluffy AgainCarefully Handwash It.Use A Conditioner.Use Clothes Dryer with Softener Sheets.Use A Towel & Rub It Dry.Brush Its Fur.Use Steam Cleaner (If With Electronics)Soak The Stuffed Animal In Fabric Softener.Brush It Down.More items...•
How do you clean a 30 year old stuffed animal?
Hand-washing stuffed animalsStep 1: Fill a sink or basin with lukewarm water and detergent.Step 2: Wash using a pumping motion.Step 3: Let it soak for 30-60 minutes depending on its condition.Step 4: Rinse until free of suds.Step 5: Squeeze out any water and let it dry on a towel, using a hair dryer to fluff up the fur.
Do stuffed animals decay?
Since stuffed animals are mostly made up of clothing, buttons, beads, and cotton, they'll take a very long time to decompose. Precisely, the average teddy bear takes at least fifteen years before complete decomposition can take place, and that's a long time for a material to sit on a landfill.
How long do teddy bears last?
15 to 18 yearsThe teddybear has a long life expectancy, often 15 to 18 years.
How to dry a bear?
Blow dry the bear with a blow dryer, being careful not to scorch the fur. Allow it to further air dry overnight to ensure the seams are completely dry. ...
What to use to wash a bear?
Scissors. Thimble (if sewing with a needle and thread) A bag of natural cotton or polyester fiberfill (approximately six times the size of the bear) An alternative to fiberfill stuffing is worn out panty hose. If you choose to use this you won't need to take the stuffing out of the bear next time you wash it.
How to remove stuffing from bear?
If your bear does not already have a hole in a seam through which the stuffing can be removed, very carefully open a straight seam (such as the back seam) by cutting the seam thread with a pair of scissors, a very sharp knife, or a seam ripper. Remove all of the stuffing and discard. 2.
How to get water out of a bear?
Remove the excess water by placing an old towel on the floor, placing the bear on the towel, folding the towel over the bear, then standing on it. This will squeeze excess water from the fur without wringing it, which could damage the fabric. Blow dry the bear with a blow dryer, being careful not to scorch the fur.
How to clean a furry dog?
Remove all of the stuffing and discard. 2. Very gently hand-wash the now empty fur in warm water with a mild laundry detergent. Rinse well with warm water. Repeat these steps as necessary, until the wash water no longer becomes coloured with the dirt that may come out of the fur.
Gallery of Much Loved Teddy Bears and Dolls Before & After Restoration
A simple but very important restoration, a broken leg. Reattached and hand sew onto existing fabric.
A gallery or our most recent teddy bear patients who have been sympathetically repaired and restored to their former furry glory
Ready for home, re-stuffed, two new paw pads stitched from the inside for a neater finish and a new voice.
Step 1: Making the Plan
First step is to take a good look as to what state the teddy bear is in. Mine was missing nearly all the fur on all the gold areas, but the brown fur was generally only missing at the seams. The bear also had a large hole in the crotch where styrofoam pellets were slowly falling out.
Step 2: Pick Out Materials
I chose to go with the original color scheme for the repair, so I collected a number of gold interior design fabrics. (There is no reason that you can choose completely different colors.) I started with a neutral sewing thread, but later brought in heavier cream and brown nylon string for the embroidery.
Step 3: Layout and Attach the Patches
I attached the patches with small stitches similar to boro stitching where there is a running set of small stitches. Most of these I made in parallel lines, but alternative patterns can be used to add interest. For example, I chose to create circles for the circle patches on the ends of the legs and arms.
Step 4: Restuffing the Teddy Bear
I fortunately had a bag of recycled polypropylene pellets to use as stuffing.
Step 5: Embroider the Edges of the Fabric
Most of the interior design fabrics will be woven fabrics and the edges will fray if not protected. I chose to add interest by covering the edges with embroidery. Since the teddy bear has a number of curves and shapes, it is helpful to have a curved needle.
Step 6: Other Ways to Use Embroidery Stitches
Embroidery stitches can also be used to create structure and shape in the fabrics. I shortened the length of the stitches on the inside of the ear to cup the ear and make it stand up on it's own.
Step 8: Embroider the Brown Seams
Most of the seams on the brown fur areas were still strong and just needed to be decorated. Here I just wrapped a stitch around the seam.
What happens if you don't sew a stuffed animal?
Because that’s the thing. Even if you don’t sew, you’ll get out the needle and thread to repair a special stuffed animal for a child. Beloved stuffed animals become a member of the family and are often as important to the parents as they are to the child.
Is Pigawig's patch clean?
The patch stands out quite a bit because it is clean and new, but after a few romps outside and a couple of hugs to tear- stained cheeks it’ll blend right in. And with an appropriately sized patch Pigawig looks more similar to his original handsome self .
Step 1: De-stuff and Vacuum
First thing I did was get an Xacto knife and cut the rear seam in his back, then proceeded to de-stuff him.
Step 2: Wash and Dry
Next, I filled up my sink with cold water and soaked him in there. I used gentle fabric soap and soaked him for about an hour. I then slowly laundered him with my hands to make sure he'd get a good scrubbing. Check out the color of the water. Gross! That's about 35 years worth of grime coming out.
Step 3: Sew and Repair
Now that he's all clean I started on his repairs. I turned his arms inside-out and then took a needle and thread that kind of matched the original. Make sure to use a needle that's large enough to push through the fabric, then sew. I don't know anything about sewing so I just looped the thread around. Seemed to work perfectly.
Step 4: Re-stuff Head
Now it's time to re-stuff. I bought this "economical eco-friendly recycled polyester fiberfill" and ended up removing it all after I had re-stuffed fully. DO NOT USE THAT. He ended up feeling like a cheap carnival animal and wasn't super soft and squishy like he originally was.
Step 5: Re-stuff Arms and Legs
Next, I stuffed his arms and legs. I made sure not to stuff his body yet, as I still needed to sew up his back a little more.
Step 6: Sew and Re-stuff Body
As you can see in the first picture, his back is now fully opened up, so, I needed to sew him up again to where my hand would fit in just enough to stuff more stuffing into him. That way, you'll have enough room for stuffing and the final seam won't be so big or noticeable. Now, start stuffing!
Step 7: Stuff and Seal
Last step, sew up his back. I didn't care so much if you could see the thread or seam too much, but because of his fur, the stitching seemed to get lost anyway. Perfect! Now he sits up nicely and looks nice and fat.
How to make a mangled toy look better?
Unstuff and wash. You may not need this step, but washing can be much easier without the stuffing, and replacing or rearranging the stuffing can make a mangled toy look 100 percent better. Most toys have a spot several inches long (usually along their back) where they were turned, stuffed, and hand-stitched closed.
Is a Velveteen Rabbit a perfect toy?
Any repair you do will likely not be perfect, but perfection probably isn't what your child loves about their toy. A favorite bear with a missing arm is still a favorite bear, hold out hope that the toy can be salvaged. "The Velveteen Rabbit" has always been a favorite story of mine, and I figure a little extra wear on a toy just brings it closer to being "real." Plus, battle scars add character!
Is there a backup toy plan?
For one, there is the backup toy plan. This is a great option if you know that this toy will be a favorite at a time when purchasing a backup is still an option. We didn't. Once you have said backup in hand, you are supposed to routinely switch out the toys so they become one and the same in your child's heart.
Can you reattach a toy that has become detached?
Now is the time to reattach any limbs or ears that have become detached . These parts will be much easier to attach properly before you stuff. Don't be afraid to turn the toy inside out for this step, it will make for a much cleaner attachment. Use the other limbs as a guide for your repair.
