How to Repair a Tubeless Tyre Puncture
- The Puncture Repair Kit. These are minimum tools. I also carry a hand pump for filling air to the tyres. The vehicle is very small.
- Prepare the Kit. Take a Repair Strip from the pack and insert in the eye of the Split-eye Insertion tool.
- Repair the Punctured Hole. Twist the Insertion tools 360 degrees and pull out. ...
- Fill Air

What happens if you puncture a tubeless tyre?
a puncture with a tubeless tire is not that hard to fix. mainly because the tires are not filled with air like in the case of tube-type tires. so when they get punctured it does not result in an instant flat tire which can be very dangerous especially if you are on the highway speeding around corners and curves.
Why does a tubeless tire get a puncture?
What are the causes of frequent punctures?
- Tube type tyres. Tube type tyre are going out of style now as more carmakers adopt tubeless tyres for their cars. ...
- Causes of punctures. The primary cause of punctures if of course penetration by any foreign object – nails, spikes, stones, thorns etc.
- Tubeless tyres. ...
- Puncture prevention tips. ...
Is it possible to patch or fix a tubeless tire?
Special patch plugs inserted from the inside of a tubeless tire are certainly safer, but even if you can find someone who will install one for you, every tire manufacturer (and even those who sell patch plugs) recommend replacing the tire instead since it has to come off anyway.
How to tell if a tire is tube or tubeless?
Tubeless Tractor Tires: 10 Things You Need to Know About them
- Are Tractor Tires Tubeless? Most of the current tractor tires are tubeless. ...
- How to tell if a Tractor Tire is Tubeless Read the inscription on the tire. ...
- Is Tubeless Tires Worth it?

Can you fix tubeless tire puncture?
Tubeless puncture plugs are a quick and effective solution. With these, there is no need to take off the tyre – just plug, re-inflate and go. While there are a number of tubeless repair kits out there, most work in a similar way, using a rubber plug to fill the hole.
Can you put a patch on the inside of tubeless tires?
It obviously won't work to slap a patch in the middle of your tire tread. But you can patch that same puncture on the inside. Just be sure to clean off any sealant and dry the surface around the puncture before applying the patch. Note: Only the old-school, glue patches work.
Are tubeless repairs permanent?
While inserted tubeless plugs can stay put for a good long time, this kind of repair shouldn't be seen as a permanent fix, rather than a get-me-home solution. The plugs can work their way out under the forces that general riding puts through a tyre.
How to repair a punctured tyre?
Step 1: The Puncture Repair Kit 1 A Spiral Probe to clean and expand the punctured hole 2 A Split-Eye Insertion Tool to insert the Tyre Repair Strip 3 A small tube of Rubber Cement 4 A packet of Tyre Repair Strips
How long does it take to repair a tubeless tyre?
Attach the pump and fill air. That's all you are done. It took just 15 minutes for me to repair the tyre puncture. Hope you all having vehicles with Tubeless tyres carry a Repair Kit, which will be very useful in an emergency.
How to repair a tubeless tyre?
3. Use The Tubeless Tyre Puncture Repair Kit 1 The kit usage remains same for both front and rear tyres. You can use the “smoothening tool” and pliers set together to pull out the nail from the tyre. Be careful to dispose of the nail safely. 2 Next, you will need to use the “smoothening tool” to smoothen out the small hole made by the nail. You will need to insert and extract the tool multiple times so that the hole becomes big enough to accommodate the rubber strip that is used to clog the hole. 3 Once you feel the hole is big enough, prepare to insert the rubber strip. Remember, do not extract the “smoothening tool” out, but leave it midway in the hole. Now use one complete strip and insert it into the “Strip insertion tool”. If you have taken out the tyre, hold it between your legs tightly. As you remove the “smoothening tool”, insert the “strip tool” side by side and push it in all the way. Wait for a second and pull it out completely.
How to fix a puncture on the move?
If you get a puncture on the move, try to park the car at a safe spot. Make sure it’s a well-lit area and you are not obstructing the traffic flow. A front tyre is easy to repair than a rear one. This is because you don’t have to take out the front wheels – simply locate the nail (or some other sharp object) and turn the wheel outside or inside depending on the location of the nail. You may have to move the car slightly to get a good view of the nail. For rear puncture, you will have to put the car on a jack and take out the wheel. For this, refer to our guide on “ how to change a car tyre ”.
How long does it take to fix a front tyre?
A portable tyre inflator will also come handy to refill any lost air. Time taken: You can easily repair a front tyre in about fifteen minutes including filling back any cost air. If it’s the rear one, add in another fifteen minutes to remove and fit the wheel back.
Do tyres have an inner tube?
As the name suggests, these tyres do not have an inner tube and are mounted on the rim or alloy wheel of the car directly. These are as safe and reliable as a tube type tyre but have a major advantage in the form of air not leaking out immediately in the event of a puncture.
Part - 1: Materials Required
A tubeless tyre requires the following materials/equipment for a puncture repair:
Step 1
Remove the object that caused your puncture (nail etc) and insert the Spiral Probe in the puncture hole.
Step 2
Use the probe to expand the hole by inserting it a couple of times in the puncture hole. Rotate the Spiral probe in different directions make sure the puncture hole becomes clean and expands.
Step 3
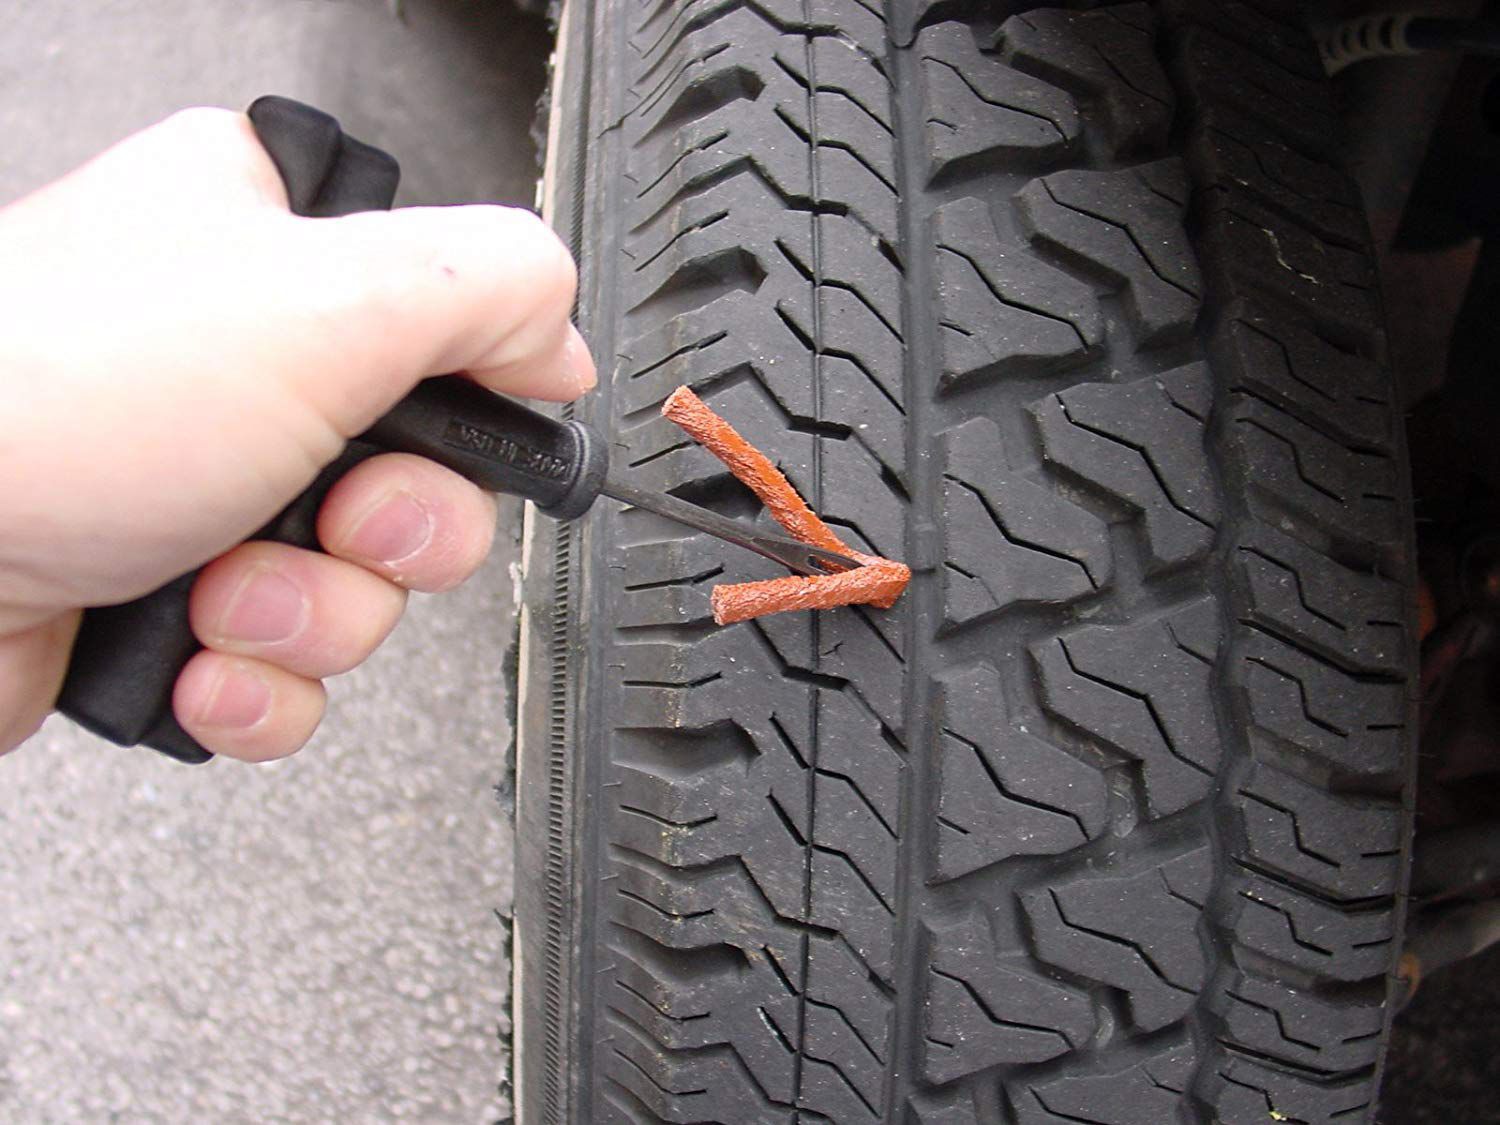
Take a Puncture Repair Strip from the pack and insert it in the eye of the Split-eye Insertion tool. Keep pushing the strip through the eye till the eye lies exactly at the center of the strip.
Step 4
Apply a little bit of Rubber Cement Solution over the Spiral probe and insert it again into the tyre to fill the puncture with some cement. Now, without any delay, remove the Spiral Probe and immediately use the Split-Eye Insertion tool to insert the repair strip into the hole.
Step 6
Once you're about 2/3rd of the way in, twist the Insertion tools 360 degrees while simultaneously pulling it out of the tyre. The goal here is to keep the repair strip in place as you take the Split-Eye Insertion tool out. Don't pull it out too hard or you might take the out the strip along with the tool.
Step 7
Use a knife to trim the excess length of the Repair Strip protruding out if you want. You can also leave it as it is and the extra bit will flatten out and weather as you run your vehicle.
Tubeless tyre puncture kit
1 – Pliers – To extract the object that caused puncture (s) in tyre (s).
Now see how to repair tubeless punctured tyre (s)
1 – First, properly inflate the tyres and locate the puncture (s) by checking for any sharp objects that might have caused the puncture. Because there are times when the case is not exactly of puncture rather of air leaked out of the tyres.
Author: Ankit verma
My need for speed began at a very early age and I realised this as soon as I got my first bicycle at the age of 8. When all the other kids would break downhill I would pedal harder just to go faster and enjoy the thrill.
How to fix a tubeless puncture?
The most common method of fixing a tubeless puncture is to simply fit an inner tube. This repair is a quick and easy way to get you home. You will have to remove the tubeless valve by undoing the lock ring and then fit a new inner tube as you would with a standard clincher wheel. Remember to check that there is nothing sharp on the inside of the tyre such as glass or sharp stones as the sealant may well have sealed numerous other punctures with the sharp object still in place. Just make sure you have a spare tube with you out on your rides and make sure the valve is long enough if you are using deep section rims.
Why does my tubeless tire lose pressure?
There are couple of reasons for unexplained pressure loss in tubeless tyres. The first has already been addressed and that is simply that the latex sealant has dried up . The simple solution is to top up the tyre with sealant and this should then seal the air leaks. Another issue can be damaged rim tape.
What is tubeless plug kit?
Tubeless Plug kits are a quick and easy method of fixing a tubeless puncture. Essentially the tubeless plug kit is a piece of rubberised cord that you force into the tyre cut. The plug fills the hole in and allows the latex sealant to work sealing the puncture. The tubeless plug kit is a very quick and easy way to fix a punctured tubeless tyre on the road side and you can continue to use the tyre for many miles after the repair.
What are tubeless tyres?
Road Bike Tubeless tyres are a fantastic upgrade to any road bike. Benefits include increased grip, lower rolling resistance and increased puncture resistance. Our tubeless tyre fitting service is a quick and easy introduction to the world of road bike tubeless tyres however we often receive questions about tubeless tyre maintenance and puncture repair. The aim of this blog is to answer some of the most common questions and give you a better understanding of the practicalities of running tubeless tyres.
Why are tubeless tyres better for road bikes?
A huge advantage of road bike tubeless tyres is the reduced risk of puncture. There are two reasons for this, firstly as there is no inner tube the risk of pinch punctures is totally eliminated. The second reason is the latex sealant used ensures that the tyre remains airtight and is sealed to the wheel rim.
Can you ride home on a 60 PSI tyre?
The pressure may drop slightly in the tyre as some air is lost and thus also allow the sealant to seal the hole and it is still possible to ride home on tyres with around 60 psi in them.
