Repair Methods for Clapboard Siding
- Split Decision. Clapboard lends itself to splitting due to its long, thin dimensions. ...
- Filler up. Use epoxy filler to patch smaller gouges, scratches or broken corners of clapboard siding. ...
- Patch Things up. If the damaged area is substantial and not a candidate for epoxy patching, cut out the damage and replace it with a new piece.
- Real Enough. ...
- Damaged clapboards and new ones.
- Remove the damaged clapboard with a hammer and pry bar.
- Cut the replacement clapboard.
- Slide the new clapboard into place.
- Add flashing between the joints.
- Tap the board into place, then nail it securely.
How to replace damaged clapboards?
- Choose straight 3/4-inch thick lumber that is free from open knots, splits and checking.
- Set your table saw blade as high as it will go at a 15 degree angle for 1 by 6 lumber, or 10 degrees for 1 by 8.
- Run your siding stock across the table saw with one 3/4-inch edge down, cutting a bevel along its length.
How do you repair Hardie plank siding?
- Cracked Hardie boards from improper installation
- Swelling siding
- Window header flashing not done to code
- Window trim rot
- Lp & Hardie Plank full replacements
- Siding replacement on rotting chimney areas
- Structural rot repair
- Vinyl siding repair and replacement
- Belly band repairs
- Face lifts for curb appeal
How to repair damaged shiplap siding?
Steps:
- Pull loose nails from clapboard siding.
- Tap flat bar under siding to loosen nails.
- Secure old siding by driving ring-shank nails down at an angle through the old nail holes.
- Pull nails from split clapboard.
- Grab butt edge of damaged clapboard and lift up sharply, snapping it off.
- Use flat bar to carefully pry up the siding course above.
How to repair cracked wood lap siding?
What You Need
- Hammer
- Tape measure
- Square
- Flat pry bar
- Putty knife
- Keyhole saw
- Caulking gun
- Paintbrush
- Sanding block
- Utility knife
How do you fix rotted wood siding?
0:2111:13Replacing your rotten wood siding! - YouTubeYouTubeStart of suggested clipEnd of suggested clipSo we're going to take a few minutes this is my rotted piece I'm gonna pull this up and I'm going toMoreSo we're going to take a few minutes this is my rotted piece I'm gonna pull this up and I'm going to cut it over here and put a seam right. There over here you can see the seams are staggered.
How do you restore old clapboard siding?
Painting and Repairing Old Wood Siding—Step-By-StepRemove the old siding. Carefully use a pry bar to remove the siding. ... Add house wrap. ... Now strip the old paint. ... Next glue any cracks at the ends of the boards. ... Patch surface holes with an exterior wood filler. ... Caulk cracks. ... Sand. ... Nail any loose boards.More items...
Can wood siding be repaired?
It's important to repair your wood siding as soon as you notice signs of damage. If it is cracked even a little bit, it can allow water to seep in, leading to rot and mold. Fortunately, if the damage is limited to just a few boards, you can repair them easily without having to do a full replacement.
How do you repair wood siding on a house?
1:324:19How To Repair A Hole In Wood Siding - YouTubeYouTubeStart of suggested clipEnd of suggested clipAny cracks in wood siding or above. Any knots holes that might have fallen away smooth. It offMoreAny cracks in wood siding or above. Any knots holes that might have fallen away smooth. It off filling the areas where the beak has been doing some damage. And you can this draw. The putty knife in
How do you fix rotten wood without replacing it?
0:033:30How to Fix Rotted Wood with Epoxy | This Old House - YouTubeYouTubeStart of suggested clipEnd of suggested clipAnd uh the bottom of the mullion post was rotted so i cut out the rot i mixed up a two part epoxy.MoreAnd uh the bottom of the mullion post was rotted so i cut out the rot i mixed up a two part epoxy.
How much does it cost to replace clapboard siding?
Average cost: $9,000 - $18,750 For instance, basic clapboard style wood siding costs closer to $6 to $10 per square foot, while cedar shakes can cost an upwards of $12. Total siding replacement costs will vary by size of your home and local labor rates for your area.
How do you repair exterior siding?
0:503:26How To Patch and Repair Siding - YouTubeYouTubeStart of suggested clipEnd of suggested clipIt's quick and it's easy all it is is taking a piece of vinyl siding trimming off a couple of partsMoreIt's quick and it's easy all it is is taking a piece of vinyl siding trimming off a couple of parts on it. So that it slides up under a joint and then pop rivets on the bottom.
How do you replace a small piece of siding?
2:256:20How to Replace Damaged Vinyl Siding | Ask This Old HouseYouTubeStart of suggested clipEnd of suggested clipIf they don't overlap when you put them together tight when it shrinks you'll have an opening. AllMoreIf they don't overlap when you put them together tight when it shrinks you'll have an opening. All right now all we have to do now is take the piece start here on an angle and push it up.
What can I use to patch exterior wood?
Epoxy is the perfect material to make permanent repairs of rotting window sills, door jambs and exterior molding that are difficult to remove and expensive to replace. Epoxy is easy to handle too. You mix it like cookie dough, mold it like modeling clay and, when it hardens, you carve and sand it just like wood.
How do you replace rotted wood on the outside of a house?
0:025:08HOW TO REPAIR EXTERIOR ROTTED WOOD TRIM - YouTubeYouTubeStart of suggested clipEnd of suggested clipWe're gonna be using bondo all-purpose putty it's good for all kinds of services wood drywallMoreWe're gonna be using bondo all-purpose putty it's good for all kinds of services wood drywall concrete masonry surfaces dries. Like a rock.
How do you apply wood filler to siding?
1:023:30Applying Wood Putty to Wood Siding - YouTubeYouTubeStart of suggested clipEnd of suggested clipNow applying this stuff is very simple glob it on here you want to lay it flat to glob it into theMoreNow applying this stuff is very simple glob it on here you want to lay it flat to glob it into the hole. And then lift it up straight to scrape it back then just keep doing this until.
What is the difference between clapboard and wood siding?
What is the difference between clapboard and wood siding? Clapboard is a type of wood siding that comes in long, narrow planks installed horizontally, often overlapping, on the exterior walls. Clapboard wood siding can be made from several types of wood.
When should you replace clapboard siding?
It's Faded or Peeling Wood siding should keep its shape and color for 8-10 years under average conditions. If your home needs more frequent painting because it is peeling or has become significantly faded or discolored, it may be time to replace your siding.
Can you paint clapboard siding?
When painting clapboard siding,apply the paint with a roller then “brush it in” using a brush, this saves a lot of dipping with a brush. Rollers are available in many sizes and various widths from 3″ to 12″. A 1/4″ to 1/2″ thick roller nap is good for clapboard siding.
How do you repair a wooden clapboard?
How To Replace Damaged ClapboardsDamaged clapboards and new ones.Remove the damaged clapboard with a hammer and pry bar.Cut the replacement clapboard.Slide the new clapboard into place.Add flashing between the joints.Tap the board into place, then nail it securely.
What is clapboard siding?
Clapboard is a throwback to an earlier time when hemlock, pine, spruce or cedar boards were split lengthwise to produce siding. The slices were then nailed horizontally to the exterior side of the home, overlapping each other slightly to produce a solid exterior surface. Contemporary clapboard siding is installed the same way, but it's manufactured in a variety of different materials. Repairs to clapboard siding is basic no matter what it's made of.
How to fix a split clapboard?
Split clapboards don't have to be removed. Pry open the split or crack with a pry bar and inject exterior wood glue into the crack until it's saturated. Place a 3/4-by-2-inch scrap board under the crack, apply upward pressure to close the split and nail the scrap board in place while maintaining the pressure. When the glue is dry, remove the scrap board. Place finish nails above and below the repaired area to stabilize it . Fill the nail holes with exterior caulk.
How to get epoxy out of clapboard?
Use a putty knife to trowel the epoxy into the damage, defect or gouge. Apply enough so that the surface of the epoxy is slightly higher than the surface of the clapboard. Allow the epoxy to dry overnight. If it shrinks into a depression, add more epoxy and allow it to dry again.
How to clean a chipped wood floor?
Start by cleaning out the soft wood with a screwdriver or putty knife. Remove all the chips, splinters and debris. Following the manufacturer's directions, mix the epoxy resin if needed; some require mixing and some don't. Use a putty knife to trowel the epoxy into the damage, defect or gouge.
Is clapboard real?
Plastic, vinyl or composite clapboard siding -- although technically not real clapboard -- is still referred to as "clapboard style.". Individual clapboards are joined together in two or more sections to create the appearance of traditional clapboard.
What is the best match for clapboard siding?
For your clapboard siding repair, your best bet for a good match on anything out of the ordinary is a good lumberyard. A lumberyard can help you get the best match for your clapboard siding repair. I bought a couple of pieces of the siding, in case I screwed one up or discovered more rot (both very likely scenarios).
What to do with leftover paint from clapboard?
If you have some leftover paint from your last paint job, put a good coat of it on your beautiful patch job. If not, take a scrap of the stuff you pried off to your nearest home center or paint store. They should be able to match it, and fix you up with a pint; that should be plenty to complete this mission, and leave you with a bit for the NEXT clapboard siding repair!
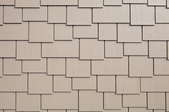
What is Dutch lap siding?
Our siding is tongue and groove, with a cove profile at the top. It’s commonly called Dutch lap or cove lap, and retailers refer to it as Pattern 105 or 106. Home improvement centers aren’t likely to carry siding like this. For your clapboard siding repair, your best bet for a good match on anything out of the ordinary is a good lumberyard.
Remove the Damaged Clapboards
First, you’ll want to start by locating the damaged clapboards that you want to replace and remove them. Simply pry them off using a pry bar, hammer, or another tool that can give you some leverage to help pop them off.
Measure and Cut The Siding
Next, you’ll want to measure the area where you need a new board. It’s important to measure the home and not the board you just removed. Once you have your measurement, add an additional 1/32” for a watertight seal and make your cuts on the new panels.
Install the Panels
Now that you have the siding ready, it’s time to install it! If you’d like to add additional weather protection, you can put tar paper or tin flashing down between your joints. Simply slide it under the existing clapboard to the top and staple it in place.
Do you want to replace clapboard siding with dutch lap?
If you would like to remove this traditional siding and replace it with more modern dutch lap siding, you should not be worried. There are not many differences between the two. You can read more in our articles where we compare dutch lap and clapboard siding more in detail.
Finish Up
If your clapboards have been painted, you will want to touch up the new panels to ensure they match the existing ones. Make sure to use a primer first, letting it dry before you put on the first coat of paint. You may need more than one so that it looks seamless. This finishing touch will help to cover dings and help everything blend.
How to lay clapboards?
Try constructing a jig that duplicates the lap over each course. The first course is laid to match the base line of the water table or wall. If there is variation in the base line, then the clapboards should follow suit, using short lengths where waves are tight. Snap a chalk line from the corner boards to establish a standard course that you can deviate from slightly. Position the first clapboard in a course, then scribe and cut it. Tack the board in place. Then lay the next clapboard in position, aligning the laps. If the end goes past a trim board, mark where it meets the trim and cut it out. A good method is to cut boards long by about 1/16" then scribe them to meet the edge of the trim exactly. With scarf-joint clapboards either work from left to right or the opposite, but not both. Sticking to one lay standardizes all the movements it takes to cut, fit and install the clapboards, and makes the work more efficient. Each scarf joint is fastened with a single nail, grabbing two boards. 6d galvanized cut shingle nails from Tremont Nail Company. Cut nails have blunt points that punch a hold in the wood and make splitting less likely-especially important with scarf joints. If you use wire nails, you can limit splitting by boring a pilot hole in the clapboard. Remember to stagger the joints every course at random intervals. Space these joints a minimum of 16" apart.
How to nail a beveled siding board?
One nail is sunk into the upper clapboard a sufficient distance up from the bottom of the board to miss the lower clapboard. This method of nailing practice does not hold the width of the board captive in the event of expansion. Some argue this method increases the chances a board will split or cup. Single nailing is also seen on lapped, rectangular, weatherboard type siding where the boards are wide and fairly thick.
How far above the butt of clapboard should nails be?
It seems to be the prevalent method for beveled siding in the 1800's and earlier. With this technique, nails are spaced 1/2 inch to 3/4 inch above the butt of the clapboard so that they also anchor the top of the board in the course below.
How to seal a corner with tar paper?
Work the tar paper or house wrap into the bead of caulk with a thin, right angled scrap of wood. The result is a neat, square inside corner that seals barrier, sheathing, and trim all together. Don't let the caulk fill up the corner or the clapboards will not lay right.
What is corner board?
Corner boards protect the corners of the house where rain can deteriorate the butt joints of the clapboard coming together. Mitered joints look professional and elegant but aren't as durable as other options, and the technique required laborious hand-fitting.
Why do carpenters work from the top down?
Some carpenters work from the top down because it is easier to lay out longer courses using machine made clapboards. It also produces an tighter lapping and better weathertight seal since the lower clapboard is wedged into the upper clapboard. Since the lower board is wedged in, it is possible to work alone. Although most carpenters continue to work from the bottom up.
How to make a chalkboard lap?
Snap a chalk line from the corner boards to establish a standard course that you can deviate from slightly. Position the first clapboard in a course, then scribe and cut it. Tack the board in place. Then lay the next clapboard in position, aligning the laps.
Step 1: Pull loose nails from clapboard siding
Loose nails may appear on the siding due to termite infestation or after the clapboard siding is eaten away by rodents. Sometimes just as a result of moisture-induced rot. The loose nails may be hand-pulled easily and removed. Rancid siding can also be removed at this stage.
Step 2: Tap a flat bar from under the siding to loosen nails
If there are nails that are still tightly fixed on the strong siding boards, tapping with a bar may help to loosen them. You could also use a hammer to tap them gently until they become loose and easy to remove. Once they are loose, you can use a claw hammer to pull them out of the siding.
Step 3: Snoop the remaining pieces of old clapboard out from behind the curse above
Make sure all the affected siding boards are removed so that proper replacement is done.
Step 4: Remove vertical caulk joints
Any vertical caulk joints existing between the end boards and siding should be removed using an edge such as the knife or a sharp chisel.
Step 5: Clapboard with a section damage
Where only a section of the clapboard is damaged, mark a new joint using a speed square and cut off the spoiled portion using a circular saw.
Step 6: Remove areas damaged by termite
Use a reciprocating saw to cut the outline of the damaged wood for easy removal. Follow the outline using a circular saw and make vertical cuts with the reciprocating saw. When the outline is clear cut, use a wood chisel and mallet to remove the damaged wood.
Step 7: Use a sill to patch the siding damage
Measure the length and width of the sill removed. Cut out two pieces of lumber, treat them, and nail them together in order to achieve the desired thickness. Using a sled hammer, fix the replacement sill into the hole. A tighter fix can be achieved by nailing the sill into the neighbouring sill.
How to make a replacement clapboard?
To make the replacement clapboard, measure the location of the old one—not the board you just removed. Measure out the first clapboard (always measure twice) and add 1/32″ extra, then cut it—the additional length helps secure the board for a watertight seal.
What is the best replacement for quarter sawn pine clapboard?
High-quality, tight-grain red cedar clapboard is the best replacement for original quarter-sawn, old-growth Eastern pine claps. Give your new boards one coat of primer before installing—this will increase the wood-to-paint bond after installation.
When cross cutting clapboards, always cut from the finished side?
When cross-cutting the new clapboards, always cut from the finished side, starting from the thin top edge and cutting toward the thicker end to prevent breakage. Repeat this process as necessary for each replacement clap needed. Cut the replacement clapboard.
How to get nail out of butt joint?
Start at one end of the butt joint, and work your way across horizontally until it comes free. Sometimes tapping nail shanks under the clap (to the left and right) will free a nail reluctant to come loose. Remove the damaged clapboard with a hammer and pry bar.
What is lap siding?
This type of exterior covering , also known as bevel siding, lap siding or weatherboard, is made from wedge-shaped boards that overlap each other. This overlapping design allows the natural material to expand and contract with changes in weather. It also encourages rain and snow to run off the side of the structure, preventing water damage.
How long does it take for bevel siding to dry before primer?
Wait one or two days for the bevel siding of your home to dry out before applying primer. Be sure to prime any new pieces of lumber, bare areas, or sanded down areas. Make sure to follow the directions on the primer regarding outdoor temperature and humidity. Also, be sure that you have several days of clear weather forecast in order to give the primer a chance to fully dry.
Do bevel siding paints last longer?
Many homeowners who choose to refinish their bevel siding decide to buy the best quality paint available on the market, as they are already saving money on labor costs by doing the job themselves. The premium line from any manufacturer will almost always cover existing color better and last longer than less-expensive products.
Is water based siding better than oil based siding?
However, it is important to note that if your siding has multiple layers of oil-based color from previous paint jobs, it's best to stick with oil-based products moving forward.
Is oil based siding cleaner?
Department of Agriculture Forest Products Laboratory, showed that water-based options expand and contract with the wooden clapboard siding, while oil-based products do not . Additionally, oil-based products must be cleaned with mineral spirits, while water-based colors can be cleaned with simple soap and water. Water-based products are also gentler on the environment because they are lower in volatile organic compounds.
Do slats peel when pressed?
In addition to peeling, damaged slats will feel soft when pressed, so be sure to feel around your home's exterior to find problem areas. These compromised timber pieces should be replaced immediately to ensure the damage or rot doesn't spread.
Can you paint clapboard siding outdoors?
Again, be sure to follow the directions on your paint can regarding outdoor temperature and humidity. At this point, you may also want to lay out tarps to protect any vegetation or property surrounding your house.