How to Fix 19.2 Volt Craftsman Battery Won’t Charge?
- Check the Charger. It could be that the reason why you are experiencing difficulties while trying to charge the...
- Check the Batteries. After you have made sure that the problem is not with the charger itself, then the next logical...
- Getting it To a Repair Shop. If you are having a hard time trying to fix the battery...
Full Answer
How to wire a craftsman to a car battery?
Attach the cable to negative pole of the battery of the battery one-third. Connect the cable from the battery fourth to three battery positive pole. Make sure that the two sons do not touch other. Plug the other end of the cable to the negative terminal of the battery to the negative terminal of the battery of your craftsmen 19.2 Volt.
Why won’t my Craftsman drill charge?
(Possible Causes & Fixes) The feeling can be quite an annoying one. You go to grab your Craftsman drill, pull the trigger and nothing happens. You make sure that the battery is secured but still nothing. So, assuming the battery is dead, you pop it into your charger and still nothing happens.
What should I do if my Craftsman battery explode?
Read the label on your Craftsman 19.2 volt battery and make sure that it contains NiCad cells. If it contains the Li Li-ion or Li - on cells, try not to repair the battery, Li-on because the batteries a circuit breaker which receives the amount of the fee a cell limit. Overload circuit breaker can cause, Li batteries catch fire or explode.
How do you know if your Craftsman drill battery is dead?
The feeling can be quite an annoying one. You go to grab your Craftsman drill, pull the trigger and nothing happens. You make sure that the battery is secured but still nothing. So, assuming the battery is dead, you pop it into your charger and still nothing happens.
How do you revive a Craftsman 19.2 volt battery?
1:032:34Resuscitate Craftsman 19.2V NiCa battery - YouTubeYouTubeStart of suggested clipEnd of suggested clipAnd then attached the positive terminal eight times one two three four five six seven eight and theMoreAnd then attached the positive terminal eight times one two three four five six seven eight and the top one one two three four five six seven eight then I switched to the other negative terminal.
How do you fix a lithium ion battery that won't charge?
1:275:45How to fix a lithium ion battery that won't charge - YouTubeYouTubeStart of suggested clipEnd of suggested clipSo that's the first thing you'd want to try is use some sandpaper. Use a shim use something to cleanMoreSo that's the first thing you'd want to try is use some sandpaper. Use a shim use something to clean the contacts.
How do you fix a drill battery that won't charge?
0:333:07How To Fix A Cordless Drill Battery That Won't Charge - YouTubeYouTubeStart of suggested clipEnd of suggested clipSo once you get these to where each one is touching. The positive the positive negative to negativeMoreSo once you get these to where each one is touching. The positive the positive negative to negative just let it sit for five minutes.
Where is the positive and negative on a Craftsman 19.2 volt battery?
When your charger is ready, make sure it is set for 20v output, connect the red, positive, clip to the positive terminal on the rounded side of the battery charge connector and the black, negative, clip to the negative terminal on the flat side of the battery charge connector.
How do you bring a dead lithium-ion battery back to life?
Seal the Li-ion battery in an airtight bag and put it in the freezer for about 24 hours, ensuring there is no moisture in the bag that could get the battery wet. When you take it out of the freezer, let it thaw for up to eight hours to restore it to room temperature.
How do you bring a battery back to life?
Prepare a mixture of baking soda mixed in distilled water and by use of a funnel pour the solution into the cells of the battery. Once they are full, close the lids and shake the battery for a minute or two. The solution will cleanse the inside of the batteries. Once done empty the solution into another clean bucket.
How do you rebuild a cordless drill battery?
2:0910:54Cordless Drill Battery Pack Rebuild for $20 or Repair for $0 - YouTubeYouTubeStart of suggested clipEnd of suggested clipYou're going to set your old battery pack. Right next to you don't cut it apart. We'll need this topMoreYou're going to set your old battery pack. Right next to you don't cut it apart. We'll need this top bracket piece off of it but the rest of it we don't need to really worry about. It.
How do you reset rechargeable batteries?
1:265:23how to fix a dead rechargeable battery - YouTubeYouTubeStart of suggested clipEnd of suggested clipI'm going to apply a negative and positive to the negative and positive terminal. And all you haveMoreI'm going to apply a negative and positive to the negative and positive terminal. And all you have to do just touch it a couple of times like four or five times.
Can a lithium battery be repaired?
In theory, replacing one dud lithium cell in a battery should be real easy. However manufacturers make repairing broken lithium batteries almost impossible. They weld and glue them tightly together so it's impossible to access individual cells, man-with-a-mission Amrit Chandan explains.
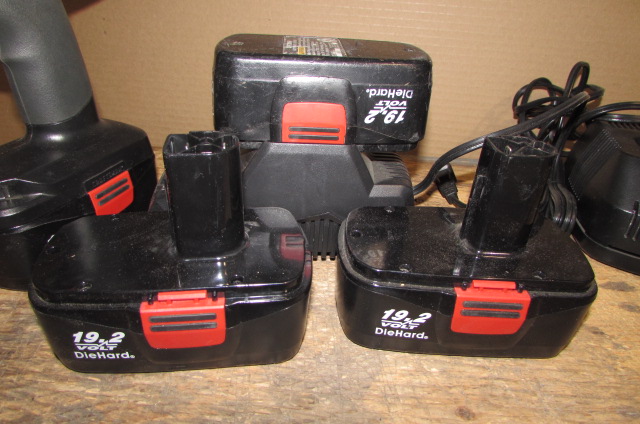
Are all Craftsman 19.2 batteries interchangeable?
The 19.2 v batteries are not compatible or interchangeable with the 20 v models.
What does NTC and ID mean on Craftsman battery?
ago. Additional comment actions. NTC is a thermistor for temp measurement. ID connects to a battery authentication IC in the battery pack that communicates over a single wire connection.
Who makes Craftsman 19.2 volt tools?
Made by Black & Decker and also available under the B&D Matrix line. More than 5 years ago, someone asked about whether it was still worth investing in the Craftsman C3 19.2V lineup.
Why is my Ryobi charger flashing red and green?
The most common cause for your Ryobi Charger showing flashing red and green lights is that the battery has been over-discharged.
Can electric bike batteries be repaired?
While it is possible to repair an eBike battery, especially if you only have a minor performance issue, the reality is that most eBike batteries aren't worth the effort of trying to fix them. This is especially true when you have a severely damaged battery. Trying to fix it can cause you to get hurt.
Why is my Ryobi battery not charging?
The most common problem is the Ryobi battery gets stuck in sleep mode. This can be fixed by 'mini-charges' – slot the defective battery into the charger for a few seconds, then remove before the lights flash. Repeat (up to 30 min) until it has enough charge to 'revive' itself.
Are Black and Decker 20V batteries interchangeable?
A: Yes, you can use all 20V BLACK+DECKER batteries since they are compatible with 20V BLACK+DECKER tools.
How To Fix The Craftsman 19.2 Volt Battery?
If you are a drill professional, then you are well known about the craftsman 19.2 volts. It is because when compared to others, it is working perfectly!! But, the craftsman 19.2 volt battery charger problems are a common thing. By using some solution, you can resolve it.
Why It Is Essential To Fix The Battery
For instance, if your craftsman 19.2 V drill battery gets issues, you have to check it once. It is because the charger has the green indicator light.
What Is The Average Cost To Replace The Battery?
If you decide to replace your dead battery, it is possible, but many people consider the cost. The cost to replace the battery depends on where you get it from. Otherwise, it is a lower cost to replace the battery.
What Are The Ways To Rebuilding Your Battery?
In order to rebuild the battery, you have to learn about the inner working of it. If you need to use the necessary tool for your project, you have to know the fixes. The process for rebuild the battery is simple. To rebuild, you have to follow the steps below!!!
How Does The Charger Work?
If you have to follow the above steps, then the battery will work properly. For instance, if your craftsman drill does not work correctly, you have to check the steps that may have missed any actions. Then, you can make your battery new. It is perfect to use these steps!!
When Is It Best To Rebuild The Battery?
If your battery is not holding the charge means, you have to check the charger first. It is because sometimes the problem occurs within the charger.
Things To Remember
If you use the drill, you have to know how to find the battery didn’t take the charger, including many of the people making the same mistake charging the battery overnight. Don’t do that. Once you find the issues, you have to rebuild the battery and hold the charge.
Step 2: Open the Case
If you have a #10 security torx bit, use it to remove the 4 screws from the case. If you only have a normal torx bit, first use the scratch awl with enough pressure to break off the little pin in the middle of the screw head. You might have to come at it from several angles but it can be done.
Step 3: Remove the Circuit Board
First, pry up the white plastic charge connector support so it is loose. Remove the 4 small screws holding down the circuit board. Cut the four thinner wires from the outer edge of the plastic battery holder (three red and one blue).
Step 4: Rebuild the Battery
Set the charge connector base back in its original position with the two pins in their respective holes. Use the glue gun to fill in the space and to attach the other two legs to the battery holder so it will stand firm. Strip the red wire from the charge connector and the other red wire from the battery pack.
Step 5: Build the Charger
I live in Mexico and bought my universal laptop battery charger on Mercadolibre.com for about $10 dollars. Yours may be different depending on where you live, but there are cheap universal laptop chargers (made for lithium batteries) readily available. The charger must have a 20v output position on the selector since these are 19.2v batteries.
Monday, July 4, 2011
Craftsman of 19.2 volt battery-battery tools include drills, circular saws and hand vacuum cleaner. A battery replacement, which do not become a burden can often it costs about 30 percent of a new tool. To save money, try fastening of the battery.
How to Fix a Craftsman Battery 19.2 Volt
Craftsman of 19.2 volt battery-battery tools include drills, circular saws and hand vacuum cleaner. A battery replacement, which do not become a burden can often it costs about 30 percent of a new tool. To save money, try fastening of the battery.
How much does a Craftsman battery cost?
Battery cost. Depending on the vendor that you choose, 19.2 volt Craftsman batteries can start as low as $35. That said, they can also run as expensive as $65-$70. While that may seem like a steep cost, it can at least provide peace of mind in knowing that it will work as it is supposed to.
Why does my Craftsman drill keep popping into the charger?
You make sure that the battery is secured but still nothing. So, assuming the battery is dead, you pop it into your charger and still nothing happens. There are two likely reasons: an internal component has gone bad in either ...
How to attach a battery to a battery holder?
Set your charge connector base back into the original position and make sure the two pins are in place. With a little glue, fill in the space and attach the two legs to the battery holder so that it stands firmly. Strip out the red wire from your charge connector as well as the red wire from the battery pack.
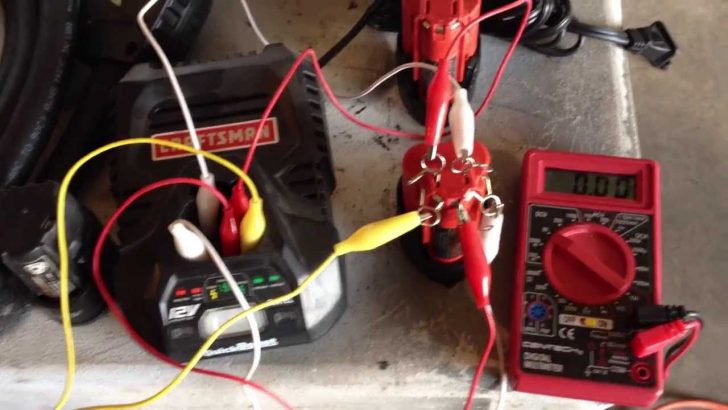
How to check if battery is working?
There are two answers here, one specific and the other vague. Circuit board. First, check the circuit board. Use a tester to ensure that it is functioning properly. If it isn’t, replacing it is certainly possible, though you may have to rebuild the entire battery.
How to see the innards of a battery?
Now that we can see the innards of the battery, start by prying up the white plastic charge connector support. Just make sure that it is loose, you don’t need to remove it entirely. Then turn your focus to the four screws that hold the circuit board down.
