How to Repair HDMI Cable
- Cut off the connector from one end of an HDMI cable with the blade of a utility knife. Dispose of the connector in the trash.
- Slit 15 inches in from the cut end on the outer insulation with the blade of a utility knife. Peel back the outer insulation and cut it ...
- Push the wire mesh back from the cut end until you come to where the outer insulation is still on the cable. Peel open the foil insulation ...
- Cut the broken connector end of the HDMI cable off with the blade of a utility knife. Dispose of the broken cut connector end in the trash.
Full Answer
How to repair HDMI cable?
Replacing a Broken HDMI Cable Connector
- Make Sure the Connector is the Issue. Before you can conclude that your lack of a picture or fuzzy display is really due to the cable’s connector, ...
- Cut the Connector. Once you've ruled out other possible causes, unplug the cable from the receiver or whatever device you are using to receive your signal (game ...
- Acquire Replacement Connector. ...
How to fix HDMI end?
Step 4: Fix Wires
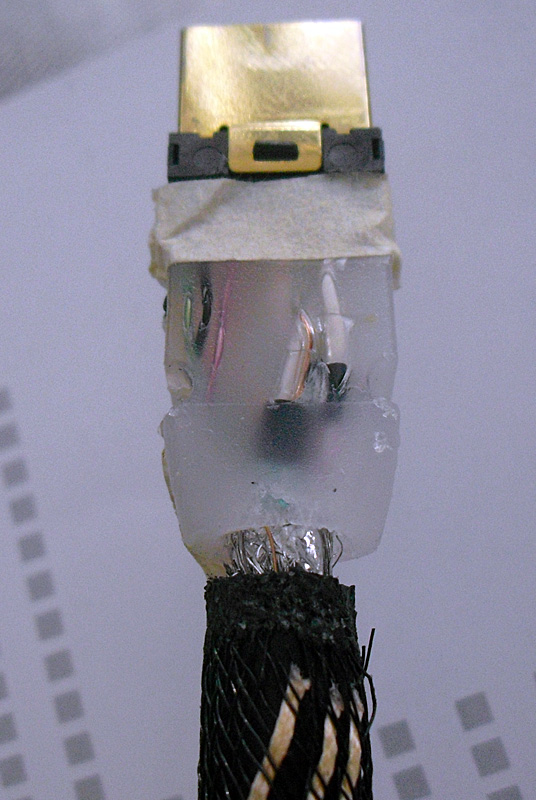
- Put glue near to the bottom of the holder.
- Fix wires near to the connector by bamboo stick.
- Fix wire holder on the surface using double sided foam tape.
- Insert connector in the F-F adapter and clamp it.
- Precisely align the connection with wires.
- Fix clamp with masking tape.
- Align each wire if needed.
Will Ethernet replace HDMI?
While this is an exciting feature, your current devices are not designed to accept an Ethernet signal through an HDMI cable. This means that if you want to utilize Ethernet over HDMI, you will need to purchase all new equipment that is HDMI v1.4 compliant and has the ability to recognize an Ethernet signal coming across your HDMI cable.
Can you get a bad HDMI cable?
Some output devices have multiple HDMI ports too, so you can always check those as well. If all devices work, you are on the right input, and the picture or sound still does not appear, you may have a bad HDMI cable. In this case, you will likely need to simply replace the HDMI cable. Technology has grown more robust.
Can HDMI cable ends be repaired?
An HDMI cable provides a single solution for sending high-definition video and audio from one device to another. Those who have installed HDMI cables in their walls are ill-equipped to removing them if a connector becomes broken. You can repair the broken connector by replacing it with a new connector.
How do I fix my HDMI end?
0:514:42HouseLogix - HDMI Repair Kit Installation - YouTubeYouTubeStart of suggested clipEnd of suggested clipFor an easier repair first remove the mounting. Screws. Cleanly cut off the damaged HDMI end makeMoreFor an easier repair first remove the mounting. Screws. Cleanly cut off the damaged HDMI end make sure all the inner conductors are the same length remove. One and a half inches of the insulation.
Can you cut and rejoin a HDMI cable?
It is impossible to splice a HDMI cable. the signal path, attenuation and various other components will be stuffed. I suggest use a female / female connector or buy a longer cable.
How do you fix a bent HDMI cable?
0:472:02How to Repair a Broken HDMI Connector - YouTubeYouTubeStart of suggested clipEnd of suggested clipIf you push or tug in any direction. It will bend and cause this male end of the connector to warp.MoreIf you push or tug in any direction. It will bend and cause this male end of the connector to warp. So we'll just take our flat head screwdriver. And apply it. Right against the bottom edge here.
How do you solder an HDMI connector?
0:3012:46New way to solder an HDMI connector without making a mess - YouTubeYouTubeStart of suggested clipEnd of suggested clipWhat low mel solder does is it will lower the melting temperature of the joints. So we can easilyMoreWhat low mel solder does is it will lower the melting temperature of the joints. So we can easily remove the connector. Let's apply flux. And we're going to soak those joints with low melts out.
How do you crimp a HDMI cable?
0:170:57HDMI Crimp Tool P#93-100-007 - YouTubeYouTubeStart of suggested clipEnd of suggested clipThis versatile tool has aerodynamic covered handles for comfort.MoreThis versatile tool has aerodynamic covered handles for comfort.
How many wires are there in HDMI cable?
The HDMI cable consists of 5 twisted pairs, 4 separate wires and a drain wire, used for grounding. The four blue colored pairs are meant for transmission of TMDS signals, the twisted pair with silver aluminium foil is for Ethernet (HEAC) and Audio Return Channel (ARC).
What is inside a HDMI cable?
0:323:01Inside a HDMI cable: Home Theater Geeks 265 - YouTubeYouTubeStart of suggested clipEnd of suggested clipSo on there there's 19 pins that's basically broken up into three different groups. So there's highMoreSo on there there's 19 pins that's basically broken up into three different groups. So there's high speed which is really where the video the audio. And all that control information lives.
Can you splice HDMI to USB?
Depending on the device "USB" cables that connect to HDMI can use a special USB connector that has extra pins embedded in it to allow the transmission of the HDMI signals. You cannot simply cut and splice a standard USB cable to a HDMI in many cases. Buy a cable suitable for your device.
Is it OK to bend HDMI cable?
Damage to HDMI Cable/Plugs A simple solution to this could be to use a right angled HDMI adapter as it is recommended that a minimum bend radius of 25mm is applied during installation. Further to this, any damage to the HDMI plugs (such as being crushed) could result in poor signal quality.
Can HDMI work with broken pins?
Distinguished. It will simply stop working if there is an issue. If the cable is still working then you're fine. If it was an Analog connection such as VGA a broken pin could reduce quality/colour channels.
Can you make HDMI cables?
New from Greenlee is a HDMI Field Installation Kit designed to let the installer make custom length High Speed HDMI cables. The kit includes the stripper, crimper and field installable HDMI plugs allowing the installer to make any custom length HDMI cable from 1' to 100'.
Why would an HDMI cable stop working?
What Causes an HDMI Cable to Fail? An HDMI connector uses 19 pins, so if any of these pins or the individual lanes inside the cable become damaged you're going to experience issues. These pins carry various information like video, audio, clock information for syncing, and communications data.
Why does the HDMI cable not work?
If your HDMI connection is still not working, it's likely there are hardware issues with your HDMI port, cable or your devices. In this case, there are a few things you need to do: First, replace your HDMI cable with a new one. This will resolve any problems you might be experiencing due to your cable.
Are all HDMI connectors the same?
HDMI connectors are available in three sizes: standard, mini and micro. There are also different types of HDMI cable (see the chart below). Not all cables use the logo but the cable specifications should indicate whether it is Standard, High Speed, Premium High Speed or Ultra High Speed.
How do I fix my Xbox one HDMI?
How to Fix Your Xbox One HDMI IssuesCheck Your HDMI Connection. ... Try a Different/New HDMI Cord. ... Connect with HDMI Out. ... Check AVR Connection. ... Power Cycle Your Xbox One. ... Turn on Low-Resolution Mode. ... Turn off 24Hz on Your Console. ... Contact Xbox Support.
Step 1: Tools You Need
This is what you need: (give or take) - Solder Iron - Solder - Desolder wire - Second Hdmi cable (optional) - Hdmi to hdmi connector (optional) - Hdmi connector - Tyraps - Sissors - Extra power cables - Multi meter - Aluminium (optional) - Crocodile clamp assist (thing) 2/3 hours... Some soldering experience...
Step 2: Wiring It All..
First we need to know which connection is going where, since both Hdmi internal connections are the same (no twisted wires or anything like ethernet patch cables) the pinout is very straight forward. 1 is going to 1 2 to 2 3 to 3 etc.... But ones the cable is cut you cannot measure which wire comes from which pin, so I used a multimeter to check which wire belongs to which pin.
Step 3: Start
Next: Peel of 2 cm from the cable and get some room between the wires.... As you can see we have a few wires (for display detection, 5 volt power, clock speed and data) in beautiful colors. And 4x 2 pairs of wires in a colorfull metal shield, these are the data wires for the picture and sound. Before you begin, slide the first part from the connector on, its a common mistake to have the connector in place and then realise that you needed to slide that one on first.
Step 4: Soldering..
First I did some solder on the contacts and on the wires. After that you can hold them together and push them in place while heating the contact on the connector.. The 25 watt soldering iron was more then enough, (maybe to much) for the job... Work from left to right (or right to left) If you dont you could end up like photo 3, with to much sodler it will touch the contact next to it and change into one big solid lump. This can be corrected by using desolder wire... After a a few wires you could be in for a suprice, some of the wires can bearly make it to the contacts. (going through all the other wires) This should not be a really big problem, just try to place the wires in the shortest way from cable to connector... And done, I was left with two ground wires, which I cut off.
Step 5: Some Extra Precaution..
After searching on the internet for a Hdmi connector I found out that there wasnt anything with a cable strain relief. Iam not sure why but do they think that 15 small wires are going to hold out? I replaced another connector two months back because it malfunctioned after working for two months... And for some reason my cable is a lot thinner then the exit hole in the back of the connector (of course there are many types of Hdmi cables out there but you would think they thought of that when they designed this connector) Not sure what to think of this... And tata...
Step 6
Then we put the hole assembly into the wall, since the walls are hollow we have enough room to put it all in there without bending anything. After closing it all up there is nothing to be seen, but if this cable breaks we can connect a new Hdmi cable within 10 minutes. And there you go, running a signal through a 5 meter long cable with a self-soldered connector, then through a Hdmi to Hdmi connector and then another 3 meters to the Imac with converter. I tested it with a 1080P trailer and there was no scrambeld or strange picture to be seen, proves that Hdmi is a good and solid protocol. Way to go Hdmi... Bytheway a nice tip that I've got from from c0lin was to get one of these: http://www.infinitecables.com/pop/wpk-hd1-d.htm And I have seen comments about using glue as a strain relief, I have something to say about it: DONT DO IT! It didnt work with any glue I used (including hot glue) and I ended up doing al this a second time. The cable itself and the connectors are so smooth that any glue you would use has trouble sticking on to it. That is why I left it out and used the aluminium and Tyraps approach. For more tips (untested) look at the comments below (first page).
Step One: Gather Your Tools and Supplies
To do this job right, you’ll need some tools and a new HDMI connector.
Step Two: Prepare the HDMI Cable
Inside the cable itself, there are lots of wires. Before you can access them, you’ll have to strip away the wire insulation a bit. To do so, use a sharp razor or utility knife to make a careful cut through only the outermost layer of the cable.
Step Three: Identify the Wires
If you buy an HDMI kit, it might come with a guide that makes this part easy. Your new connector has a screw holding its two halves together. Remove that screw, and you’ll see the terminal block inside the connector. It’s usually green and has a bunch of small terminals where (you guessed it) you’ll install the tiny wires you exposed in step two.
Step Four: Attach the Wires
Most HDMI cables have soldered connections. To make repairs more manageable, you can buy repair kits with a connector that doesn’t require soldering.
Step Five: Protect Your Work
If you prepared your wire with a strip of shrink wrap, you’re ready to slide it up over the connections you just made. Use a heat gun to apply the right amount of heat, and seal your connections.
Step Six: Enjoy!
Plug your new connector into the appropriate port on your device and enjoy your handiwork.
How to get wire mesh back from cut end?
Push the wire mesh back from the cut end until you come to where the outer insulation is still on the cable. Peel open the foil insulation with your fingers to reveal a twisted pair of wires lying above four other pairs of twisted wires. Untwist these two wires from each other.
How to cut insulation off a cable?
Slit eight inches in from the cut end on the outer insulation with the blade of a utility knife. Peel back the outer insulation and cut it off the cable with the knife. Push the wire mesh back from the cut end until you come to where the outer insulation is still on the cable. Peel open the foil insulation that is now revealed with your fingers.
Can HDMI cables be repaired?
Those who have installed HDMI cables in their walls are ill-equipped to removing them if a connector becomes broken. You can repair the broken connector by replacing it with a new connector.
Step 1: Remove Wire Insulation
Most HDMI cables have a braided shielding layer and soft PVC jacket, this allows easily remove insulation with a utility knife, without damaging data wires.
Step 2: Trace Wires
There is no standardized color schematic for HDMI cable wiring, this means we should trace each wire one by one. For this you will need a digital multimeter with continuity test function. If your multimeter does not have a continuity test you can measure resistance.
Step 4: Fix Wires
After the wire holder is done, we can fix wires in the grooves. No matter what you use to cut grooves, soldering iron or coping saw, there is a big chance that wires will be slightly loose. The best way which I found to fix wires in place is hot glue.
Step 6: Assembling
There is almost no space inside the case at first glance. Actually we can freely fit all excessive cable with no problems.