How to Fix a Leaky Sink Drain Pipe
- Method 1 Patching Leaks Temporarily. Apply a 2-part epoxy putty for the most durable temporary fix. A 2-part epoxy putty...
- Method 2 Fixing Leaky Pipe Connections. Tighten the slip nuts between pipes if they’re leaking at the joint. A lot of...
- Method 3 Replacing the P-Trap. Put a bucket or pan underneath the pipes. Even though there’s...

How to repair a leak under the sink?
- Turn off the water supply line in the house.
- Drain the damaged line and ensure that the area to be patched is clean and dry so that the epoxy putty will properly adhere to the pipe.
- Tear off enough plumbing epoxy putty to fully cover the surface around the leak.
- Knead the putty until it is pliable enough for application.
- Apply the putty to the pipe.
Why there is a leak underneath your bathroom sink?
Replace the Faucet’s Inner Cartridge
- Turn Off the Water Supply. This is typically done underneath the sink. ...
- Remove the Faucet Handle. Most handles have screws that you can find pretty easily either on their sides or rears. ...
- Find the Retaining Nut and Remove it. ...
- Remove the Old Cartridge. ...
- Install the New Cartridge. ...
- Put it All Back Together and Test the Faucet. ...
How do you fix a leak under a kitchen sink?
Kitchen Sink Leaking From Drain The Easy 5 Minute Fix
- Disconnecting the pipe from the kitchen sink drain using adjustable wrench. ...
- Remove the Big Locking Nut On The Strainer. ...
- Next Clean Off The Old Plumbers Putty From The Sink. ...
- Prepare The New Parts For Install
- If you are replacing the whole strainer and I really suggest you do it because it is not very expensive and will avoid problems in the future. ...
How to replace a kitchen sink drain strainer, repair leak?
- Measure the drain hole to make sure you choose a basket strainer that fits.
- If your sink has an existing basket strainer, use it as a model to help purchase your new one so you know it will fit.
- Make sure the tailpiece fits your drainpipes as well, and choose a brass tailpiece so it lasts longer.

What is a good sealant for sink drains?
A clay-like substance called plumber's putty is the most popular choice for sealing sink drains, but you can also use silicone caulk.Most Popular: Plumber's Putty.Plumber's Putty Installation.Alternative: Silicone Caulk.Silicone Caulk Installation.
Why is my sink drain dripping?
The dripping noise you hear could come from some sort of motion, concussion, or vibration in the pipes themselves. For instance, temperature changes that cause thermal expansion may make pipes produce tapping, ticking, or dripping noises. Abnormal water pressure or air in the pipes can also create such sounds.
How do you seal a kitchen sink drain?
Just follow these steps to put a seal around a kitchen sink.Remove old sealant. Scrape it off with a putty knife or cutting tool. ... Clean the area. Avoid exposing the surface to water. ... Prepare the silicone sealant. ... Apply the sealant. ... Smooth the sealant. ... Remove excess sealant. ... Wait for the sealant to dry.
Should I use silicone or plumbers putty for sink drain?
Plumbers Putty or Silicone for Sink Drain You can use silicone caulk or plumber's putty to seal sink drains. Plumber's putty may crack and cause leaks as the clay dries out with time. But it's the preferred choice of sealant if you'll be adjusting or removing the drain.
Can you use plumbers putty to stop a leak?
The best place is with one of the most common tools professional plumbers use. Plumber's putty can help fix the leaks that spring from plumbing fixtures around the home.
Do I use plumbers putty on sink drain?
If you need to stop or prevent leaks around your faucet, sink or tub drains − plumber's putty is the product you need. Plumber's putty is a sealing staple for professionals, homeowners and DIY-ers alike.
How do you seal a stainless steel sink drain?
0:241:48How to Properly Install a Sink Drain in a Stainless Steel Sink - YouTubeYouTubeStart of suggested clipEnd of suggested clipWe're going to take some plumber's putty roll it and place it on the perimeter of the strainer.MoreWe're going to take some plumber's putty roll it and place it on the perimeter of the strainer.
How do you seal a sink plug hole?
Apply a bead of silicone sealant around the opening of the plug hole to create a watertight seal inside your basin. Fit the waste into the hole, making sure any slots are pointed towards the overflow (if your waste and basin has these). Apply a second bead of silicone around the thread before adding a washer.
Can you use plumbers putty instead of silicone?
Plumbers use it because it remains soft for a long time and maintains a watertight seal, but unlike silicone and other types of caulk, plumber's putty is not an adhesive, so a fixture or drain part sealed with putty remains easy to remove if you ever need to replace it.
Do you need plumbers putty if you have a rubber gasket?
The rubber gasket should be sufficient to seal without putty.
Community Q&A
Include your email address to get a message when this question is answered.
Tips
You don’t need to turn the water supply off for your sink since the drain pipe doesn’t connect to the water line. [29]
Warnings
If you don’t feel comfortable working on the pipes yourself, contact a professional plumber to ensure your drain gets fixed properly.
About This Article
This article was written by David Balkan and by wikiHow staff writer, Hunter Rising. David Balkan is a Professional Plumber, CEO of Balkan Sewer and Water Main Service, and President of Balkan Sewer and Drain Cleaning.
How to seal a leaky area with epoxy?
Wrap the epoxy putty around the leaky area and make sure that the putty forms a layer around the leak. Taper the putty edges tightly so that it makes a watertight seal.
How to fit a clamp on a gasket?
Fit the clamps by tightening the bolts of the rubber gasket. Tighten the bolts until the clamp sets perfectly in the leaking area and does not turn later. Clamps are also used for a temporary replacement.
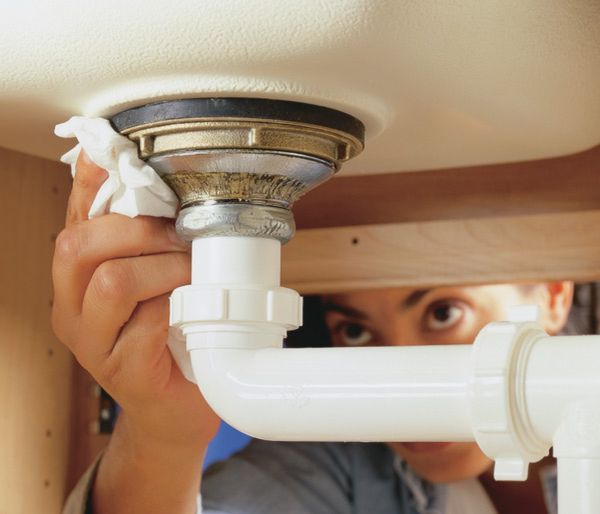
Disconnecting the pipe from the kitchen sink drain using adjustable wrench
Most plumbing today is done with PVC pipes which most of the time you can take off by hand. But if by chance your plumbing has not been upgraded this is where you will need your adjustable wrench. Just get it tight around the slip nut and give it twist counter clock wise.
Remove the Big Locking Nut On The Strainer
Next, you need to remove the locking nut from the strainer. This is a huge nut and what I do is grab a flat head screwdriver and a hammer and hit it on the tabs. You can try your adjustable wrench first. You Can also buy a tool here on Amazon to use. In any case you need to get this off.
Next Clean Off The Old Plumbers Putty From The Sink
The next thing is to grab a piece of paper towel and clean the old plumbers putty off the sink. You can also use a scraper to get the stubborn stuff off. Just don’t scratch it up.
Reinstall Your Sink Strainer
Now, we are going to reinstall the sink strainer. Place it in the sink and lightly push down to squeeze out just a little plumbers putty. Then go under the sink and place the paper ring first then the rubber ring and slide the bottom of the strainer on.
Reinstall Your drain Pipe
Next Reinstall your drain pipe making sure you snug up the nuts. Once that is done go back up top and remove any excess plumbers putty and save it for another day. Run the water and check for leaks. Thats it all done.
Is a Bathroom Sink Leaking Dangerous?
Yes! A leak in the bathroom sink might be more serious than a leak elsewhere. For example, if there is a locked vanity concealing the drain, leaks might go unnoticed for a long time. This can lead to water damage and potential mold growth.
Understanding Your Bathroom Sink Drain Assembly
Every sink is unique, and what you'll find in the bathroom is distinct from what you may find in the kitchen. However, many of the sink's components are common across all versions.
Diagnose The Source of the Leak
The first step in repairing your bathroom sink leak is locating the leak. The main causes of bathroom sink leaks are lose pipe connections, a bad drainpipe, or a leaky drain flange. Once you've figured out where the leak is coming from, you'll be able to take the appropriate action. The faulty component may be repaired or replaced.
Leak Coming From The Shut-Off Valves
The hot- and cold-water supply shut-off valves must be replaced. You'll need to turn off the main water supply. Shut-off valves are either screwed on with a compression fitting or soldered on, which necessitates the services of a plumber.
Leak Coming From The Water Hose
Remember to inspect for leaky pipes or your supply lines. To tighten the connection, use a pair of pliers. If that doesn't work, remove the hose and inspect the gasket to see whether it's worn and needs to be replaced.
Leak Coming From The Sink Drain
Leaks from the drain-assembly are the most difficult to repair and almost certainly need the assistance of a specialist. If you're ambitious and want to give repairing a bad drain pipe a try, the P-trap is first removed before the drain is. Wrap the drain threads with plumber's tape and replace the drain and P-trap.
Leaky Sink Drain Flange
You may want to call a plumber for a leaky sink flange too. Remove the sink drain and check it for any leaks. Clean it if necessary, and if the flange is damaged, replace it. You'll need to reconnect everything as it was before when you're done.
How to tell if a sink connection is leaking?
Even if you don’t see the connection leaking directly, there is one way to tell when things are wrong. Check the cabinets under your sink. You may notice that there is pooling water at the bottom of the sink. In some cases, you may notice that everything underneath is soaking wet.
Why is my thread connection leaking?
Generally speaking, there are four main reasons why you would be experiencing a leak at the connection. Those four reasons are: Compression nut is worn. The connection point is held together by a compression nut. The nut can become worn or cracked over time, particularly at the threads.
Why is my compression nut leaking?
Compression nut is loose. One of the most common reasons for a leak at the connection point is a loose nut. Try tightening the nut first and foremost. In most cases, that should be enough to stop the leaking. If that doesn’t do it, you can move on to other troubleshooting methods. Pipes are the wrong length.
What happens when a pipe is clogged?
P-trap clog. When there are clogs in your drain pipe, it can put extra pressure on the joints and pipes at the connection point.
What happens if you don't install a pipe?
Even if the installation was done by a professional, that does not necessarily mean the job was done properly. Pipes can be the wrong size, putting pressure on the joint at the connection.
Can plumber's putty be used for a leak?
Where plumber’s putty can be used. Plumber’s putty is really only meant to be used for things like sealing drains and faucets. Putty can deteriorate over time and eventually leaks will come back. If you are using it for a leak solver, you will have to revisit the issue sooner rather than later.
Is plumber's putty a fix all?
The fact of the matter is that plumber’s putty really should only be used in certain instances. It is definitely not a fix-all and will provide serious disappointment if treated that way. Where plumber’s putty can be used.
Why do plastic pipe traps leak?
Plastic-pipe traps are more likely to leak when the pipes or washers become misaligned, so check for alignment. Check the pipes for rust or corrosion. If s pipe is corroded or cracked, take it with you to the hardware store to buy an appropriate replacement.
How to stop a drip?
You can often stop a drip by simply tightening the coupling nuts (shown in the illustration below). The best tool for this is a large pair of slip-joint pliers (also referred to as “tongue-and-groove pliers” or by the trade name, Channellock pliers. Open the jaws of the pliers wide enough to grip the coupling nut.
How to seal a tongue and groove trap?
First, check the large rubber slip washers or cone-shaped plastic washers that provide the watertight seal at each joint between the trap’s pipes. Rubber washers may leak as the rubber hardens over time. If they’re hard or deteriorated, replace them.
How to tighten a metal trap?
On a metal trap, tighten them hand tight plus about a half turn, using slip-joint pliers to grip the nut. On a plastic trap, just hand tighten, and, if needed, give the nut about a quarter of a turn with slip-joint pliers. If that doesn’t work, loosen and remove the entire trap. Tongue-and-Groove Pliers Channellock.
