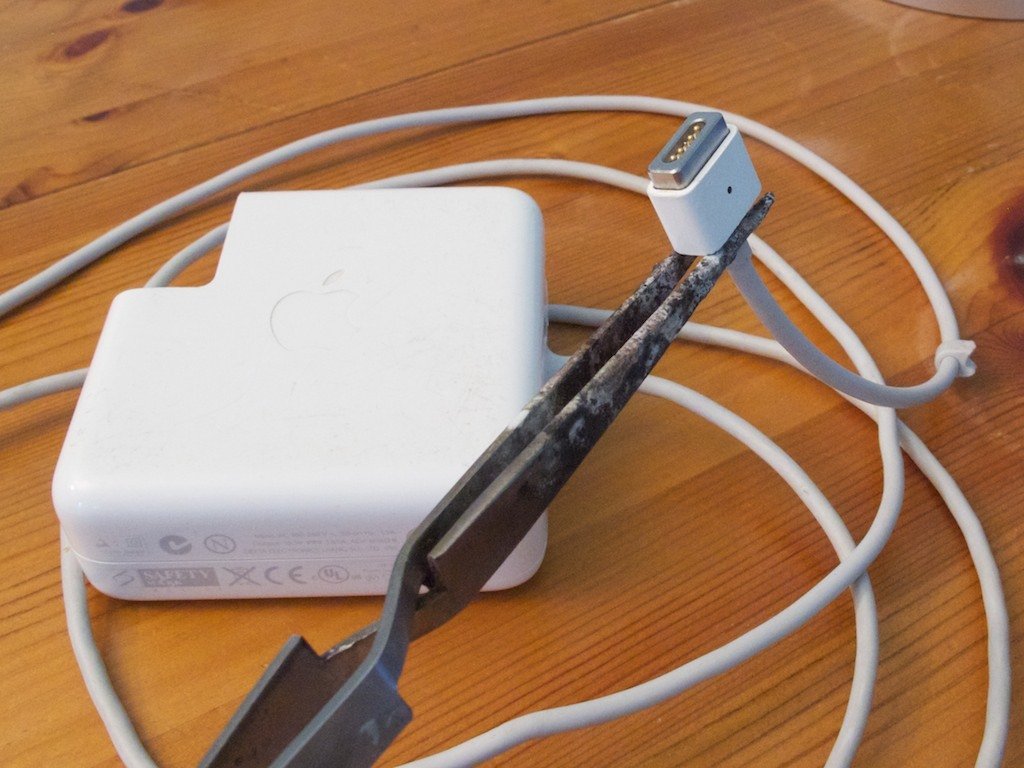
- How to Repair a MagSafe Connector. Open the jaws of the vice so the metal shell of the magsafe just fits between them. ...
- Unsolder the braids and core from both sides of the circuit board.
- Cut back 15mm of sleeve from the cable. Split the braid in to two equal parts and twist together.
- You will probably want three strips of heatshrink. They will need to fit over each other shrunk in place so likely need to be different sizes.
- Tease out the fibres that are contained within the braid and then cut them off as close to the cable as possible.
- Solder the core on to the opposite side to the chip (in the opposite corner). Cut two pieces of the smallest heatshrink - roughly 4mm long.
- Make sure that the cable comes off the centre of the circuit board so the housing will fit over it.
- Reattach the strain relief. It needs to fit under the two lugs on the circuit board above the solder points for the braid and core.
- Slide down the first bit of heatshrink and shrink down. ...
- Slide the housing back over the magsafe connector. It goes on either way round (there is a hole for the led on both sides.

How do you fix a broken MagSafe connector?
Step 1 How to Repair a MagSafe Connector. Open the jaws of the vice so the metal shell of the magsafe just fits between them. Place the magsafe between the jaws with the cable upwards and the white plastic housing resting on the jaws. Cut off the cable as close to the housing as possible.
What should I do if my MagSafe power adapter separates?
If your DC cable (the thin cord that attaches the MagSafe connector to the power adapter) separates at either end of the cable, or you observe stuck pins on the MagSafe connector, immediately stop using the cable and get your cable and power supply evaluated. Learn how to reduce cable strain and get tips for using your MagSafe power adapter.
How do I know if my MagSafe adapter is bad?
The LED on the adapter connector doesn't light up when attached to the computer. The adapter only charges the computer intermittently. The adapter's white insulation separates from the magnetic end of the MagSafe connector. Your MagSafe connector on the adapter or computer has debris in the connector. You see a spark.
What is the MagSafe connector on a MacBook?
The MagSafe connector and MagSafe port on your Mac notebook contain a magnet that can possibly erase data on a credit card or other magnetic devices. Keep magnetic media away from the end of the MagSafe adapter and away from the MagSafe port.
How do you fix a frayed MagSafe charger?
0:102:25A quick fix for that nasty frayed out Magsafe cable. - YouTubeYouTubeStart of suggested clipEnd of suggested clipSo what are you gonna need to fix. This you'll need some heat shrink tubing soldering iron andMoreSo what are you gonna need to fix. This you'll need some heat shrink tubing soldering iron and solder dyeing cutters and wire.
How do I fix my MagSafe 2 cord?
5:507:08Magsafe 2 cable repair: Connector - YouTubeYouTubeStart of suggested clipEnd of suggested clipOver the joint. So that it doesn't roll back or pull. Back. We pull it all the way to the yellowMoreOver the joint. So that it doesn't roll back or pull. Back. We pull it all the way to the yellow insulation ensuring that the whole joint is covered. And remember we had the rubber.
Can Macbook charger be repaired?
Yes, Magsafe adapters are repairable (well, mostly).
Is MagSafe cable removable?
The cord attached to the MagSafe charger is non-removable, and the charger itself is made from aluminum, but the front middle section has a grippy, rubber-like feel to it.
How can I charge my MacBook without a MagSafe?
Use a USB Type C Depending on the version of the MacBook that you're currently using, you can charge it using an Android USB Type C phone charger. You can simply plug the cable into your MacBook and charge it from an outlet. This charging system is similar to how you usually charge your iPhone.
Why is my MagSafe Charger not working?
If you're running an outdated iOS, this could also be the reason why your MagSafe charger is not working. Install the newest software update, then try charging your iPhone with the MagSafe charger again. To update iOS directly from your iPhone, open Settings. Then, tap General -> Software Update.
How do you fix an Apple charger cord?
0:403:43How to Fix Broken iPhone Charging Cable [ Unbelievable Hack ]YouTubeStart of suggested clipEnd of suggested clipBut how you can fix that so what you have to do is you have to buy these tapes ping tubing's theseMoreBut how you can fix that so what you have to do is you have to buy these tapes ping tubing's these are for electrical wires insulation.
How do you fix a broken Mac charger?
2:243:24How to fix a cat chewed broken Macbook charger - YouTubeYouTubeStart of suggested clipEnd of suggested clipAnd electrical tape on and when you put the electrical tape on make sure you put it right in here soMoreAnd electrical tape on and when you put the electrical tape on make sure you put it right in here so that these two are never going to touch so wrap one wire. And then wrap the other wire.
Can I use electrical tape on MacBook charger?
3 days agoIf you're really in a pinch to fix up your MacBook charging cable, then dig out an old roll of electrical tape and get tapin'! It may not look like the prettiest DIY fixer-up job for your cord, but it totally does the trick – at least for a little while.
Why did Apple discontinue MagSafe?
Apple discontinued MagSafe in 2017 as it switched its laptops to the more common USB-C standard. And then, with the iPhone 12 launch this week, the company reintroduced it in a reimagined form. The new MagSafe doesn't actually plug into any port at all.
Is MagSafe charging bad for battery?
Let's get straight to the question, will Magsafe charging ruin your battery? Using Magsafe wireless charging in the long run does shorten battery life. The main reason that your battery is ruined is the heat. Theoretically, preventing your iPhone from overheating is the key to avoiding battery capacity reduction.
Why is it called MagSafe?
MagSafe, as the name suggests, uses magnets to connect a charger to a charging port on the Mac, with the idea that if a MagSafe cable is pulled, it disconnects safely without pulling the MacBook down from wherever it might be resting.
How do you open a magsafe 2?
Step 2Open the cord winding flaps.Heat the power brick's plastic casing with a hair dryer, and/or run a razor blade along the seam between the two halves of the casing, in order to weaken the adhesive. ... Insert your pliers and pry slowly. ... The cord winding flap will fall out.Do the same on the other side.Work slowly!
How do you test a magsafe charger with a multimeter?
Step 14Use the multimeter to check your work;pins 1 and 5 should not short with pins 2 or 3.and you should be able to see +6.8V DC between them.If all looks good, its time to test with your mac. Even if the LED doesn't light (if might be heat damaged) boot your mac and check the power status.
What happens if a DC cable separates?
If your DC cable (the thin cord that attaches the MagSafe connector to the power adapter) separates at either end of the cable, or you observe stuck pins on the MagSafe connector, immediately stop using the cable and get your cable and power supply evaluated. MagSafe 2 pins. MagSafe pins.
What happens if my AC adapter charges?
If the adapter now charges the computer, the AC plug or AC cord that was originally in use should be replaced and no longer used. If you notice any of the following, stop using and replace the AC plug or three prong cable: The AC blades are bent (don’t attempt to straighten a bent blade).
What happens if you plug an electrical plug into a live outlet?
This is usually normal and can occur when you plug any electrical appliance into a live outlet. If the spark comes from somewhere other than the blades of the plug, if you experience any damage or discoloration of the adapter, or if you have other concerns about sparking, contact Apple.
How to make sure your power outlet is working?
Make sure that the power outlet you're using is working correctly. Plug in a known good appliance, such as a lamp, TV, or clock, and confirm it powers on properly.
Where to plug power adapter?
Always plug the power adapter directly into a power outlet using the AC plug, or place it on a table or other well ventilated area. Avoid placing your adapter in a poorly ventilated area, like on a couch, thick carpeting, bedding, or a pillow. Avoid covering the adapter with a blanket or other insulation.
Why does my AC blade wobble?
The blades wobble side to side when in locked position on the AC plug or they seem loose on the three -prong cable. The AC blades have black marks or other visible damage. There is visible wear or a break of the insulation on the three-prong cable.
Step 1 How to Repair an Apple Magsafe Charger Magnetic End
Start by examining the cable for any obvious cracks, holes or exposed wires
Step 2
Using a multimeter or continuity tester check to see if the pins are shorted
Step 3
To remove the plastic cover grasp the metal end using a pair of heavy duty pliers (or in a vice) and use a flat bladed screwdriver to gently lever the cover off
Step 4
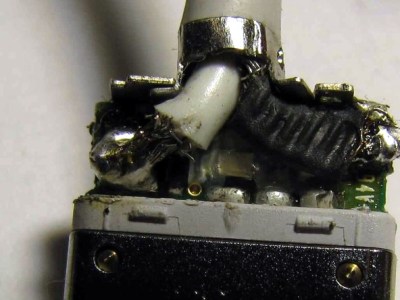
The discoloration here suggests we may have found the source of the problem
Step 5
Having determined the likely source of the problem we need to remove the plug from the wire to see if the charger still works
Step 6
Strip the ends of the cable and use a multimeter to check that these leads are no longer shorted
Step 7
Assuming you've confirmed the leads are not shorting the next step is to plug the adapter back in and check to see if power is still being delivered
Step 5: Heat Shrink Tube
Put sufficient piece of the bigger heat shrink tube on the whole power cable. I have used about 10 cm.
Step 6: Solder the Wires Together
Solder the white wire of the power brick to the white wire which runs in the middle of the power cable. Pull the piece of heat shrink tube of the seam and heat it with a lighter.
Step 8: Put the Charger Back Together
Apply CA glue on the places you see on the picture and press the power brick back together. Make sure the cable runs nicely through the hole and is not stuck.
Step 9: Test It
As you can see it's a very quick and simple task. All that is left to do is to test it out it should work perfectly.
Step 1: Opening the Adapter
Some other tutorials online have used things like a Dremel and a cutting wheel to cut the casing apart or they used a screw driver to gouge the plastic apart. This not only makes reassembly more difficult but makes the reassembled adapter a bit ugly.
Step 2: Ok So Now It's Open
Ok so now you've got the adapter open. You'll see two winding ears, two spring clips, the electrical internals and then the two halves of the outer case. Take the internals completely out and set the case components aside so we can use them later for reassembly.
Step 3: Removing the Current Cord
Bend the shielding out of the way to allow you to access the two solder points we'll need to desolder to be able to remove the current cord. These are labeled white and black in the picture below. Use desoldering braid to desolder the cord and then remove the old cord from the main board.
Step 4: Solder in New Cord
Solder in the new cord. Pretty self explanatory really. Then once you complete that bend the shielding back into place and retape the other flap of shielding back down.
Step 5: Reassembly
Insert the charger back into half of the outer casing and then reinsert the spring clips.