- Enable the Mesh: 3D Printing toolbox. Launch the Blender software Go to “ File > User Preferences > Add-ons ”. ...
- Import the STL file. Go to “ File > Import > STL .” Browse for the STL file you want to repair on your PC and select it.
- Repair the STL file. On the left sidebar, you should see the Print3D Click on it, and you’ll see a variety of options for repairing the STL mesh.
- Save and export the STL mesh.
Full Answer
How to edit STL files for 3D printing?
Meshmixer is also a useful tool to edit STL files, resculpt entire sections, as well as optimize and finalize 3D models. Read our tutorial with 15 pro tips for editing STL files for 3D printing. Autodesk’s Netfabb distinguishes itself by being geared towards engineers with its advanced 3D printing preparation capabilities.
Is it possible to repair STL files for free?
How to Repair STL Files with Free STL Repair Software | All3DP This article is free for you and free from outside influence. To keep things this way, we finance it through advertising and shopping links. If you purchase using a shopping link, we may earn a commission. Learn more How to Repair STL Files with Free STL Repair Software
What is a typical STL file repair workflow?
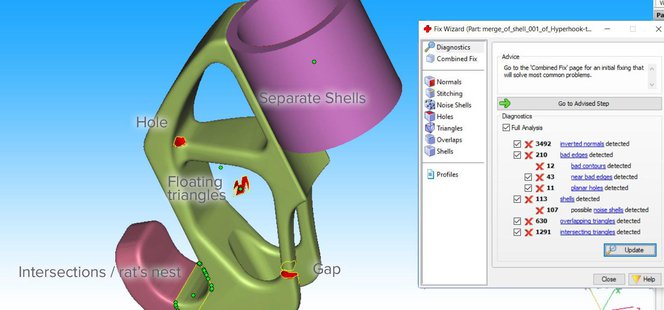
A typical STL file repair workflow contains the following steps: Auto-repair. The STL repair software’s wizard will attempt to fix all major errors, including holes, separate shells, and intersections.
What are the most common errors in STL repair?
The STL repair software’s wizard will attempt to fix all major errors, including holes, separate shells, and intersections. Separating shells. A mesh consists of collections of connected triangles. It can contain multiple continuous surfaces that ideally are joined together while obsolete ones need removal.

How can I fix STL files?
This can be very useful for simple edits such as adding text, removing part of the design, or combining two STLs into a single model.Step 1: Import an STL. ... Step 2: Apply Size and Scaling Adjustments. ... Step 3: Edit STL File. ... Step 4: Export as STL. ... Step 1: Open STL file and convert it to solid model. ... Step 2: Edit STL file.More items...•
What software can you use to check and repair STL files?
Advanced STL Repair Software TutorialsMeshmixer.Meshlab.Magics.Blender.Netfabb.
How do you repair STL in Cura?
7:0315:59Mesh Repair made easy with Cura, Prusa Slicer and 3Dbuilder - YouTubeYouTubeStart of suggested clipEnd of suggested clipThe other way to repair. Improve the slicer is you can right-click the model and then in the menu.MoreThe other way to repair. Improve the slicer is you can right-click the model and then in the menu.
Why is my STL file corrupted?
When trying to import an STL file with the STL Slicer or Pattern Sculptor, it fails and reports “Invalid or corrupted STL file”. Most likely the STL file has conflicting ascii and binary encoding signatures. The issue can be fixed with the free program Meshlab.
Can STL files be edited?
You can definitely edit and modify STL files, and it can be done using two different types of modeling software: CAD (Computer-Aided Design) Software. Mesh Editing Tools.
How do I fix STL files online?
How to use STL repairing app to repair your STL file.Click inside the file drop area to upload a file or drag & drop a file.Your file will be uploaded and we'll show you file's defects with preview.Select the issues we can fix for you, and click the repair button.More items...
Why is my STL hollow?
Re: STL file renders as hollow. They are just sheets floating in air. Even if you add thickness to them, they will still be just slightly thicker sheets floating in air. You really need to merge them with the other solid models so that you have one complete solid.
How do you repair 3D printed parts?
More videos on YouTubeClean the surface of both 3D printed parts with sandpaper to flatten the surface.Apply a thin layer of acetone to both surfaces with a brush or a cloth.Now connect the two pieces with a clamp or even some tape and let it sit.After drying out, your pieces should be nicely bonded back together.
What are mesh fixes?
Mesh fixes settingsUnion overlapping volumes. If a model contains two volumes that interfere (as if they were placed through each other), this setting allows you to fix that. ... Remove all holes. ... Extensive stitching. ... Keep disconnected faces. ... Merged meshes overlap. ... Remove mesh intersection. ... Alternate mesh removal.
How do I convert a STL file to Gcode?
Converting STL Files to G-codeStep 1: Download a conversion tool. ... Step 2: Import your . ... Step 3: Repair the mesh. ... Step 4: Convert your mesh to a shape. ... Step 5: Convert the shape to a solid. ... Step 6: Export your solid to a . ... Step 7: Import your file in to Fusion 360. ... Step 8: Generate toolpaths.
How do I repair STL files in blender?
BlenderStep 1: Open STL file. File > Import > STL. ... Step 2: Edit STL file. Switch from Object to Edit You can now see all the edges your model.Step 3: STL Repair. Activate the 3D Print Toolbox: File > User Preferences > Add-Ons > Mesh: 3D Print Toolbox.Step 4: Export as STL file.
How do I know if an STL file is printable?
0:000:34Always check if your STL-file is printable! - YouTubeYouTubeStart of suggested clipEnd of suggested clipHow to check if your file is printable let's see if I have any holes in valid orientation or borderMoreHow to check if your file is printable let's see if I have any holes in valid orientation or border edges drop your file into netfabb. And if you have a red triangle.
How do I repair STL files in blender?
BlenderStep 1: Open STL file. File > Import > STL. ... Step 2: Edit STL file. Switch from Object to Edit You can now see all the edges your model.Step 3: STL Repair. Activate the 3D Print Toolbox: File > User Preferences > Add-Ons > Mesh: 3D Print Toolbox.Step 4: Export as STL file.
How do you repair STL on Meshmixer?
0:597:51Fixing Broken STL's Using Meshmixer [BEST WAY] - YouTubeYouTubeStart of suggested clipEnd of suggested clipRed all you have to do is go to edit go to make solid. And this is the the air you can be playingMoreRed all you have to do is go to edit go to make solid. And this is the the air you can be playing around in mostly in order to fix this model.
How do you repair 3D printed parts?
More videos on YouTubeClean the surface of both 3D printed parts with sandpaper to flatten the surface.Apply a thin layer of acetone to both surfaces with a brush or a cloth.Now connect the two pieces with a clamp or even some tape and let it sit.After drying out, your pieces should be nicely bonded back together.
How do you repair STL with Fusion 360?
Usually, Fusion 360 lets you know the STL has issues as soon as it's imported, and all you need to do is select the Repair tool and choose what to repair. Repair options include the “Close Holes” and “Stitch and Remove” actions, and once selected, the program will run them automatically.
What Are STL Errors in 3D Printing?
STL file errors in 3D Printing occur due to faults in the model or issues stemming from poor exportation of the CAD model.
How Do I Fix an STL File That Needs Repair?
Now that we’ve seen some things that can go wrong with an STL file, it’s time for some good news. You can repair all these errors and print the STL file successfully.
How Do You Simplify & Reduce an STL File Size?
To simplify and reduce an STL file, all you need to do is to recalculate and optimize the mesh. For smaller file size, you’ll need a smaller number of triangles or polygons in the mesh.
What is STL file?
It’s the file format you convert your 3D objects into after modeling them in the CAD software. You can then send the STL file to a slicer to prepare it for Printing.
What is the requirement for a 3D model to be watertight?
One of the primary requirements set in place for a 3D model to print is for it to be “watertight.” For an STL 3D model to be watertight, the triangular mesh must form a closed volume.
What is STL repair?
Repairing STL files in 3D Printing is a valuable skill to learn when you come across files or designs that have errors. These are usually holes or gaps in the model itself, intersecting edges, or something called non-manifold edges.
What is STL in 3D modeling?
STL, which stands for Standard Tessellation Language or Stereolithography, is a file format used in describing the surface geometry of a 3D object . It is important to note that it doesn’t contain any information about the model’s color, texture, or other attributes.
What is STL repair?
Auto-repair. The STL repair software’s wizard will attempt to fix all major errors, including holes, separate shells, and intersections.
What is the best tool to repair STL?
Based on our explorations, the best STL repair tool is Meshmixer. It combines a user-friendly interface with all the options needed to repair complex mesh errors. Its additional possibilities and free availability make it a clear number one.
How to repair a hole in Netfabb?
When attempting to bridge gaps, Netfabb will rather fill the open holes which require further manual repairs. Tap the Select Surfaces icon on the main toolbar and select the entire hole, then hit Delete. Alternatively, use the Brush Selection tool and use Ctrl + Scrollwheel and the Plus/Minus buttons to alter brush size and selection. With the triangles selected, choose the Remove Selected Triangles icon and manually add missing triangles as well as a few bridging triangles with the Add Triangles button. The Repair → Close all Holes operation will complete the mesh repair task. Finally, we can opt to refine the mesh using the Mesh Edit → Remesh command which recomputes the model based on a Target Edge Length parameter. Check the Maintain Edge option to optimize model integrity around sharp edges.
How to delete triangles in Meshlab?
Hold the Alt key to leave backfaces out of the selection, use Shift + Ctrl + D to deselect. For selecting individual triangles, click the Z-Painting tool on the toolbar and select the red brush icon. Left click to select triangles, right click to erase the selection and hit delete to remove triangles. Because Mesh lab does not implement any triangle creation functions, we reside to the surface generation method under Filters → Remeshing, Simplification and Construction → Surface Reconstruction: VCG. With a low enough setting for Voxel Side and high enough value for Geodesic Weighting and Volume Laplacian Iterations, it will result in a smooth manifold mesh. This method is usually recommended over Filters → Remeshing, Simplification and Construction → Screened Poisson Surface Reconstruction. Another alternative method is to generate an Alpha Complex then generate an Alpha Shape which sometimes works with the right values. For remesh operations, Meshlab offers a voxeliser under Filters → Remeshing, Simplification and Construction → Uniform Mesh Resampling which results in a manifold mesh and offers an offset parameter useful for creating hollow parts.
How to fill a hole in Blender?
The simplest way to fill a hole in Blender is to first select the boundary loop with Select → Select Boundary Loop or select all non-manifold edges with Select → Select All by Trait → Non Manifold (Shift + Ctrl + Alt + M) and then hit Mesh → Faces → Make Edge/Face (F) or Mesh → Faces → Fill (Alt + F) for an improved fill. Individual triangles can be created by right-clicking an edge or vertex, Shift + right-clicking the second one and pressing F. It is helpful during editing to switch between Vertex Select, Face Select, or Edge Select modes that are indicated by three icons at the bottom toolbar. Selecting a particular area can be done with Select → Circle Select (C) which works similar to brush selection. Change the brush size with the mouse wheel or the numerical plus/minus buttons, deselect holding the Shift key. Mesh → Faces → Beautify Faces (Shift + Alt + F) sometimes works to improve mesh quality in the selected area. Individual boundary loops can be selected using Alt + Right click. With two open boundary loops selected, choose Mesh → Edges → Bridge Edge Loops and the two areas will be smoothly connected.
How to repair mesh in Meshlab?
For example, Filters → Cleaning and repairing → Select Self Intersecting Faces → Apply will select all intersecting triangles which can then be removed by pressing Delete. Filters → Cleaning and repairing → Remove Duplicated Faces and Remove Duplicated Vertex are always useful actions to perform. The next step is healing up holes using Filters → Remeshing, Simplification and Construction → Close Holes. The Compute Geometric Measures operation under Filters → Quality Measure and Computations will indicate when a mesh is not watertight. If not, detect the involved areas with Render → Show Non Manif Edges and Show Non Manif Vertices.
What is mesh conversion?
Mesh conversion is like smashing a perfectly smooth mirror, then gluing back together all the bits and pieces to make it look like the original. Done badly, the result is a model with all kinds of edges, holes, and floating parts, as well as areas with many intersecting triangles that do not belong there. Done well, the 3D print is a manifold mesh without holes, indistinguishable from the original design.
How to reduce size of a.stl file?
The menu will give you a range of options to reduce the size of your file. The simplest is to use the default Percentage option, allowing you to determine the final file size you want rather than needing to know exactly how many triangles will be used to make up the file. In this case I have calculated that in order to get my original .stl file below 10MB’s, I need a reduction of 70% or more. As you adjust the values, you will get a preview of what your model will look like, allowing you to control how much reduction you employ before the model becomes too distorted and ‘pixelated.’
What is pinshape 3D printer?
Pinshape is a 3D printing community and marketplace where makers from all over the world can find and share their next great 3D print and help each other get the best results from their 3D printers.
What is the difference between mesh and 3D modelling?
Without a long-winded explanation, essentially the difference is that Solid Modellers like FreeCAD use solid pieces of geometry to construct 3D forms, a bit like pieces of clay. Mesh Modellers on the other hand like 123D Sculpt+ use surfaces that have no 3-dimensional thickness, so in essence they look good on screen but can’t actually exist until they are turned into a watertight solid. This is also true of 3D scans. If you want to know more about different types of modelling, check out our Designer Handbook.
What are the three options for patching a hole?
You have three options for patching a hole: Minimal Fill (which will fill the hole with the minimal number of polygons), Flat Fill (which will create a flat surface patch), and Smooth Fill (which will attempt to blend between all the surrounding surfaces).
What is watertight in 3D printing?
It’s important that your object is watertight (also known as manifold), meaning there are no holes on the outside surface where water would pour out if your model was hypothetically filled with water. It’s a term you will come across a lot when reading about 3D printing.
Can you see a.stl file in meshmixer?
If you rotate a model like this around in 3D, you will be able to see inside the object, which is exactly what you don’t want for 3D printing. Luckily, the repair process is extremely simple in Meshmixer:
Can you delete rogue objects in meshmixer?
Deleting rogue surfaces and objects are very easy in Meshmixer, and can be simply done using the same process explained for Problem 1.