- Repair popped nails with screws. Just tapping the nail back down with a hammer will solve the immediate problem, but eventually, the nail will probably work its way back out.
- Add more screws if you suspect skimping. If the installer failed to use enough fasteners, the drywall panel might not be securely attached to the studs, resulting in movement and ...
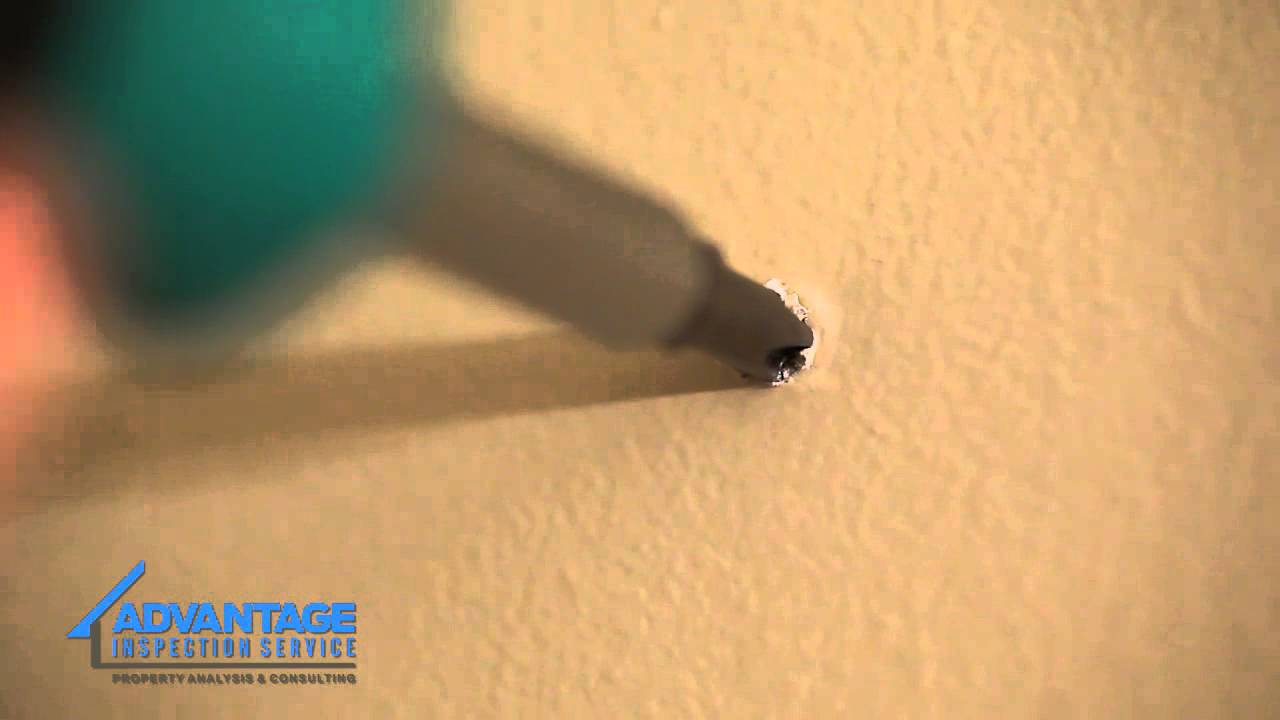
- Fill indentions with drywall joint compound. Drywall screws are designed with trumpet-shaped heads, which allows you to insert them just beneath the surface of the drywall, but they will leave ...
- Inspect trusses, where uplift can cause nail pops. If you noticed popped nails in the walls of your home, you may wish to do a bit of investigating for similar ...
- Popped nails in combination with other issues signal a bigger problem. Normal house settling can cause framing lumber to move a bit, resulting in popped nails. ...

What causes nail Pops and how do you fix them?
Other sources of nail pops include:
- Improper spacing of drywall screws or nails
- Installing the fasteners at an angle, rather than driving straight into the stud
- Missing the stud altogether with the drywall fastener
- Nails that are too short, resulting in insufficient penetration of the stud
- Overdriving the drywall screws or nails, breaking into the soft gypsum layer of the sheetrock
What causes the nails to pop out of the ceiling?
Warning signs of a ceiling under stress may include:
- a loud cracking sound in the ceiling;
- a sagging or dropping of the plasterboard sheeting and/or the cornice; and
- visual cracking and/or small circles or blisters (nail pops) on the ceiling, which are a sign the plasterboard sheeting may be pulling away from the nails or screws.
How to properly fix nail Pops in drywall?
Banish the bulges caused by nail pops before you paint to achieve flawlessly smooth wall surfaces.
- Repair popped nails with screws. ...
- Add more screws if you suspect skimping. ...
- Fill indentions with drywall joint compound. ...
- Inspect trusses, where uplift can cause nail pops. ...
- Popped nails in combination with other issues signal a bigger problem. ...
What causes nails to pop through drywall?
Nail pops occur when the nails used to secure drywall become loose and pop out. This occurrence is characterized by a silver dollar size protrusion of paint and plaster. There are several reasons nail pops may occur, including humidity, regular vibrations and sound waves. Humidity is the primary cause of nails protruding from drywall.
Should you fix nail pops?
The result is a tiny bulge on the wall surface or, in some cases, a visible nail head if the drywall compound comes loose and falls away. This is the most common cause of nail pops and it's completely cosmetic. There are no structural issues to worry about, and repair is fairly simple.
Can you hammer nail pops back in?
0:051:12Fix Nail Pops - Drywall Nail Pops - YouTubeYouTubeStart of suggested clipEnd of suggested clipAnd what you want to do is just take a hammer with the widest head you can find this one is actuallyMoreAnd what you want to do is just take a hammer with the widest head you can find this one is actually specifically a drywall hammer it has a serrated face and a very wide beveled.
Do nail pops come back?
Not many people are aware that you cannot just cover up a nail head with some spackling compound or plaster to repair the damage. The bumps, or crescent shaped cracks, will reappear if proper preparation of the surface is not made.
What are nail pops caused by?
Causes of Drywall Nail Pops Drywall screws may occasionally snap off but they will never pop out. Instead, the nail pops in your ceiling and walls are caused by short drywall nails that are no longer firmly attached in the two-by-four studs.
Can you fix nail pops with spackle?
If the nail pop is in the ceiling, use an additional drywall nail or screw within an inch of the pop to reinforce the mounting strength. Using the putty knife, apply a small amount of spackling or joint compound to the new recess formed by setting the nail or screw.
How do you fix a drywall popping screw?
1:187:39HOW TO FIX SCREW POPS IN DRYWALL - YouTubeYouTubeStart of suggested clipEnd of suggested clipSo if you don't have a lot of skills with a drill you can even stop at that point. And twist it theMoreSo if you don't have a lot of skills with a drill you can even stop at that point. And twist it the rest of the way in until is just below the surface. Then. You want to make sure it's not clicking.
Are nail pops a defect?
In most cases drywall nail pops are a cosmetic defect, though in some locations such as near a center partition below a truss roof, they may indicate interesting structural movement such as arching roof trusses.
How common are nail pops?
A Few Nail Pops All Over the House What if your nail pops are only somewhat common, but they're coming up all over your home? If you're seeing nail pops all across your home, it's more likely that you're dealing with a structural problem. Alternately, the nails behind your drywall may be improperly positioned.
How much does it cost to fix nail pops?
How much does it cost to fix nail pops? If you get a professional to fix your nail pops, it can cost anywhere from $30 to over $100, depending on rates in your location. If you repair the nail pops yourself, however, supplies shouldn't cost more than $40-50.
How can I prevent my nails from popping?
Nail pops can be easily fixed by following these recommendations:Use kiln-dried lumber for framing or if the framing is installed way before the drywall, you will need to protect it from moisture.Drywall screws should be used instead of nails. ... Avoid fasteners within 16 inches of any wall to prevent nail pops.More items...•
How do you cover nail pops in the ceiling?
How to Fix Nail Pops in Walls and CeilingsGather your materials. ... Drive new drywall screws a couple of inches on either side of the nail pop. ... Drive a new nail immediately adjacent to the popped nail using the hammer and nail set. ... Apply a coat of compound over the new fasteners and the old nail. ... Sand the patch.More items...•
Can you paint over nail heads?
When painting new exterior construction where non-galvanized nails have been used, it is advisable to first countersink the nail heads, then prime with a rust-inhibitive primer, and caulk them with a top-quality, water-based all-acrylic or siliconized acrylic caulk.
How to make a nail pop?
1. In the center of the nail pop, place the tip of nail punch, and tap in with hammer. ...
What happens if you don't use primer on a patch?
If you don't use primer on the patch it will "flash," or show through the paint. Thanks! If your walls have a texture on them, you will have to match it before painting. Some textures can be matched with some drywall mud or Spackle and a putty knife.
Why do my nails pop out?
Drywall screws may occasionally snap off but they will never pop out. Instead, the nail pops in your ceiling and walls are caused by short drywall nails that are no longer firmly attached in the two-by-four studs.
What is nail pop?
Nail pops are cosmetic imperfections that sometimes show up in drywall ceilings and interior walls that have been fastened with nails. Nail pops rarely affect your wall's structure, though in great enough numbers your wall might lose a section of drywall. Hammering in the nail pops sometimes works but usually not.
How far should drywall screws be from the nail?
Both screws should be about 1 or 2 inches from the nail. In the previous step, if you were unable to hammer the drywall nail in and get it to stay in, the two drywall screws that you drive in this step usually will be strong enough to pull the drywall tight up against the stud.
How long are drywall nails?
Made of galvanized steel and with a broad head, drywall nails generally range from 1 1/8-inch to 1 7/8-inch long. Even if you have walls that have been built after the 1970s, you might still have wallboard hung with drywall nails, since some drywall installers prefer to use nails. As the wood studs dry out over time, ...
How to get a nail back into drywall?
Hammer the Nail Back. Wearing safety glasses , use the hammer to drive the protruding nail back into the wall , being careful not to damage too much of the drywall around it. Be sure to use a smooth-headed hammer, not a hammer with a waffle or grid head. The result will be a small, round indentation in the wall.
How long does joint compound dry?
Allow the joint compound to dry for two to four hours. Apply a second coat of joint compound. If the patch is not blending in well with the surrounding wall, use a broad feathering knife to draw a wide, thin coat farther out on the wall.
Can you fix nail pops on drywall?
However, if entire rooms have many nail pops, it may be time to completely replace the drywall. If this is the case, call a drywall contractor. Read More.
How to fix a popped nail?
A better solution is to tap the nail back down and then insert two drywall screws in the stud, one about an inch above the nail, and one about an inch below the nail.
Why do my nails pop on the wall?
This can cause individual nails to move, and when a nail holding drywall moves, it loosens the joint compound covering the nail. The result is a tiny bulge on the wall surface or, in some cases, a visible nail head if the drywall compound comes loose and falls away. This is the most common cause of nail pops and it’s completely cosmetic. There are no structural issues to worry about, and repair is fairly simple.
How long does it take for joint compound to dry?
Apply with a putty knife, then smooth away any excess. Let the compound dry at least 24 hours, and then apply one more thin coat of joint compound with the putty knife. When that dries, sand over the compound with a drywall sanding sponge, and then roll on a new coat of paint.
How long should a drywall screw be?
The general rule is to use screws that will penetrate the stud by a minimum ¾ of an inch. For example, with ½-inch thick drywall, you’ll need a screw at least 1¼-inch long.
What does it mean when a nail pops in the ceiling?
If you noticed popped nails in the walls of your home, you may wish to do a bit of investigating for similar bulges on the ceiling—which can indicate a more serious problem. Today’s homebuilders often use manufactured trusses to construct a roof rather than building the roof with rafters. Some wood members in a set of trusses are designed to move slightly with attic humidity and temperature fluctuations, and so many modern drywall installers use a special attachment technique when hanging drywall on a ceiling made from trusses. If they attach the drywall directly to the underside of the trusses, however, when the trusses lift, nail pops can occur in the ceiling drywall. Depending on how much the truss moves, in addition to nail pops, you might also find a horizontal crack between the ceiling and the wall. In order to fix this issue, a contractor should remove the drywall panels and install news ones attached to clips or blocks, but not to the trusses themselves.
Can a truss lift a nail pop?
If they attach the drywall directly to the underside of the trusses, however, when the trusses lift, nail pops can occur in the ceiling drywall. Depending on how much the truss moves, in addition to nail pops, you might also find a horizontal crack between the ceiling and the wall.
What are Roof Nail Pops?
Roof nail pops, also called “backed-out nails”, are a type of roof defect where the roofing nails which secure the shingles have been forced back and out of the roof sheathing due to cyclical changes in the pressure exerted on the nail by the surrounding wood.
Why are Roof Nail Pops a Problem?
Roof nail pops are unattractive, for one thing. Your roof will have bumps and humps and out-of-place shadows. So, roof nail pops are an aesthetic issue.
How to Do It
Lift the existing shingle right above the area where the nails are backing out.
How to fix a nail pop on a flip?
If you find that nail pops are popping up around your flip here’s what to do: In general, the fix can be as simple as hammering or screwing a drywall fastener into place. If it was overdriven, though, it needs to be removed. Usually, driving in two nails or screws above and below the nail pop can secure it.
Why do nails pop out of drywall?
This movement causes nails to back out of the drywall and pop through the surface. There are many other reasons for nail pops. They can result from the improper spacing of drywall screws or nails, driving drywall fasteners at an angle instead of straight into a stud, completely missing a stud with the fastener, ...
What Causes Most Nail Pops?
For a nail to pop, movement of drywall or wood has to occur. If you didn’t have an earthquake in the area, you might be wondering how it can move. The answer is pretty simple.
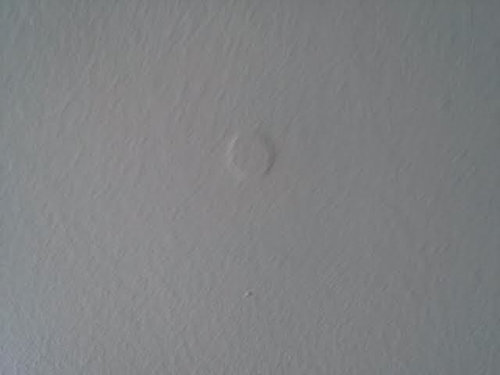
How to Repair Nail Pops On Drywall
Most frequently, nail pops occur on the walls, and there is a simple method to fix it. On the right, you can see an example of one of several nails pops in my new house.
How to Repair Nail Pops Appearing On the Ceiling
When nail pops occur on the ceiling, many homeowners think they have a problem with trusses or some similar, serious issue. Most commonly, that is not the case. The thing is, there is a chance that your drywall was not properly installed. To be sure, I would advise you to call a professional to do the inspection.
How Do I Know if I Have a Foundation Issue?
Sometimes, nail pops can indicate a more serious foundation problem. Luckily, there are other tell-tale signs of it, and if you notice any of them in addition to nail pops, you should call a professional and schedule a detailed inspection.