When doing a full repair of a ribbon cable (recommended if several connections are failing), peel the clear tape on the front of the PCB off both the LCD board and mainboard, then flip the calculator back to the side with ICs and peel the ribbon cable off. When doing a partial repair, use a razor blade to cut notches into the ribbon cable on both sides of the high-resistance connections, then peel/push back the plastic film of the ribbon cable to expose the pad on the PCB.
Full Answer
Can I repair a broken ribbon on an LCD screen?
You may want to try a simpler ribbon repair on an old LCD clock for example before jumping in head first with fine pitch. Also the removal of the LCD ribbon is a delicate process as you do not want to tear what is a good ribbon or damage the carbon printed lines.
How to fix a broken ribbon wire?
Prepare the conductive epoxy resin by mixing the silver-loaded resin and hardener together. You will only need a very small amount if you are fixing just one ribbon wire. Dip a flathead jeweler's screwdriver into the prepared epoxy and apply it to the ribbon wire. The epoxy should run in thin lines to connect the severed ribbon wires.
Where can I buy ribbon cable?
standard ribbon cable at the local electronics store. The stuff that looks like a bunch of regular insulated wires all stuck together in a row. I didn't actually use the ribbon, but stripped off individual wires. The only small gage like the ribbon cable has. attach point and routing the wires around things.
How to cut the LCD ribbon?
Do use a rounded scalpel blade to prevent dragging the LCD ribbon while cutting. Do use a flat cutting board or a cutting mat. Do check the ruler is as perpendicular to the sides as much as possible. Remember you may only have one chance at re-trimming so getting right first time is essential.

Can ribbon cables be repaired?
In order for the ribbon to perform, each of the multiple wires inside must be fully connected along the entire length of the ribbon to the components. Easily repair a broken ribbon wire by recreating the wire connections with a metallic conductive substance.
How do you reattach an LCD ribbon?
Step 1: Before You Start, Make an Assessment of LCD Ribbon and Module. ... Step 2: Remove Old Ribbon Connection. ... Step 3: Clean the PCB Pads. ... Step 4: Trimming and Preparing the LCD Ribbon for Re-attachment. ... Step 5: Pre-Assembley and Registration of LCD Ribbon. ... Step 6: Apply the Heat to Re-attach Ribbon.More items...
Can LCD cable be repaired?
If the back light on the liquid crystal display (LCD) screen of your laptop has failed, you will not be able to see any images. To fix the problem, the entire inverter board and its connected LCD cable will need to be manually replaced.
How do you reattach a ribbon cable?
Slide the new ribbon cable into the connector or attach the connector itself.If you're attaching a connector, you should hear the connector click into the clip.If you slide the ribbon cable into the connector, just line the end of the ribbon up with the bottom of the connector and slide it back into the clip.
How do you fix a broken ribbon cable?
1:3613:22Flexible flat cable FFC cable repair methods - YouTubeYouTubeStart of suggested clipEnd of suggested clipOr if you can't find it damaged end or you'll get a thin piece of plastic glue it on the back at theMoreOr if you can't find it damaged end or you'll get a thin piece of plastic glue it on the back at the end there to give it some stability. And then your cables okay to use again.
How do you fix a broken ribbon connector?
2:003:28Simple Hack To Clamp Down A Ribbon Cable Connector With a ...YouTubeStart of suggested clipEnd of suggested clipAnd put the other side inside on top of the ribbon cable on top of the connection. And put down someMoreAnd put the other side inside on top of the ribbon cable on top of the connection. And put down some masking tape on top of that. The other option is to use a hot glue gun.
How do you solder LCD ribbon cable?
1:313:54TFT LCD Ribbon Soldering - YouTubeYouTubeStart of suggested clipEnd of suggested clipWith at least one in the ribbon aligned top down that one end and the other end and you can alwaysMoreWith at least one in the ribbon aligned top down that one end and the other end and you can always reposition. And rotate. And move it along until all of your pins are.
How do I know if my ribbon cable is damaged?
Ribbon cables go bad all the time. If you don't have a replacement ribbon cable, then I'd likely test the suspect cable, and if it came up bad, I'd order a replacement. Get yourself a digital multimeter and measure continuity across the cable pin to pin, this will tell you if there is a break in the cable.
How do I know if my LCD cable is bad?
Problematic video cabling can distort or interfere with on-screen display of your operating system and applications. You may see blank areas, unexpected horizontal or vertical bands of color, or other flaws that also can materialize on a faulty or damaged display panel.
Can you super glue ribbon cable?
The proper fix would be to replace the connector with a new one, but this requires a person with fairly good SMT skills and equipment. If you do try glue (e.g., "Superglue", or cyanoacrylate), be extremely careful to keep it away from the actual electrical contacts.
Can you splice a ribbon cable?
You can easily splice rollable ribbon fiber to other rollable ribbon, and you can splice it to other matrix fiber optic cable.
How do you fix a TV ribbon?
0:201:34Flex Ribbon Quick Fix - TTP - YouTubeYouTubeStart of suggested clipEnd of suggested clipThat's what you want to aim for as. You can see the quickest way to test these just carefully dragMoreThat's what you want to aim for as. You can see the quickest way to test these just carefully drag your finger along. The whole roll like that pop.
How do you solder LCD ribbon cable?
1:313:54TFT LCD Ribbon Soldering - YouTubeYouTubeStart of suggested clipEnd of suggested clipWith at least one in the ribbon aligned top down that one end and the other end and you can alwaysMoreWith at least one in the ribbon aligned top down that one end and the other end and you can always reposition. And rotate. And move it along until all of your pins are.
Can you super glue ribbon cable?
The proper fix would be to replace the connector with a new one, but this requires a person with fairly good SMT skills and equipment. If you do try glue (e.g., "Superglue", or cyanoacrylate), be extremely careful to keep it away from the actual electrical contacts.
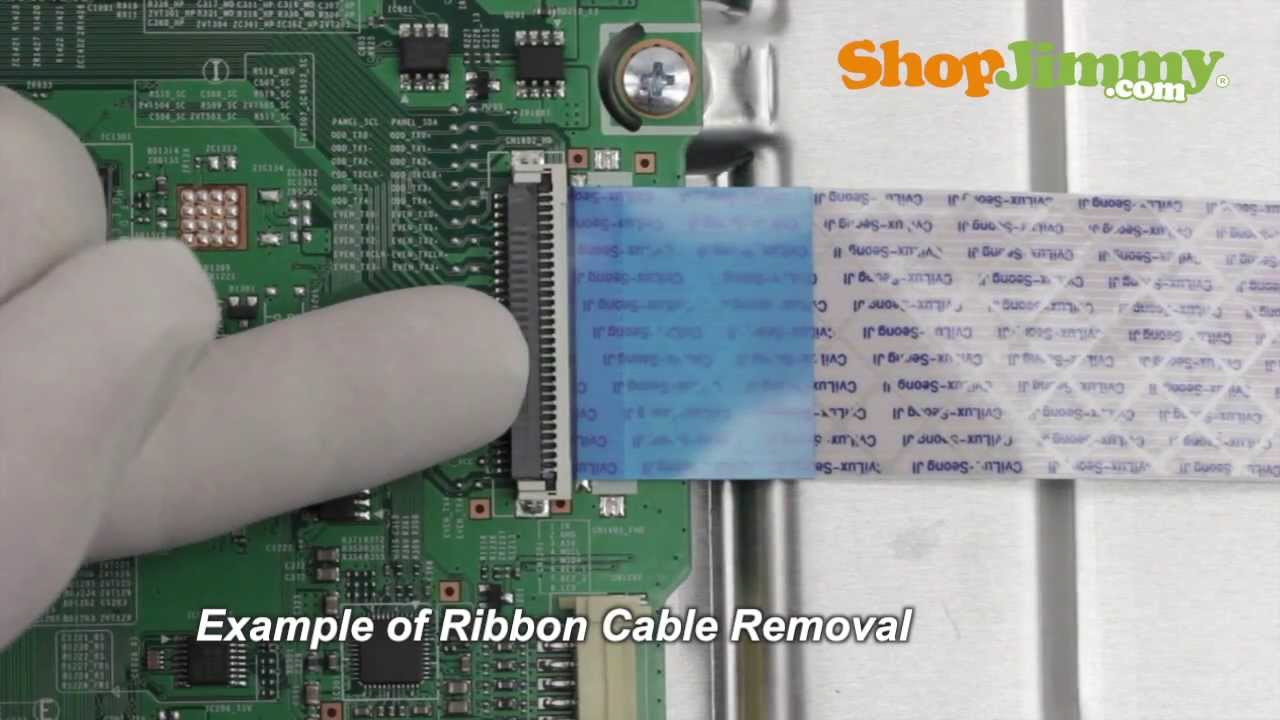
How do you remove ribbon from a circuit board?
To remove it, use a spudger or fingernail to lift the clear blue tab away from the connector. Next, use the tip of the spudger to push open the plastic locking tab. The locking tab will only move about 2 mm. Pull the ribbon cable out of the connector in the direction of the cable.
How to connect ribbon wires?
Dip a flathead jeweler's screwdriver into the prepared epoxy and apply it to the ribbon wire. The epoxy should run in thin lines to connect the severed ribbon wires.
What is ribbon wire?
A ribbon wire or ribbon cable is a flat, wide strip of cable that contains multiple wires inside its insulation. If the wire becomes damaged by way of severing, the ribbon will not be able to achieve a proper connection. In order for the ribbon to perform, each of the multiple wires inside must be fully connected along the entire length ...
How to keep ribbon from moving?
Tape the ribbon down to the table to prevent it from moving. Ensure you leave the damaged ends of the wire uncovered.
How to sand a broken wire?
Sand one side of each half of the broken wire using very fine grit sandpaper. Remove just enough of the ribbon to expose the actual wires inside.
Can you run epoxy wires together?
Do not let the epoxy wire connections run together or the ribbon wire will not be repaired correctly.
Step 1: Before You Start, Make an Assessment of LCD Ribbon and Module
Before you can even begin to think about removing the ribbon you must make an assessment of what you have and what may or may not be possible. So Before you start: Have you tried reworking ribbon? There are already some good techniques for small repairs such as the hot air gun technique. Other favorites of reworking the LCD connection that i have read here are the tinfoil on a heat gun.
Step 2: Remove Old Ribbon Connection
Ok so you got nothing to lose by re-attaching the ribbon.....Lets get going. The ribbon removal needs careful thought depending on your device.
Step 3: Clean the PCB Pads
Having removed the ribbon, the PCB pads will need some attention to remove leftover ribbon material. If you have a half decent PCB the connecting pads may be gold flashed (actually called Electroless Plated gold).
Step 4: Trimming and Preparing the LCD Ribbon for Re-attachment
The ribbon was then laid flat with a ruler and a scalpel was used to trim up the ribbon. I found it was best to use a plastic ruler to view through to the ribbon so i could see how much i should cut off. A metal ruler can be used and may have straighter edge to work against but a plastic ruler was sufficient. Do use a rounded scalpel blade to prevent dragging the LCD ribbon while cutting. Do use a flat cutting board or a cutting mat. Do check the ruler is as perpendicular to the sides as much as possible. Remember you may only have one chance at re-trimming so getting right first time is essential. From the photos you can see that ribbon was trimmed with a rounded scalpel blade.
Step 5: Pre-Assembley and Registration of LCD Ribbon
After cleaning the PCB pads thoroughly and trimming the ribbon the re-registration of the LCD ribbon was the hardest. If you have a fine pitch ribbon like i had this will cause you the most trouble. I needed an extra steady pair of hands to help and some patience before i got the the ribbon aligned.
Step 6: Apply the Heat to Re-attach Ribbon
So you now have your pristine PCB pads and the ribbon is clamped in place we are ready to apply heat. Some tips to applying heat: 1. Do not apply so much heat you obliterate the ribbon. Yes it sounds stupid but i over cooked one side of my ribbon and got away with it.
Step 7: Optional Post Ribbon Attachment - Adding Extra Mechanical Support
This bit is optional but could help with mechanical stability of the LCD ribbon. In our case the LCD ribbon was not only glued to the PCB pads but there was some additional tape at the heel of the ribbon to hold the ribbon in place.
